![[Full Repair Guide] Windows 11 Start Menu Not Working](https://cdn.techloris.com/app/uploads/2023/05/windows-11-start-menu.png)
[Full Repair Guide] Windows 11 Start Menu Not Working

A malfunctioning Windows 11 Start Menu can be a major issue regarding user experience. The Start Menu is an important operating system feature, providing easy access to applications, files, and settings. Users cannot use their computers efficiently when it doesn’t work properly.
If your Windows 11 Start Menu isn’t working correctly, there are several potential causes and solutions you can try to resolve the issue. Identifying and addressing any underlying problems before attempting a full system reset or reinstallation is important since this could lead to further trouble.
Restart Windows Explorer
If the error code says that the Windows 11 start menu is not working, it could be an issue with the Windows Explorer process on the device. The start menu can work again by restarting Windows Explorer from the task manager.
Step 1: Launch task manager from the Windows main menu. Type taskmgr in the taskbar’s search and double-click the option in the list to open.

Step 2: Click the processes tab in the task manager’s window. In the list, navigate to the Windows explorer option and right-click the option to select the end task from the context menu. It will end all tasks working for windows explorer.

Step 3: In the task manager window, click the file option in the header’s menu. Select the run new task option followed by entering explorer.exe. Click ok to complete the action. It will restart Windows Explorer.

Restart Windows Background Services
Restarting Windows background services can help fix the Windows 11 Start Menu not working issue by resetting all of the necessary services and processes associated with the Start Menu. When some of these processes or services become corrupt, they can disable or interfere with other related functions, such as the Start Menu.
Restarting them will often resolve any issues that they cause. For fixing the Windows 11 start menu, windows background services can be restarted by the task manager with these steps to follow:
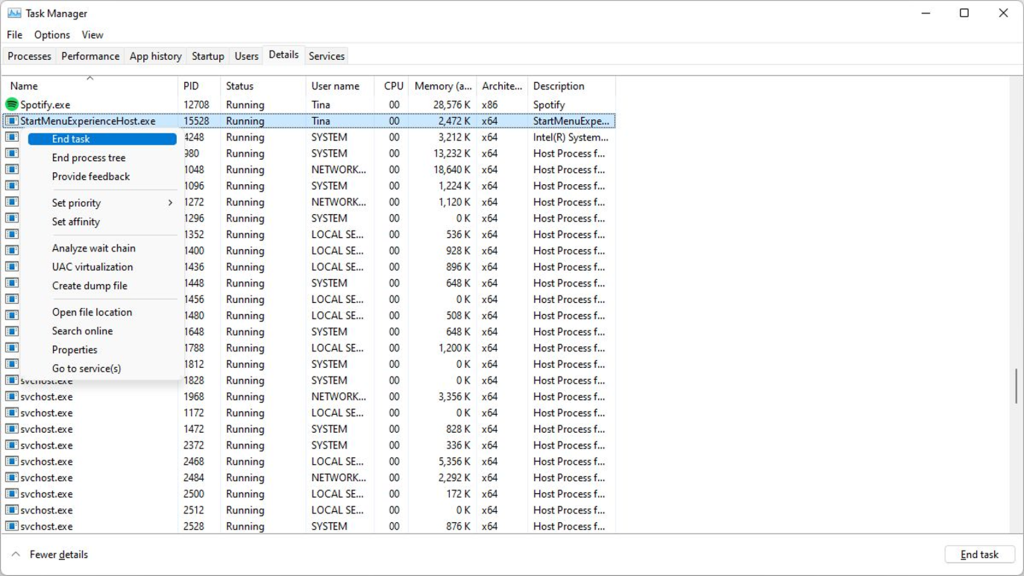
Step 1: Launch task manager from the Windows main menu. Right-click in the taskbar and select the task manager option from the list. Double-click the option to launch the menu.

Step 2: In the task manager menu, navigate to the details tab; from the list of options, locate the option of StartMenuExperienceHost.exe. And right click it to select the end task from the context menu. Restart the device to restart the Windows background services automatically.
Update Graphics Drivers
Start menu errors can be resolved by updating the Windows graphic drivers. Incompatible drivers can result in various functionality errors. The graphic drivers can be updated from the Windows device manager utility. Here is how you can update the graphic drivers in Windows 11.
Step 1: Launch the device manager from the Run utility. Click Windows key +R, and in the run command box, type devmgmt.msc and click Ok to continue. It will launch the device manager.

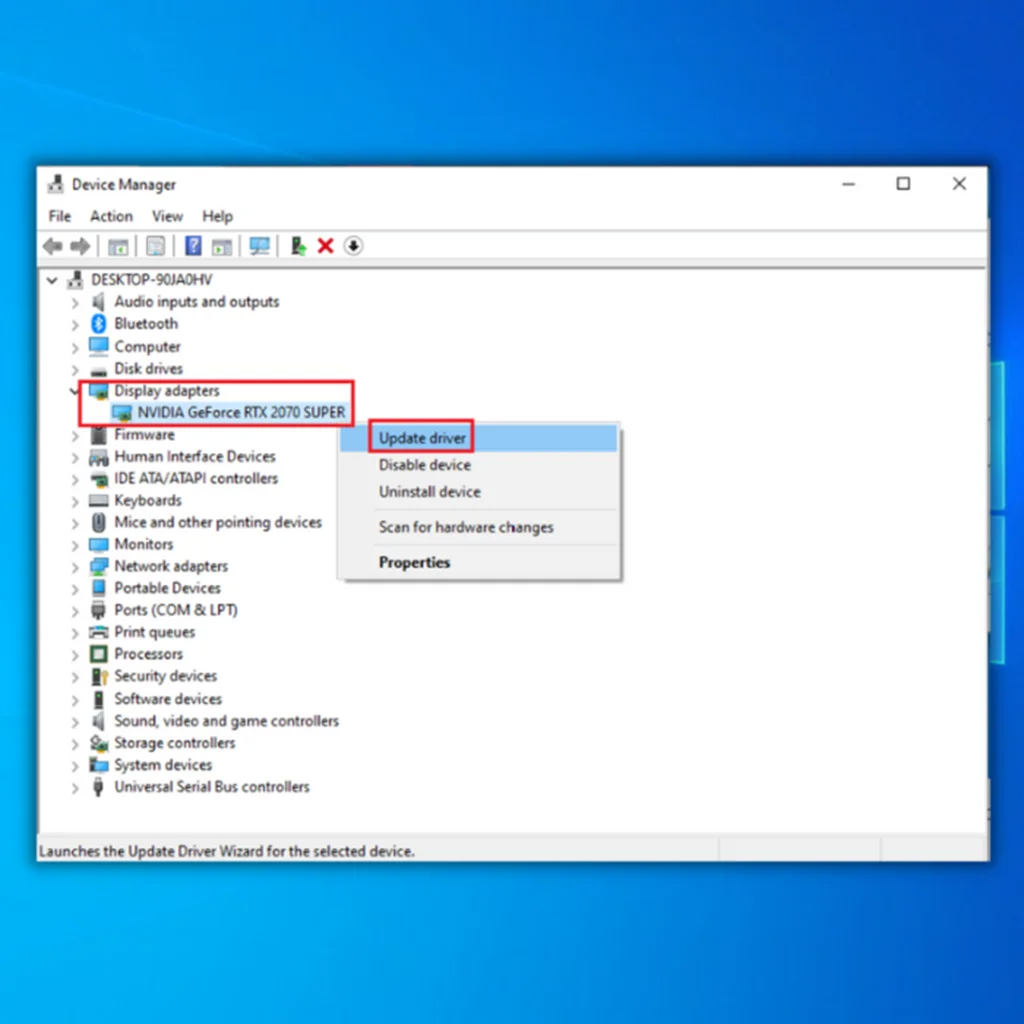
Step 2: In the device manager menu, select the option of display adapter and expand it. A list of all graphic drivers will appear on the screen.

Step 3: Right-click the desired drivers and select the update driver option from the context menu.
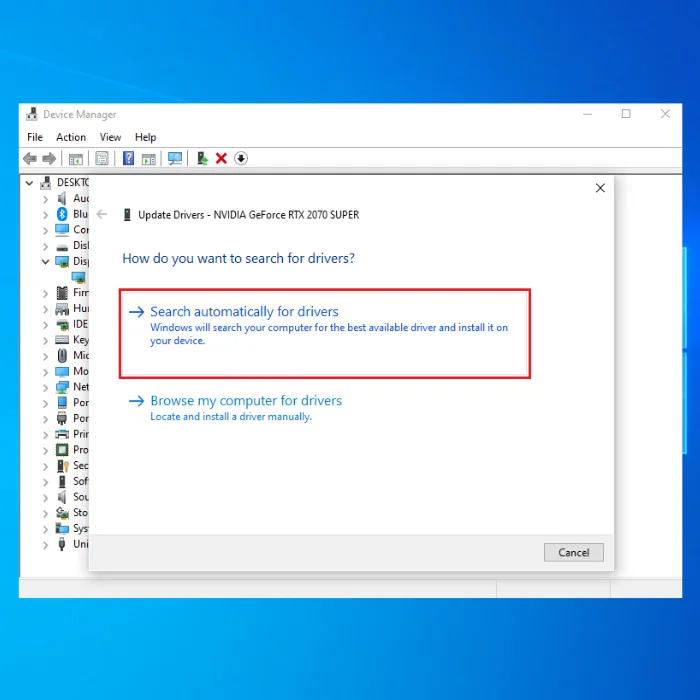
Step 4: In the next step, select the option to Search automatically for drivers. WOS will scan for all available options and install the compatible ones.
Re-Register Start Menu Shell Experience Packages
Re-registering Start Menu Shell experience packages can help with Windows 11 Start Menu Not Working issues by ensuring that the necessary components are installed correctly and working properly. It involves uninstalling and reinstalling the package from a command prompt using PowerShell commands.
This process helps ensure that all necessary registry entries, shortcut links, files, and folders are present for proper functionality. After re-registering these packages, it is recommended to reboot the computer for any modifications to take effect. Here are the steps to follow:
Step 1: Right-click the Windows icon in the main menu. Now click the Windows key + X from the keyboard and select the Windows PowerShell (Admin) option from the list. Double-click the option to open the command prompt window.

Step 2: In the prompt window, type the following command. Click enter to execute the command and complete the action. It will automatically fix the Windows 11 start menu not working error.
Get-appxpackage -all shellexperience -packagetype bundle |% {add-appxpackage -register -disabledevelopmentmode ($_.installlocation + “\appxmetadata\appxbundlemanifest.xml”)}

Rebuild Windows Search Index
Inappropriate indexing or due to multiple storage locations, indexing to additional places would not occur automatically. This may lead to several functionality errors due to missed system files. Hence, rebuilding the search index to fix the Windows 11 start menu not working can help to correct the problem. Here are the steps to follow:
Step 1: Launch the Run utility from Windows key+ R and type the control panel in the command box. Click ok to continue.

Step 2: In the control panel, select small icons in the view by menu in the top right corner.
Step 3: Now choose indexing options and select modify.

Step 4: Select the appropriate location for indexing from the list available. Click ok to continue.
Step 5: Select the advanced option in the indexing option section once the location is selected. Under the option of delete and rebuild the index, select rebuild.

Step 6: Allow your device to index the files in the location. As the indexing completes, click ok to complete the action.
Remove Start Menu Tweaks
Removing Start Menu Tweaks can help with Windows 11 Start Menu Not Working by helping to restore the system to its default settings. This means that any third-party software that may have modified the registry or installed additional menus will be removed, and the core functionality of Windows 11 will be restored.
If any corrupt files or other issues were causing the Start menu to malfunction, they would also be eliminated through this process. In this context, using the Windows registry editor can resolve the problem.
Step 1: Launch the Windows registry editor from the run utility. Click Windows key +R, and in the run command box, type regedit. Click ok to continue.

Step 2: In the registry editor window, type the following HKEY address in the address bar and click enter to locate the key.
Computer\HKEY_CURRENT_USER\Software\Microsoft\Windows\CurrentVersion\Explorer\Advanced

Step 3: In the next window, right-click to select New> Dword (32-bit). Right-click the new Dword key and click rename. Name the new key as EnableXamlStartMenu.
Step 4: Right-click the EnableXamlStartMenu key and select the modify option from the context menu. In the value data pop-up window, set the value as 0. Click ok to complete the action.

Uninstall Third-Party Start Menus
Uninstalling third-party start menus is one of the most effective ways to address Windows 11 start menu not working issues. Start menus from third-party developers are often incompatible with the system, which can cause performance problems or other related matters. Depending on the type of program you installed, uninstalling it may also help to improve system stability and speed.
Running a scan for any viruses or malware infections should also be done regularly, as these can often interfere with the smooth functioning of your operating system. If everything fails, restoring your machine to an earlier point may help resolve any persistent errors associated with Windows 11’s start menu not working properly. Here are the on-screen instructions to follow:
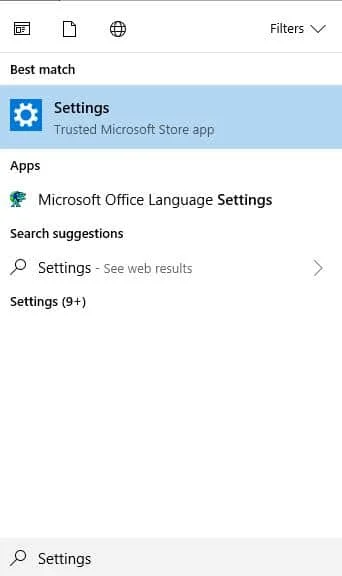
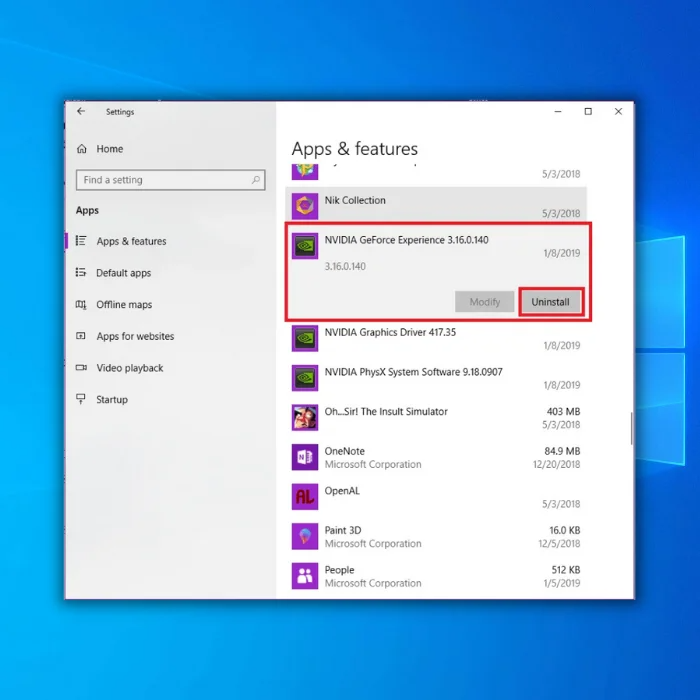
Step 1: Launch settings from the Windows main menu. Type settings in the taskbar’s search. Double-click the option in the list to open.
Step 2: In the settings menu, select the option of apps, followed by selecting apps and features in the next window.
Step 3: In the apps and features window, navigate to the targeted third-party app and click the three-dot menu before the app to select uninstall from the dropdown list.
Uninstall Recent Windows Update
Uninstalling recent Windows updates can help resolve issues with the Windows 11 Start Menu not working. This is because, in some cases, new updates can cause conflicts with existing files. Uninstalling a problematic update may fix any problems caused by it and allow the Start Menu to function properly again. Here are the steps to follow:
Step 1: Launch setting from Windows key+ I shortcut keys. In the settings menu, select the option of update and security.

Step 2: In the update and security option, click on Windows update.
Step 3: In the Windows update option, navigate to update history and select uninstall updates.

Step 4: Click on the option of latest updates and click uninstall. Click yes to confirm the action.

Update Windows 11
Windows update installs automatically on the device, but one can run updates manually too. Here are the steps to either check for updates and let it install automatically or download and install updates manually on the device.
An outdated window may also cause the start menu not to work. Updating Windows to the most recent versions may resolve the error. Here are the steps:
Step 1: Launch settings; press the ctrl, windows key + I shortcut keys from the keyboard.
Step 2: Select the update and security option in the settings window, then select Windows update. Check for updates. Select update to resolve errors.

Run the System File Checker (SFC) And Windows System Image With DISM Scan
Running an SFC (system file checker) and DISM scan can reveal the reason and help to find a proper fix to resolve the error. Here are the easy steps to initiate SFC and DISM scans on your device.
Step 1: Launch the command prompt from the run utility. Click Windows key+ R, and type cmd in the run command box. Click ok to continue. It will launch the command prompt window.

Step 3: In the command prompt, type sfc /scannow and click enter to continue. Once the scan completes, it will help to check all protected system files and replace the corrupted one with its cached copy.

In the case of running a DISM scan, i.e., a utility used for repairing Windows images, e.g., windows setup, windows PE, and Windows WinRE. Here are the steps:
Step 1: Launch the command prompt by following the steps mentioned above, and in the command prompt window, type DISM /Online /Cleanup-Image /RestoreHealth. Click enter to proceed.

Step 2: Restart your device once the scan completes to check if the error is resolved.
Keep Your Windows Updated Regularly
Keeping your Windows updated regularly is an important part of maintaining a computer. Updating the operating system and any associated software and drivers can help prevent Windows 11 Start Menu from not working. This ensures that the latest security patches are installed and running to protect your data and files from malicious attacks.
Additionally, updating all components will ensure that users can access the most current features available for their version of Windows 11. Regular updates can also help to reduce or eliminate bugs and glitches which may cause the Start menu to become unresponsive or stop functioning altogether. Keeping your operating system up-to-date will keep it running smoothly for longer periods.
Resolve Windows 11 Start Menu Issues With Our Comprehensive Repair Guide
In this complete repair guide, we have delved into the common causes and effective solutions for Windows 11 Start Menu not working. Following our step-by-step instructions and troubleshooting tips, you can overcome the frustration of a malfunctioning Start Menu and regain full functionality on your Windows 11 device. From checking for system updates to performing advanced troubleshooting methods, we have provided you with a comprehensive toolkit to diagnose and fix the issue. Say goodbye to Start Menu woes and enjoy a seamless navigation experience on Windows 11.
Frequently Asked Questions About Windows 11 Start Menu Not Working
Why Can’t I Access Windows 11 Start Menu?
Your computer may not have installed the most recent updates. If this is the case, navigate to “Settings” in the Start Menu and click “Update & Security” to check for any updates you need to install. Another reason you cannot access the Windows 11 Start Menu because your computer may have compatibility issues with certain software, such as older programs or games.
Why Do My Windows Not Respond When I Press Windows 11 Start Menu?
If your Windows 11 Start Menu does not respond, you should check for any pending Windows updates. Sometimes, an outdated version of Windows can cause this issue. If there are any available updates, it is best to install them immediately. Next, check whether the taskbar has frozen or crashed.
Does Deployment Image Servicing Impact My Windows 11 Start Menu?
DISM allows users to add or remove tiles from the Start Menu, control which apps appear in Jump Lists, create custom themes for the Start Menu, and perform other tasks. On the other hand, DISM does not affect all aspects of the Windows 11 Start Menu. For example, it cannot be used to change the size or color of tiles, rearrange menus and submenus in the Start Menu, or modify which programs are listed on the left side of the menu.
Why Is My Microsoft Account Unable to Access the Windows Start Menu?
This could be due to a corrupted account profile or incorrect login credentials. First, try signing out of and back into your account to resolve this issue. If that doesn’t work, create a new user profile using a different Microsoft Account and see if that fixes the problem.
Does a Person’s Sign-in Information Affect the Windows Start Menu?
The Windows Start Menu can be customized to provide a personalized experience for each user. It contains shortcuts to programs, documents, and other items used frequently by the individual. A person’s sign-in information can affect the appearance of the Start Menu by controlling what icons appear on it and how they are organized.
How Do I Fix Windows Start Menu Not Working?
Open Task Manager by pressing Ctrl + Alt + Del keys simultaneously, or right-click on the taskbar and select Task Manager. Then go to the Processes tab, scroll down to Windows Explorer, right-click it, and choose Restart. Check if the Start Menu is now working properly.
Can the Settings App in Windows Fix My Start Menu?
The Windows Settings app is a powerful tool for customizing your computer. It allows you to change various system settings, manage accounts, and configure hardware devices. One of the most popular uses of the Settings app is for fixing common issues with the Start menu. Many users have experienced problems with their Start menus after upgrading or installing new programs.
Can I Fix the Windows Start Menu When I Open Task Manager?
Check your computer for any viruses or malware. If you find any, delete them immediately and then restart the system. This should resolve the issue with the Start Menu not working when Task Manager is opened. If this doesn’t work, try running a disk cleanup to remove temporary files from your computer that are taking up space.
How Long Does It Take To Fix the Start Menu on Windows 11?
Depending on the issue’s complexity, it can take a few minutes to a couple of hours to fix the problem. First, you should check for any pending updates or patches. If an update is available, install it and restart your computer. This should resolve the issue with the Start Menu.
Why Is Windows Explorer Start Menu Frozen?
There are a few possible causes for a Windows Explorer Start Menu freezing up. One reason could be an application or virus interfering with the normal function of the start menu. If a virus or malicious software has infiltrated your system, it can cause the start menu to become unresponsive.
Why Isn’t Windows Responding When I Press the Start Menu?
A third-party application is interfering with the Start Menu. This could happen if you installed a program that conflicts with Windows or if something you installed modified the registry. Also, a virus or malware could have infected your system, causing it to malfunction. Scanning your computer with an antivirus program and running a malware scan can help determine whether this is the case.
How Do I Restart File Explorer?
If you are having trouble with File Explorer, restarting it can help you troubleshoot the issue. To do so in Windows 10, press the Windows key and type “File Explorer” in the search bar. Once File Explorer launches, click on the File tab at the top of the window, then select “Exit.” Reopen File Explorer by pressing the Windows key and repeatedly typing “File Explorer” in the search bar. This will restart File Explorer and may help resolve any issues.