![[Usage Guide] How to Use the Windows 11 Repair the Right Way](https://cdn.techloris.com/app/uploads/2023/04/A-Guide-for-Windows-11-Repair.png)
[Usage Guide] How to Use the Windows 11 Repair the Right Way

Discovering and rectifying technical issues on your Windows 11 system doesn’t need to be daunting. With the appropriate knowledge and strategies, you can take the reins of system repair, ensure smooth operation, and steer clear of potential future issues. This detailed guide aims to demystify the process by offering a complete step-by-step walkthrough on using the Windows 11 Repair tool effectively.
Whether you’re facing corrupted files, resolving software conflicts, or repairing hardware failures, this guide has been designed to arm you with the knowledge and tools needed for maintaining an efficient Windows 11 computer. Learn how to take full control of your system’s health and keep your machine running smoothly with this comprehensive Windows 11 Repair guide.
Recommended: To easily install drivers automatically, use the tool below.
First Step: Backup Your Data
Creating a backup of all your important data is crucial before you attempt to fix any issues with your Windows 11 computer. This is important because the repair process can sometimes lead to data loss, and you don’t want to risk losing your valuable files.
To create a backup of your data, follow the instructions below. If your computer isn’t turning on and you need to access the BIOS, you can also use these steps:
1. Use a USB drive to create a Windows media creation tool.
2. Connect the bootable media to your computer and enter the BIOS settings by restarting your PC and pressing F2 or the related key based on your PC manufacturer.
3. In the BIOS, set the boot option to Removable devices or CD-ROM drive and save the changes by pressing F10 on your keyboard.
4. Boot your PC using the USB drive and use third-party software to recover lost files.
Once you’ve recovered any lost data, you can proceed with the methods below to repair Windows 11 and fix any corrupted files.
Recommended: To easily install drivers automatically, use the tool below.
Ways to Repair Windows 11 and Fix Corrupted Files
Microsoft has recently released Windows 11, its newest operating system, with various features and improvements compared to its predecessor, Windows 10. Despite its advanced functionalities, users may still encounter issues that need fixing, such as corrupted files, software conflicts, malware infections, and hardware failures.
These issues can cause your computer to run slowly or malfunction. Therefore, in this article, we will explore effective ways to repair Windows 11 and fix corrupted files to ensure your computer runs efficiently without any problems.
Run Windows Startup Repair
Windows Startup Repair is a built-in tool in Windows 11 that can help repair system issues that prevent your computer from starting correctly. It scans your system for common problems and attempts to fix them automatically. Startup Repair can fix problems like missing or damaged system files, corrupted boot configuration data, and other issues that cause your computer to fail to boot properly.
1. Connect the bootable media you created for Windows 11 to your PC.
2. Restart your PC and use the Windows 11 installation media to boot up your system.
3. Click on Repair your computer at the bottom of the Windows installation screen to enter the Windows Recovery environment.

4. Click on Troubleshoot in the Choose an Options screen.
5. Choose Advanced options.
6. Select Startup Repair in the Advanced options screen.

7. The Startup Repair process will begin and detect any issues with your PC. If it finds any, it will automatically apply the fix.
8. Once done, your Windows 11 PC should restart automatically, and the problem should be fixed.
Install Updates
To ensure that your Windows 11 runs smoothly, it’s recommended to keep it updated. Microsoft regularly releases updates to address any issues and bugs in the operating system. You can also report any problems you encounter to Microsoft to help improve the system.
When a new update is available, your computer will usually detect and download it automatically. You’ll receive a notification in the bottom-right corner of your screen, prompting you to restart your computer. Alternatively, you can manually check for updates by going to Start > Settings > Windows Update.

Uninstall Updates
1. Open Windows Update in the Settings app.
2. Click on Update history.

3. Scroll to the bottom and click Uninstall updates.

4. Find the recent update, right-click it, and select Uninstall.
Alternatively, select the update and click Uninstall from the top menu.

5. Click Yes to confirm the operation.
6. Restart your device and check if the issue is resolved.
Note that if you can’t find the Uninstall option after selecting an update, it may be a crucial component of Windows 11 that can’t be uninstalled. In that case, you’ll need other methods to fix the issue.
Run SFC to Repair System Files
Running SFC (System File Checker) in Windows 11 can help repair the operating system by scanning and repairing any corrupted or missing system files that may be causing issues with your PC. SFC is a command-line tool built into Windows 11 that scans and verifies the integrity of all protected system files and replaces any corrupted or missing files with the correct versions from the Windows installation media.
1. Press the Win + R shortcut keys to launch the Run command.
2. In the Run command box, type cmd.
3. Press the Ctrl + Shift + Enter keys simultaneously on your keyboard to open the Command Prompt window with admin rights.
4. Type the command sfc /scannow in the elevated Command Prompt window and press Enter.
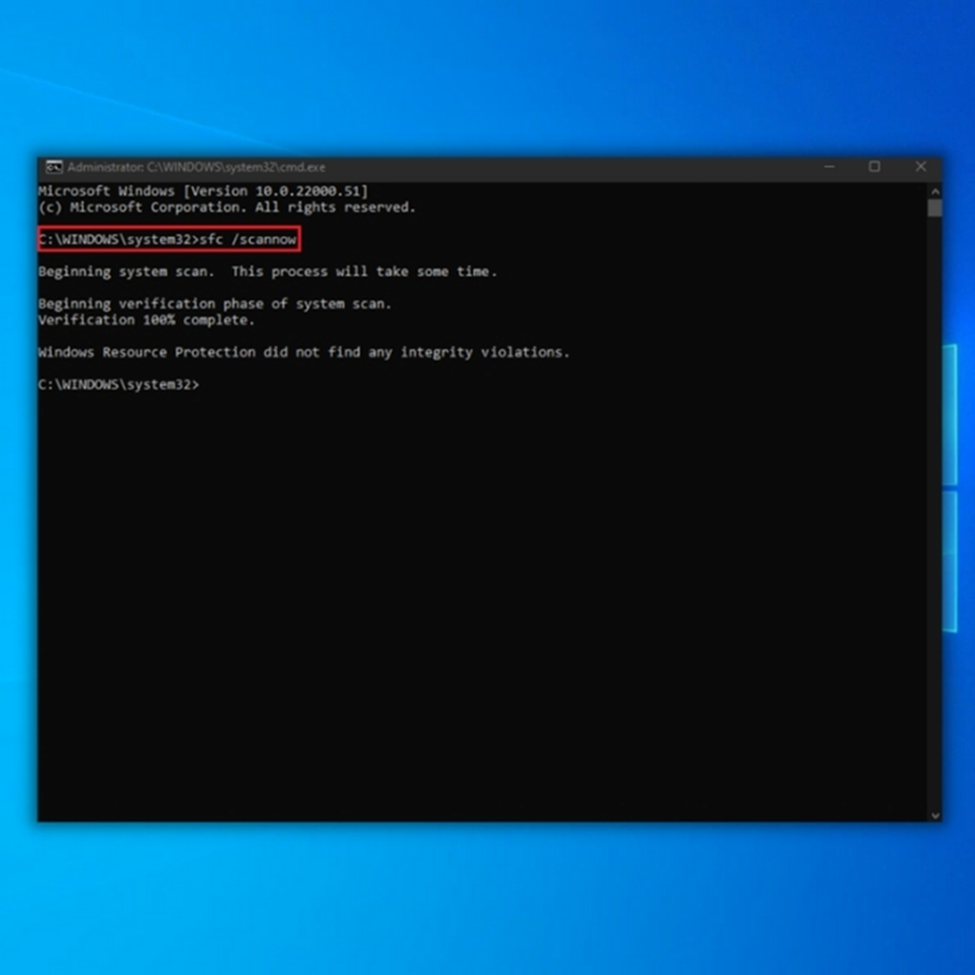
5. Wait for the scan to complete, as processing may take some time.
6. Once done, the tool will automatically detect and repair any corrupted or missing files on the spot.
7. Restart your PC to check if the Windows 11 issue has been resolved.
Use DISM to Fix System Files
Deployment Image Servicing and Management (DISM) is a command-line tool in Windows that can be used to service and prepare Windows images. This tool is especially useful for fixing corrupt or damaged system files that can cause issues, including system crashes, error messages, and other system malfunctions.
The DISM tool works by repairing the Windows image files used to install Windows on your computer. When you run the DISM tool, it scans the Windows image for any issues and then fixes them automatically.
1. Press the Win + R keys to launch the Run command window.
2. Type cmd in the search bar and press Ctrl + Shift + Enter to open the elevated Command Prompt.
3. Type DISM /Online /Cleanup-Image /RestoreHealth in the Command Prompt and press Enter to start the DISM scan.

4. Wait for the scan to finish and restart your PC.
5. Check if the Windows 11 issue has been resolved.
Check Disk (CHKDSK) Scan
Running the CHKDSK command in Windows 11 can help repair the file system and fix errors on your hard drive. CHKDSK stands for Check Disk, a command-line tool that scans your hard drive for errors and bad sectors.
When you run the CHKDSK command, it will analyze the file system and check for any errors that may be causing problems. It will then attempt to repair any issues it finds. This can include fixing corrupted file systems, repairing bad sectors on the hard drive, and recovering lost data by scanning the file system metadata.
1. Run the Command Prompt.
2. In the command prompt windows, enter chkdsk /r c: to locate and fix any bad sectors on your disk.
3. Replace c: with the appropriate letter if your Windows partition is located elsewhere.
4. If Chkdsk asks to run at the next system restart, enter Y and reboot.

5. Wait for the Chkdsk process to complete, then reboot again.
Use Windows Troubleshooters
Windows Troubleshooters is a helpful tool to quickly identify and repair issues on your computer. They are specifically designed to troubleshoot and fix problems related to various components and features. Some areas they can diagnose and fix including;
- Internet connections
- Audio playback
- Printer connectivity
- Bluetooth
- Camera settings
- Network connections
- Program compatibility
- Audio recording
- Search and indexing
- Shared folders
- Video playback
- Windows Store apps.
They also offer privacy resources to help protect your data. These troubleshooters can save time and effort by automatically finding and resolving common issues.
How to Open Windows 11 Troubleshooters and Run Them?
You can use the built-in Troubleshooters feature to fix certain issues on your Windows 11 computer. Follow these steps:
1. Click on the Start button, go to Settings, and click on Troubleshoot.
2. Click Other troubleshooters.

3. Select the specific component or service you want to fix.

3. Click on the Run button, and the tool will automatically detect and fix any issues it finds.
Use Device Manager
1. Open Device Manager by right-clicking on Start and selecting it.
2. Locate the driver that needs to be updated or uninstalled.
3. Right-click on the driver and select Update Driver or Uninstall Device.

4. Follow the on-screen instructions to complete the update or uninstallation process.
5. Restart your computer to apply the changes.
Use Windows 11 Safe Mode
Safe mode is a diagnostic mode of Windows 11 that starts your computer with only the most essential services and drivers. This model is designed to help you troubleshoot and fix issues preventing Windows 11 from starting normally. By booting into Safe mode, you can diagnose and fix problems caused by malware, software conflicts, and other issues.
1. Press and hold the Shift key on your keyboard while clicking the Start menu icon.
2. Select the Power icon and click Restart while holding the Shift key.
3. After your computer restarts, you’ll see a blue screen with several options. Select Troubleshoot.

5. In the Troubleshoot menu, select Advanced options.
6. In the Advanced options menu, select Startup Settings.

7. Click on Restart to see a list of options. Press your keyboard’s 4 or F4 key to start Windows 11 in Safe Mode.

8. If you need Safe Mode with Networking, press the 5 or F5 key instead.

9. Once Windows 11 has started in Safe Mode, you can troubleshoot any issues you may be having with your computer.
When you’re finished, restart your computer to exit Safe Mode.
Use Microsoft Software Repair Tool
Microsoft Software Repair Tool is a free software utility provided by Microsoft that can help diagnose and fix issues with various Microsoft applications and services. It is designed as an all-in-one tool to troubleshoot and repair common problems with Windows, Office, and other Microsoft products.
The tool scans your system for any problems and provides a detailed report of the issues found, allowing you to choose which ones to fix. Microsoft Software Repair Tool can be an excellent resource for users experiencing problems with their Microsoft applications and services. It provides an easy and convenient way to diagnose and resolve issues without needing advanced technical skills.
Perform a System Restore
Performing a system restore is one of the ways to repair Windows 11. It allows you to roll back your system when your computer functions properly. This feature can be helpful if you have recently installed software or made changes to your system settings that have caused issues on your computer. With system restore, you can restore your computer to the state before the issue occurs without losing personal files.
1. Right-click on the Start button and select Run.

2. In the Run command window, type rstrui and press Enter to open the System Restore window.

3. Click the Next button.

4. Select the system restore point you want to use and click Next.

5. Wait for the System Restore process to complete, as it may take some time.
6. After the process, your computer will restart automatically to the selected date and state.
Reset Your PC to Repair Windows 11
This method is similar to performing a clean install of Windows 11, but it is less drastic because it allows you to keep your files and settings while removing apps and programs that might be causing the problem.
By resetting your PC, you can bring your Windows 11 to its original state and fix performance problems, app crashes, and other system errors. This way, you can start fresh and have a more stable and reliable Windows 11 experience.
1. Press the Win + I shortcut keys to open the Windows Settings.
2. In the Settings app, click on System.

3. Navigate to the right side, scroll down, and click on Recovery.
4. Under Recovery options, click on Reset this PC and then click on the Reset PC button.
5. In the new window, choose between Keep my files to keep your files or Remove everything.

6. Select how to reinstall Windows 11, Cloud download, or Local reinstall.

7. A pop-up window will appear confirming that your apps will be removed; click Next to proceed.
8. Click Reset on the next screen to confirm the action and Windows 11 will be re-installed.
Clean Install Windows 11
Performing a clean install of Windows 11 can help restore your computer to its original settings and install the latest version of Windows 11, which can help fix serious system issues. However, it’s important to note that unlike resetting your PC, a clean install requires you to create a bootable USB drive using the Windows Media Creation Tool and then boot your PC from that USB to perform the installation.
While the Windows Media Creation Tool isn’t currently available for Windows 11 because it hasn’t been officially released, users running the Windows 11 Insider preview build can download the Windows 11 preview build ISO file, burn it to a USB drive, and use it to perform a clean install of Windows 11 if needed.
Mastering the Right Way to Use the Windows 11 Repair Tool for Effective System Troubleshooting
In this comprehensive usage guide, we have delved into the intricacies of the Windows 11 Repair tool and provided step-by-step instructions on how to use it effectively. Following the recommended procedures and utilizing the repair tool’s advanced features can resolve various system issues and ensure optimal performance on your Windows 11 device.
From troubleshooting startup problems and fixing corrupted system files to repairing network connectivity and resolving software conflicts, the Windows 11 Repair tool offers a range of solutions to tackle common system issues.
By employing this powerful tool correctly and understanding its functionalities, you can save time, avoid unnecessary complications, and restore your Windows 11 system to its optimal state. Embrace the power of the Windows 11 Repair tool and confidently navigate through system troubleshooting for a seamless computing experience.