![[Full Repair Guide] Windows 10 Volume is Not Working](https://cdn.techloris.com/app/uploads/2023/05/computer-volume-not-working.png)
[Full Repair Guide] Windows 10 Volume is Not Working

If your computer volume is not working on Windows 10, several potential causes exist.
- One of the most common causes is a hardware issue, such as an incorrect or outdated sound card driver.
- Another possible cause is software conflict or corruption. If you have recently installed any software onto your computer, it may conflict with existing processes causing the loss of sound settings.
- Also, you could have accidentally changed some audio settings in Windows 10. This may be due to changing the audio settings in a program like your web browser or media player or even accidentally pressing the volume keys on your keyboard.
This article will provide step-by-step instructions on how to fix the volume not working issue in Windows 10. We’ll check settings, update drivers, and troubleshoot audio hardware problems to get your system running smoothly again. We’ll also look at optimizing your sound settings for better performance. With the help of this guide, you should be able to get your computer’s volume working properly in no time.
Check Volume Levels and Muted Outputs
Initially, you should address the most evident issue. Double-check that you haven’t silenced the audio if you hear nothing on your computer.
1. Click the Volume icon at the bottom-right corner of your computer.
2. Right-click on the same volume icon and choose Open Volume Mixer.

3. Check the current volume level for all apps playing audio.

4. Turn up the volume levels as needed.
Make Sure You’re Using the Right Audio Output
Windows can play sound through the incorrect audio output device if multiple such devices are connected to your computer.
1. Click the Volume icon.
2. Above the volume slider, you’ll see the name of the current device if you have more than one enabled.

3. Click on the device name to open a menu of all available devices.
4. select the output device you want to use for playback from the list.
The Volume icon on your computer is a quick switcher to change your audio output device. However, it might not display all available devices. Right-click on the Volume icon and click on Open Sound Settings to see a selection of audio devices linked to your computer. This option is a shortcut to the Audio Settings > System > Sound menu.

To view everything linked to your computer, go to the Sound settings page and click Manage sound devices under the Select your output device header.

You can then use the Test button to play a quick tone on any available device. As previously mentioned, rechecking the volume levels after changing output devices is important.

In addition, make sure to check the Disabled section to ensure that the device you want to use is not turned off. If it is, click the disabled option and select Enabled to turn it back on. These steps will help you troubleshoot any issues with your audio output device.
Check All Audio Cables and Wireless Connections
To troubleshoot further, it’s recommended that you check the physical connections of your audio devices. This is especially important if your desired output device was not listed in the previous menus.
Ensure all audio and power cables are securely plugged into your computer and the audio device. It’s a good practice to unplug and reconnect all cables to confirm no loose connections. Additionally, double-check that the audio cables are connected to the correct ports.
Typically, audio output devices should be plugged into the green port, which a headphone icon may indicate. If a cable is torn, bent too much, or shows signs of damage, it could be rendered ineffective. It may require some fiddling to establish a stable connection. It is advisable to contemplate replacing cables that have become worn out, if feasible.
For wireless audio devices like headphones:
1. Open Settings on your computer.
2. Click on Devices.
3. Select Bluetooth & other devices.

4. Ensure you have correctly paired your wireless audio device, such as headphones, with your computer.
Before connecting your Bluetooth headphones to your Windows PC, ensure they are not connected to other devices, such as your phone, tablet, or TV. If they are, disconnect them from those devices first. Otherwise, attempting to play audio from your computer to the headphones may be unsuccessful if they are still paired with another device.
Try the Windows Audio Troubleshooter
Before proceeding, it may be beneficial to run the in-built audio troubleshooter. This will enable Windows 10 to detect and resolve any problems on its own on some occasions. Although these Windows troubleshooters are not always successful in resolving the issue, it is advisable to try it before delving deeper into troubleshooting.
1. Press Win + I to open Settings.
2. Click on Update & Security > Troubleshooter > Additional troubleshooter.
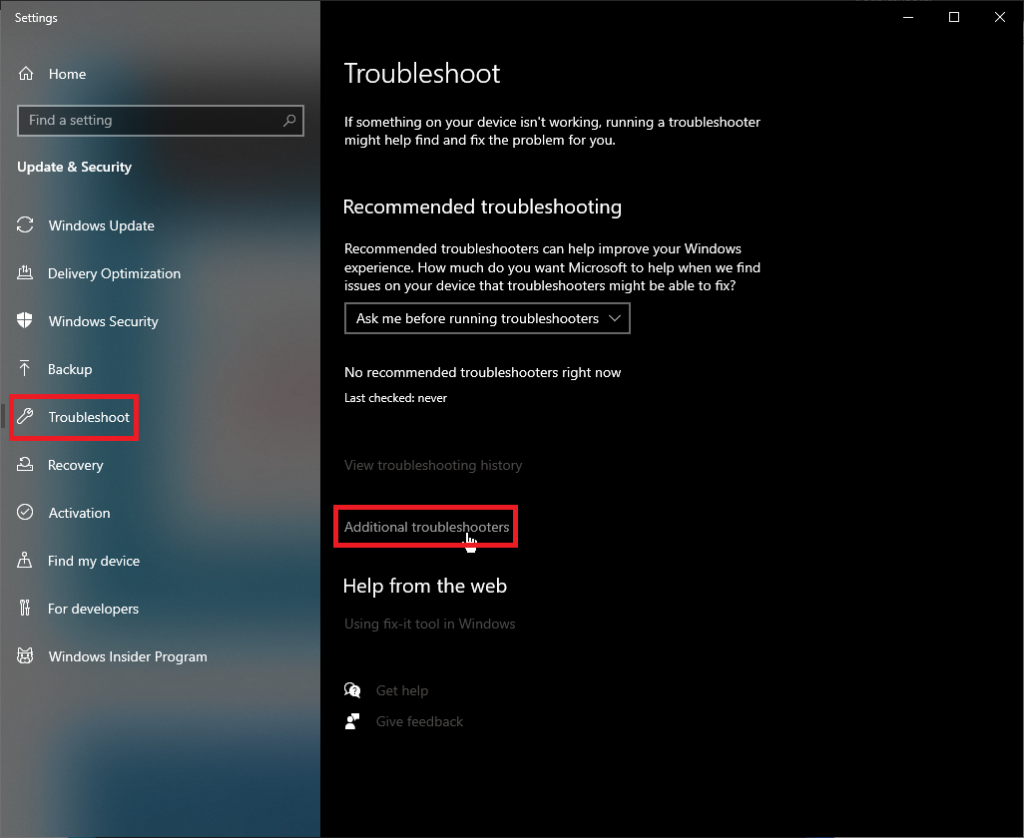
3. Click on Playing Audio and click the Run the Troubleshooter button.

4. Follow on-screen instructions, and Windows will resolve the issue automatically. Upon completion of the troubleshooting process, any fixes implemented by the troubleshooter will be displayed.
Roll Back or Reinstall Audio Drivers
Generally, drivers function effectively after being initially configured. However, when problems arise, they can lead to troublesome issues. Updating your audio driver could resolve the issue if it becomes corrupted or encounters a problem.
Rollback Audio Device
1. Press Win + X and select Device Manager.
2. Expand the Sound, video, and game controllers category.
3. Find your audio device from the list, right-click, and select Properties.

4. In the Properties window, select the Driver tab.
5. Click on the Roll Back Driver button. If the button is grayed out, there is no previous driver version to roll back to.

6. Follow the on-screen instructions to complete the process. Once finished, restart your computer.
Reinstall Audio Drivers
Before uninstalling the driver, it is recommended to download the latest version from the manufacturer’s website, if one is available. Typically, these drivers can be obtained directly from the hardware issuer’s website.
1. Follow steps 1 – 2.
2. Right-click your audio device and select Uninstall device.

3. Check the Delete the driver software for this device box and click Uninstall.
After removing the drivers, restart your system. If you have obtained a new driver, proceed with its installation. Otherwise, Windows should have automatically reinstalled its default driver for your device.
Update the IDT High Definition Audio CODEC
Certain systems may experience difficulties with the IDT High Definition Audio CODEC. One potential solution is manually updating the driver, allowing you to select the desired sound driver.
As mentioned, access the Device Manager and expand the Sound, video, and game controllers categories. Locate IDT High Definition Audio, right-click, and select Update device. But, if you cannot see it, go to the next part.
Select Browse my computer for drivers, then choose Let me choose from a list of available drivers on my computer. This selection lets you choose any of your system’s pre-installed drivers.
Select Show compatible hardware > High Definition Audio Device. Proceed by clicking on Next > Yes. You might have to reboot your computer for the changes to take effect.

Fix Realtek High Definition Audio Problems
The type of audio driver installed on your computer may vary depending on the manufacturer and hardware. For instance, instead of the IDT driver, you may have a Realtek audio driver, frequently mentioned in online forums discussing Windows audio issues.
To determine whether any driver updates are available for Realtek audio, follow the same process outlined above for IDT. If this method is unsuccessful, there are a few additional solutions for resolving Realtek audio problems that you can try.
Refresh Your Wi-Fi Drivers
When Windows 10 has no sound, one frequently suggested solution is to address the Realtek WLAN drivers by disabling and reinstalling them, even if you already have the most recent version.
Begin by going to the Realtek website and downloading your machine’s most recent driver version. Next, open Device Manager and look for your Realtek Wireless LAN drivers; this ought to be located in Network adapters and have both Realtek and Wireless in the name.
To uninstall the driver, right-click on it and select Uninstall device. Afterward, open the downloaded driver file and extract its contents. Locate the setup.exe or another installation file and proceed with the prompts provided. Once the installation is complete, you’ll need to restart your system.
Disable the Front Panel Audio Jack
While this solution may be unique to a particular system, it has resolved an audio problem for at least one individual, indicating that it may also be a viable option for solving your problem.
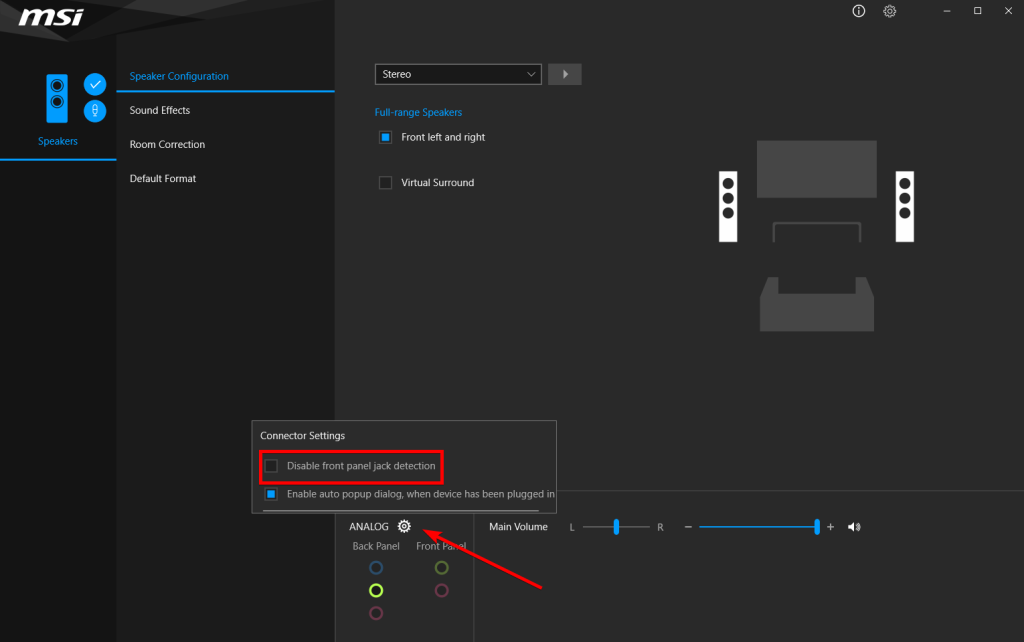
To access this tool, double-click on the Realtek speaker icon that can be found in the System Tray located at the lower-right corner of your screen. If the icon is not visible, you may need to click the small arrow to expand the menu.

The Realtek Audio Console has substituted this app on newer systems and can be discovered by running a search on your PC. Check the Disable front panel jack detection option in the advanced settings.
Disable Windows Audio Enhancements
Moving on to Windows 10’s audio enhancements, these are pre-installed Microsoft and third-party packages intended to improve or modify your system’s audio output. However, these enhancements might be the culprit behind your audio issues on Windows 10. The good news is that disabling them is straightforward.
To access the audio enhancements, right-click on the speaker icon in the System Tray and choose Sounds.
This will open the Sound window in the Sound Control Panel. Next, go to the Playback tab and double-click on the audio device you’re currently using.
Navigate to the Enhancement tab once you have accessed the audio device’s properties window. Check the box labeled Disable all enhancements and click the Apply button to disable audio enhancements. If you’re experiencing audio problems with multiple devices, repeat this process for each listed under the Playback tab.

While you’re in the same window, confirming that the device you intend to use is set as the default is recommended. You can easily set it as the default device by right-clicking on it and selecting the option Set as Default Device.
Restart Windows Audio Services
If you’re facing persistent audio issues, the root cause may lie in the Windows services. Although audio services should usually function normally, they may unexpectedly stop working, resulting in a lack of sound.
To check this possibility, type Services into the Start menu search bar and open the Services Manager. Locate the Windows Audio service and check if it’s currently running. If not, this may be why you’re experiencing audio problems. Double-click on the service and choose the Start option to initiate it.

While you are in the services manager, it is important to double-check the startup type of the audio service. Normally, audio services are set to Automatic by default. However, if it is set to anything different such as Automatic (Delayed Start), Manual, or Disabled, it could be causing issues with your system audio. If this is the case, change it back to Automatic.
Review the Present Audio Format
If the audio on your PC is not working, it could be due to an issue with its audio format. Fortunately, Windows 10 allows users to change the audio format to a compatible one. To do so, navigate to Settings > Sound > Device Properties > Advanced Device Properties. Here, a pop-up window will appear. Click on the Advanced tab and select a different audio format. Generally, a 16 or 24–bit audio format is usually compatible with different speakers.
Check the App Permissions for Microphone

Some users report that their Microphone doesn’t work with certain apps besides speakers. This issue could be due to app permissions for the Microphone. To resolve this, navigate to your system’s Settings > Privacy and open the App Permissions menu. From there, select Microphone, and you’ll see a list of applications that require microphone access. You can enable or disable an app’s permission from here and ensure that the respective app has been granted permission to access the Microphone.
Restart Your System

Occasionally, basic troubleshooting steps can resolve various audio problems on Windows 10. Restarting your computer may be all that is needed if your system has not been properly initialized or if you have recently installed updates. To restart your computer, open the Start menu and click the power button to access various options, including Restart or Update and Restart.
Update Your BIOS
In rare instances, a fresh installation of Windows or hardware incompatibility may cause sound to stop working on Windows 10. You may need to adjust or update your BIOS settings if this occurs.
Restart your computer and access the BIOS by pressing the designated key (F2, F12, or Del, depending on the manufacturer). Within the BIOS, search for a setting that enables or disables the sound card and ensure it is enabled.
If the sound card is already enabled, verify your BIOS version and compare it to the latest version on the manufacturer’s website to determine if you need to update it.
Check for Updates

Outdated firmware can also be the culprit behind a non-functional audio system in your Windows PC. To fix this, go to your system’s Settings and select Update & Security, followed by Windows Update. Check for any available updates and install them on your Windows 10 computer.
Keep Your Computer Updated
Computer updates are essential for keeping your system running smoothly and preventing errors. When you don’t keep your computer up-to-date, you can run into problems such as your volume not working. The latest software releases often include bug fixes and other improvements to ensure everything runs correctly.
Resolve the Frustrating Issue of Windows 10 Volume Not Working With Our Comprehensive Repair Guide
In this full repair guide, we have delved into the common causes and effective solutions for when the volume on your Windows 10 system is not working. From troubleshooting hardware issues to addressing software conflicts, we have provided step-by-step instructions to help you diagnose and fix the problem. Whether you’re facing sound distortion, missing audio devices, or mute settings, we have covered a range of scenarios to ensure you can regain control over your computer’s volume. Say goodbye to the frustration of silent speakers and enjoy a seamless audio experience on your Windows 10 device.