
Guide: How To Fix Windows 10 Slow Boot

Windows 10 is one of the most popular operating systems today. After all, it was designed to improve the overall PC speed and hardware performance.
A computer running on Windows 10 almost always has an impressive boot time. As a result, it is not surprising that users get easily frustrated when they experience a Windows 10 Slow Boot. Luckily, there are a handful of ways to fix this error.
Reasons Why You May Experience Windows 10 Slow Boot
Your computer will act up for a variety of reasons. Some common culprits are:
- Corrupted or outdated files
- Malware or spyware
- Fragmented files
- Windows startup programs
- Incorrect configuration in BIOS
- Incompatibility Windows 10 update
If you are unsure what causes your Windows 10 to boot slowly, you can follow these steps to check:
- Click “Start” and type update.
- Select “Check for updates.”
- You will see available updates. Click on “Install now” and update your Windows.
- Reboot your PC.
Check out the other fixes if you didn’t find any new updates or your PC still boots slowly.

- Your machine is currently running Windows 10
- Fortect is compatible with your operating system.
Recommended: To repair Windows Errors, use this software package; Fortect System Repair. This repair tool has been proven to identify and fix these errors and other Windows problems with very high efficiency.

- 100% safe as confirmed by Norton.
- Only your system and hardware are evaluated.
Method 1 – Disable Fast Startup
When unnecessary applications try to all start at the same time you boot, it may cause issues. As a result, it is crucial to be mindful of which software or apps can start by default. By disabling Fast Startup, you can improve the time your PC boots.
- Right-click the Windows icon and click Search.

- Next, in the search box, type “Power & Sleep settings” and press “enter.”

- Select “Additional power settings.”

- In the new window, click “Choose what the power button does”.

- Next, select “Change settings that are currently unavailable.”

- Untick the box next to Turn on fast startup (recommended). Hit Save Changes.

- Restart your PC and see if Windows 10 Slow Boot error is fixed.
Method 2 – Disable Any Processes with High Startup Impact
Unnecessary processes starting up altogether can cause your PC to boot slowly. Thankfully, you have a way to disable these applications. Using only the most important processes during startup will make huge changes for your Windows 10 computer. Be sure to leave crucial security software on.
- Open the Task Manager by simultaneously holding down the “ctrl + shift + Esc” keys.
- Choose the “Startup” tab.

- In this tab, you’ll have an idea of each program’s start-up impact, starting with Windows 10.
- Pick the right apps to disable. For example, you want to keep your Antivirus running, but you might want to disable Slack or Skype from automatically starting when you open your PC.
Method 3 – Update Your BIOS
Some experts who experience Windows 10 Slow Boot errors shared that the issue can be fixed by updating their BIOS. However, updating BIOS is an advanced technical procedure, so be sure to do it at your own risk.
After you have updated your BIOS, check to see if the error is fixed. Furthermore, if you have already updated to the latest BIOS, you will want to reflash it and reinstall the same version.
Steps to configure your BIOS:
- Start your PC. Press ESC, F1, F2, F8, or F10 on your keyboard during the initial startup screen. Depending on your BIOS model, a menu may appear.
- Choose to enter the BIOS setup. Next, you will see the BIOS setup utility page.
- Utilize the arrow keys to select the “BOOT” tab.
- The system devices appear in order of priority.
- Check the boot sequence priority for your drive by moving it to the list’s first position.
- Save and exit the BIOS setup utility. The computer will restart with the changed settings.
Method 4 – Update your Graphics Card Drivers
If you are experiencing a Windows 10 slow boot error after an update, it may be because of an incompatibility with your graphics driver. That means updating your graphics card driver may fix the issue.
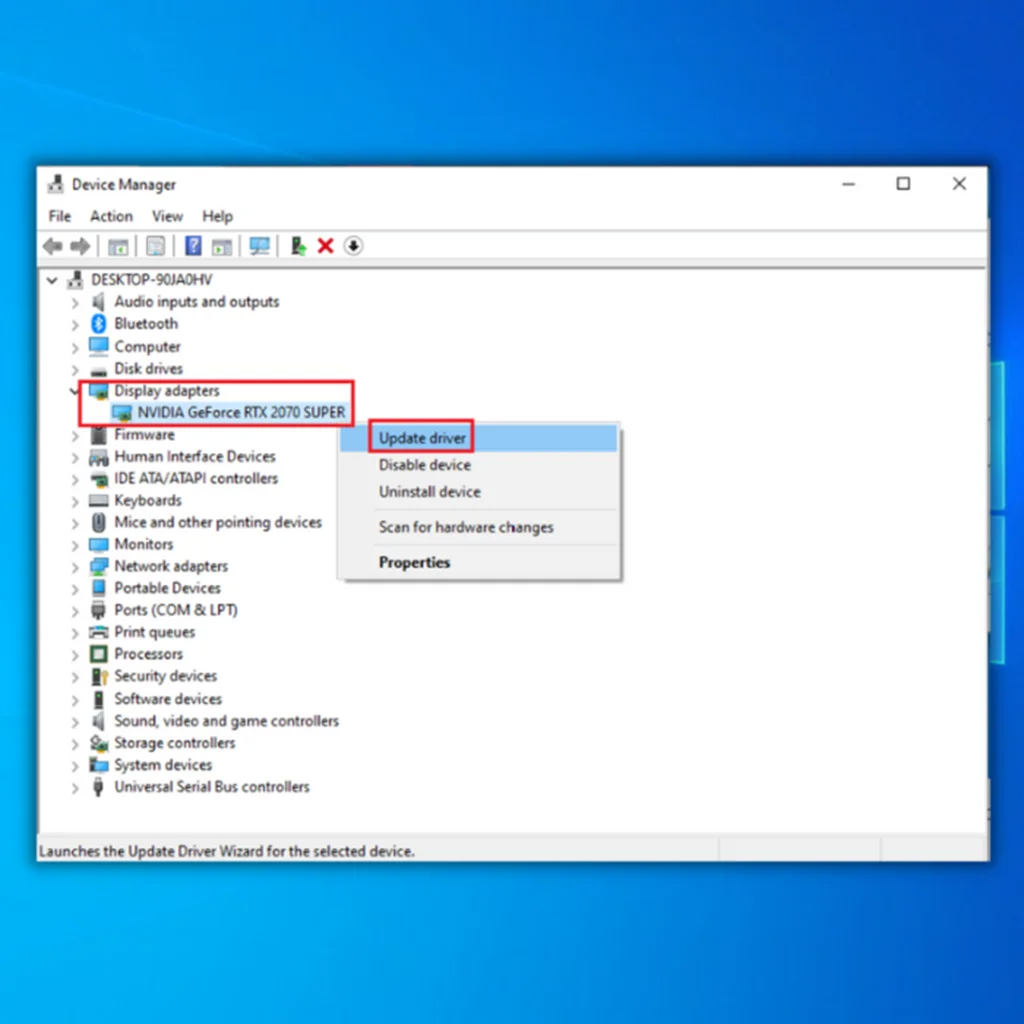
- Press the “Windows” and “R” keys and type in “devmgmt.msc” in the run command line, and press enter.

- In the list of devices in the Device Manager, look for “Display Adapters,” right-click on your Graphics Card, and Click on “Update driver.”
- In the next window, click “Search Automatically for Drivers” and wait for the download to complete and run the installation.
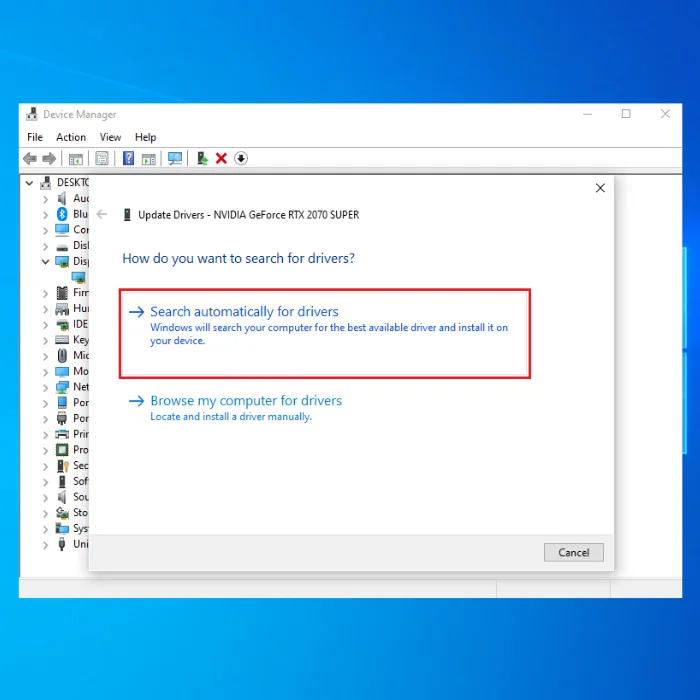
- Once the driver has been installed successfully, restart your computer.
Method 5 – Use the Windows Troubleshooter
A quick way to fix slow boot issues in Windows 10 is to utilize the Windows Troubleshooter. This utility comes built-in with any Windows 10 computer. It has the ability to find any corrupted files and fix them. Follow these steps to run your Windows Troubleshooter:
- Press the “Windows” key on your keyboard and press “R.” This will open a small window where you can type “control update” in the run command window.

- When a new window opens, click “Troubleshoot” and “Additional Troubleshooters.”
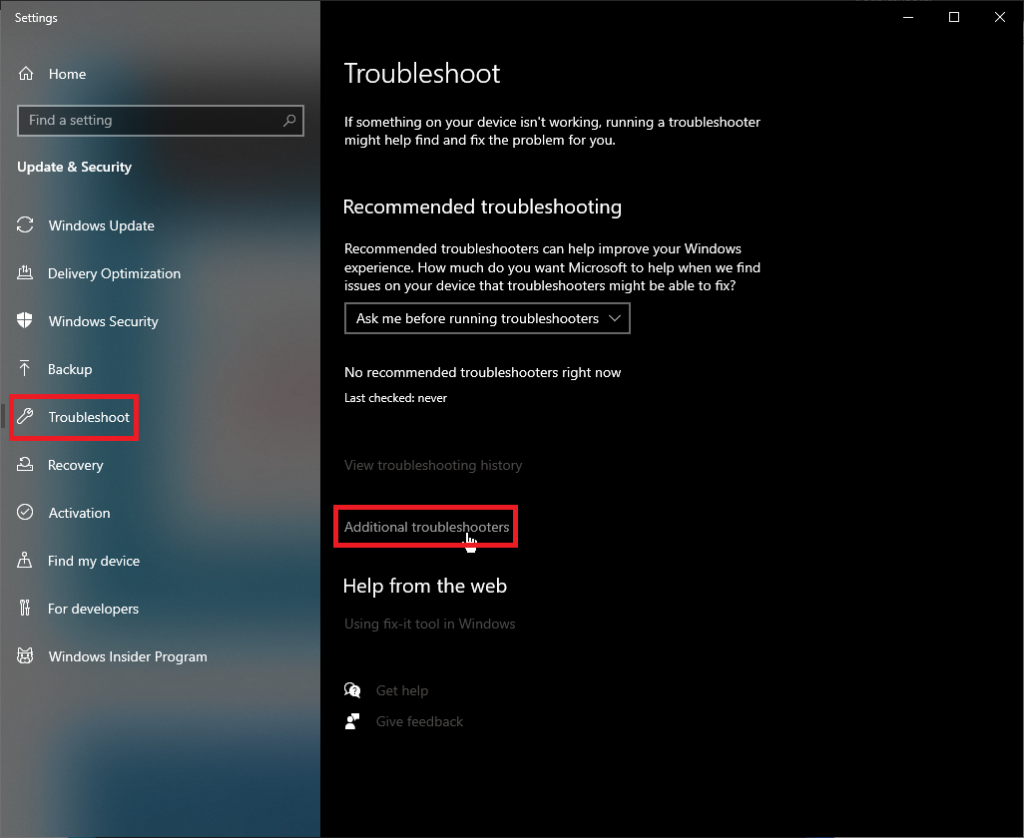
- Next, click “Windows Update” and “Run the Troubleshooter.”

- At this point the troubleshooter will automatically scan and fix errors in your PC. Once done, you can reboot and check if you are experiencing the same error.
Method 6 – Remove All WDI Directory Files
Windows 10 slow boot error can be fixed when you delete files saved in the WDI directory.
- Press the Windows Icon + E on your keyboard to run File Explorer.
- Locate the following directory:
- C:\Windows\System32\WDI
- Find the WDI directory.

Note: You may be prompted that you do not have permission; click Continue to proceed.
- Use CTRL + A keyboard shortcuts to select all the files in the WDI directory.
- Right-click and choose Delete from the context menu list.

- Reboot your PC.
Method 7 – Perform a Reset
If you continue to experience Windows 10 slow boot error, you can try to reset your PC. Before you reset your PC be sure to back up your overall data.
- Press the “Windows” key on your keyboard and press “R.” This will open a small window where you can type “control update” in the run command window.

- Click on “Recovery” and click on “Reset this PC” under Recovery.

- Follow the prompts to complete the reset process.
Final Thoughts
Experiencing Windows 10 slow boot can be frustrating. This can be especially annoying when you need to use your PC as soon as possible. Thankfully, the methods mentioned above are sure ways to fix the problem.