![[Full Repair Guide] Fixing Windows 10 Screen Shift](https://cdn.techloris.com/app/uploads/2023/03/How-to-Fix-Windows-10-Screen-Shifted-Error.png)
[Full Repair Guide] Fixing Windows 10 Screen Shift

Are you facing the annoying problem of your Windows 10 screen being shifted to the right or left side? This display issue can occur on computer and laptop screens and is usually related to the screen resolution, display adapter properties, graphics card software, or video driver.
This article will show you a solid solution to properly center the screen image using various entities such as the display resolution, advanced display settings, monitor configuration, auto adjustment button, and more.
Recommended: To easily install drivers automatically, use the tool below.
Whether you use an Intel graphics settings or an Nvidia control panel, this guide will help you resolve the Windows 10 screen-shifted error and get your screen back to its centered position.
Why Does My Screen Shift to One Side: 3 Most Common Reasons
- Incorrect Display Settings: One of the most common reasons your screen shifts to the right or left side is incorrect display settings. This can happen when you change your computer or laptop screen’s resolution or display adapter properties.
- Video Card Driver Issues: Another reason your screen may shift to one side of the screen is due to video card driver issues. This can happen when the graphics card software or video driver is outdated or incompatible with your Windows 10 version.
- Screen Refresh Rate: A third reason your screen may shift to one side of the screen is the screen refresh rate. This can happen when the refresh rate is set too high or too low for your display adapter or graphics card.
11 Ways to Fix Screen Shifts on Windows 10
Use the Auto Button to Calibrate Your Display Automatically

- Look for the “Auto” button on your monitor.
- Press the button to calibrate and center the display.
- Press the “Menu” button on your monitor if you can’t find the Auto button.
- Look for the “Auto” or “Calibrate” feature in the menu.
- Select the feature and let it automatically correct the display.
Change the Display Resolution

To re-center your screen if it has shifted to either right or left,
- To open the context menu, right-click on your desktop.
- Click on Display Settings to access the Settings app.
- In the Settings app, adjust the resolution to the recommended value.
- Click on Keep changes if the issue is resolved; otherwise, click Revert.
- If the screen still shifts to the right, it may be due to an incorrect display resolution.
- To fix this, try changing the display resolution to one that your monitor supports.
- Keep trying different resolutions until you find the best one for you.
Choose the Center Image Option
To adjust the screen position on Windows 10, select the Center Image option. Here are the steps to follow:
- Right-click on a blank space on your Desktop and select Graphics Options.
- Navigate to the Panel Fit category and select Center Image.
- This will readjust the image. Check to see if this resolves the issue you were experiencing.
Update Your Drivers
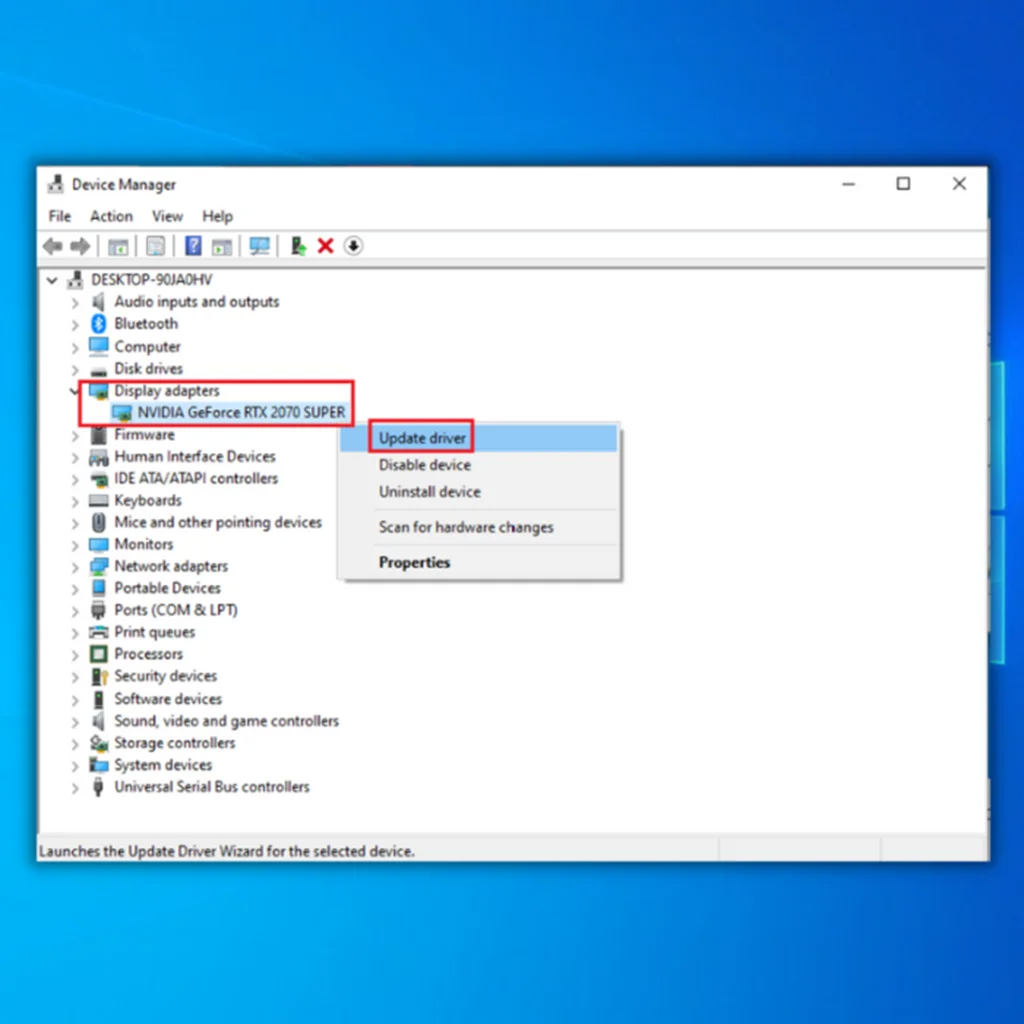
You can update your drivers to resolve display issues such as screen shifts. Follow the steps below to start the update:
- Perform a right-click on the Start menu and choose the option of Device Manager.
- Expand the Display Adapters menu.
- Perform a right-click on your display adapter and choose the Update driver option.
- Choose the option to Search automatically for drivers.
- Visit the website of your graphics card manufacturer and download the latest drivers for your model.
- Install the downloaded drivers.
- Check if the display issue has been resolved.
For HP My Display Settings
To change the display pivot settings on an HP monitor, follow these steps:
- Go to the desktop and right-click.
- Select “HP my display” from the menu.
- Click on “Options.”
- In the “Options” menu, look for the “Pivot” option.
- Choose the 0° pivot setting to change the display orientation.
Check Your Graphics Card Software
To fix a left-shifted laptop screen, follow these steps:
- Open the graphics card software, typically Nvidia or Catalyst Control Panel.
2. Navigate to the Display section and select “Adjust desktop size and position.”

3. Click on the Position tab, then click the left arrow until your display is correctly centered.
4. Finally, click Apply to save changes.

If you experience screen shift issues, the root cause might be the graphics card software. Almost all graphics cards have dedicated software configuring display settings such as resolution, scaling, and position. Some of these settings might have been altered, resulting in the issue.
Note: The steps might differ slightly if you use AMD or Intel’s graphics.
Make Some Alterations in the Monitor Configuration
If you encounter a screen shift issue on a Windows 10 PC, it may be due to the monitor’s configuration. You should check if this is the case.
Here are the steps to follow:
- Open Monitor Settings by clicking on the menu button on your monitor.
- Choose the horizontal and vertical Screen Position options to readjust the screen position and resolve the issue.
- Alternatively, try the Auto Configuration option, which automatically readjusts the screen.
Start Your PC in Safe Mode
- Open the Settings app by pressing the Windows Key + I shortcut.
2. Navigate to the Update & Security section.

3. Select Recovery from the left-hand menu and click the Restart Now button in the right pane.
4. Select Troubleshoot and then choose Advanced options.
5. Select Startup Settings, and then click on the Restart button.

After your PC restarts, a list of options will appear. Press the corresponding keyboard key to select the desired version of Safe Mode. Once you enter Safe Mode, check if the screen shift issue persists. If the issue doesn’t appear, it is likely related to your settings.
Reinstall the Graphics Card Driver
If you’re having trouble launching GeForce Experience, the NVIDIA driver running your GPU may cause the problem. This issue can be particularly problematic if you use an outdated or improperly installed driver.
Follow these steps to uninstall and reinstall the latest driver for your GPU:
- Perform a right-click on the Windows Start menu and choose the option of Device Manager.
- Search for Display Adapter and right-click on your NVIDIA GTX or RTX graphics card.
- Choose Uninstall Device, as shown in the picture.
- After uninstalling the driver, select the Scan For Hardware Changes option to check if this resolves the issue.
- Change your refresh rate
- Right-click on the Desktop and select Display settings.
- Scroll down and click Advanced Display settings.
- Click Display adapter properties for Display 1.
- Go to the Monitor tab and set the Screen refresh rate to the desired value.
- Click Apply and OK to save changes.
- Experiment with different values until you find the one that works for you.
- Some users resolved the issue by switching to the 59Hz resolution.
- Use your graphics card’s control panel software to change the refresh rate of your monitor.
- Ensure only to use the refresh rates supported by your monitor to avoid potential damage.
- Update your Video Card Driver
As Windows 10 is a new operating system, some users are experiencing issues such as screen freezes or blank screens. To address this, video card manufacturers have released fixes to improve system stability. It is recommended to check for updates regularly to ensure optimal performance. To do this, visit the website of your video card manufacturer (usually ATI or Nvidia) and search for any available updates.
Resolving Windows 10 Screen Shift
Dealing with technical issues such as the “screen shifted” error can be time-consuming. Following the steps outlined in this article, you can quickly troubleshoot and fix the issue on your Windows 10 device.
Keeping your software and hardware updated and performing regular maintenance to prevent technical glitches is always a good idea. Don’t let technical errors discourage you from using your device to its full potential! With a little effort and patience, you can overcome them and continue enjoying a seamless computing experience.