![[Repair Guide] Windows 10 Photos Application is Not Working](https://cdn.techloris.com/app/uploads/2023/05/windows-10-photos-app-not-working.png)
[Repair Guide] Windows 10 Photos Application is Not Working

The Photos app on Windows 10 is a comprehensive digital photo management system. It allows users to browse and organize their pictures, create slideshows, share photos with friends and family, and even apply special effects or touch-up images. The Photos app also offers powerful editing tools that instantly crop, rotate, or enhance photos.
Plus, you can use the app to make videos from your photos by adding music and other fun elements. The Photos app also has various features that help you get more out of your photos. For example, the “People” view lets you identify people in your pictures, while the “Places” view shows you where your photos were taken. The app can also help you find duplicate photos and ensure all your pictures are backed up safely in OneDrive.
Reset Photos App
Before moving forward, performing a brief rest of the app is recommended. Windows 10 lets you reset any Store apps, restoring them to their default settings.
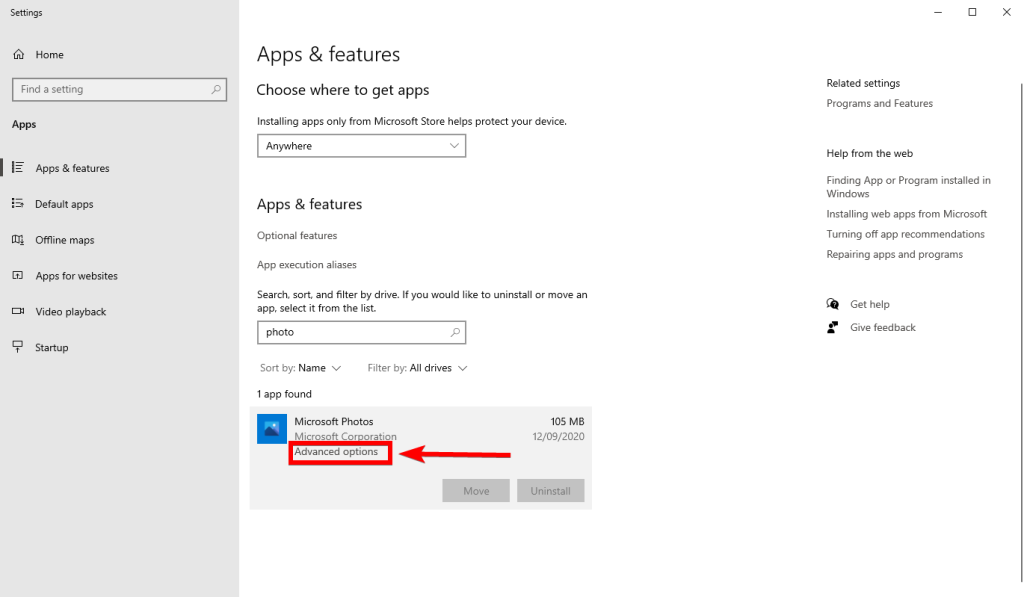
1. Click on the Search box and type Apps & Feature.
2. Click on the Apps & Feature in the search result.
3. Scroll down through the Settings window, click on Microsoft Photos, and click the Advanced Options link.
4. Click on Reset to reset the application.
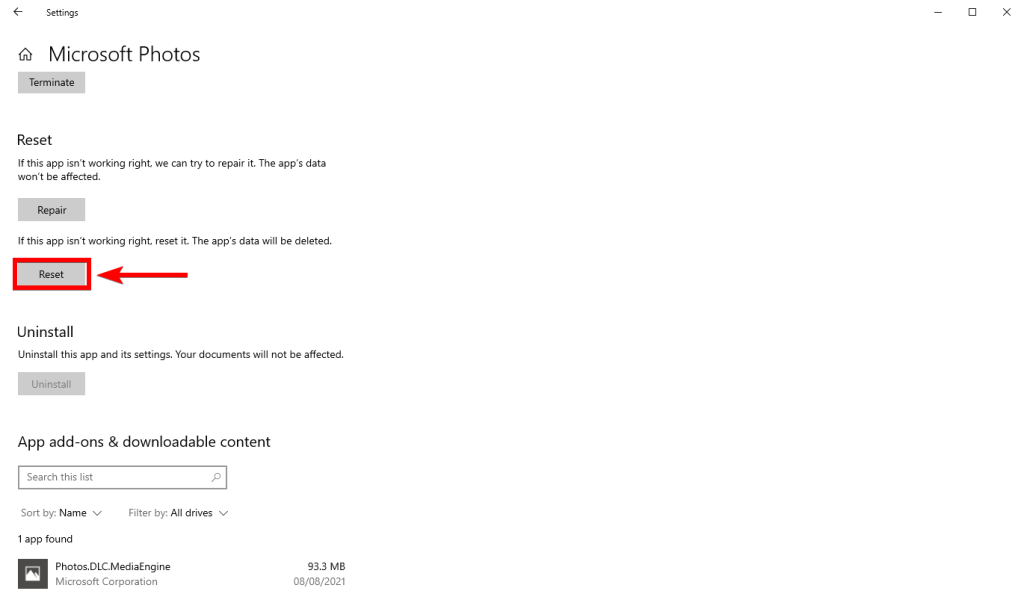
5. Reboot your computer.
6. Once the Photos application is reset, try to open the Photos app again on your computer.
Open Microsoft Store, search Microsoft Photos app, and, if you get a reinstall option, reinstall the Microsoft Photos app.
Reinstall Photos App
If the reset does not fix the issue, you may need to reinstall the Photos app fully. However, Windows does not provide a direct option to uninstall Photos, so you must use PowerShell or a third-party uninstaller to remove it.
1. Open the Run window by pressing the Windows key + R on your keyboard.
2. Type PowerShell and click on OK.
3. In the Windows PowerShell, type the command to remove the Photo Library package and hit Enter:
Get-AppxPackage *photo* | Remove-AppxPackage

4. Close the PowerShell window.
5. Reboot your computer to save the changes.
6. Open Microsoft Store on your computer.
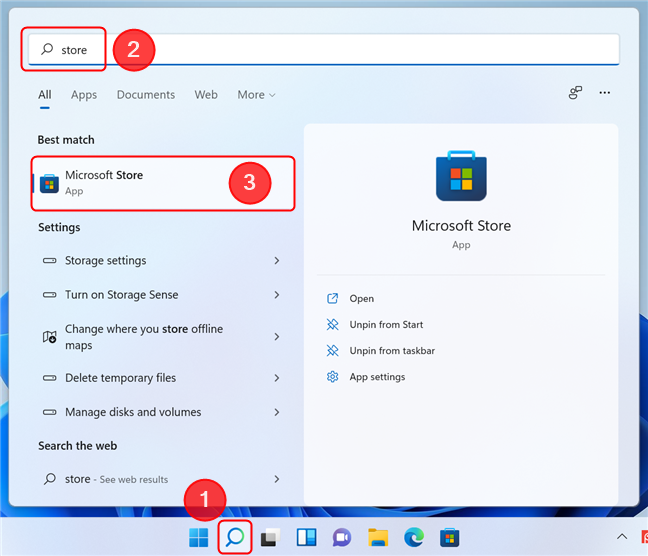
7. Type photos in the search box and click on Microsoft Photos.

8. Click on Get to install Photos on your computer.
9. After the installation, the problem with Photos should be resolved.
Tweak Settings in Photos App
1. Open the Photos app.
2. Click on the three dots in the app’s top-right corner and select Settings from the context menu that appears.

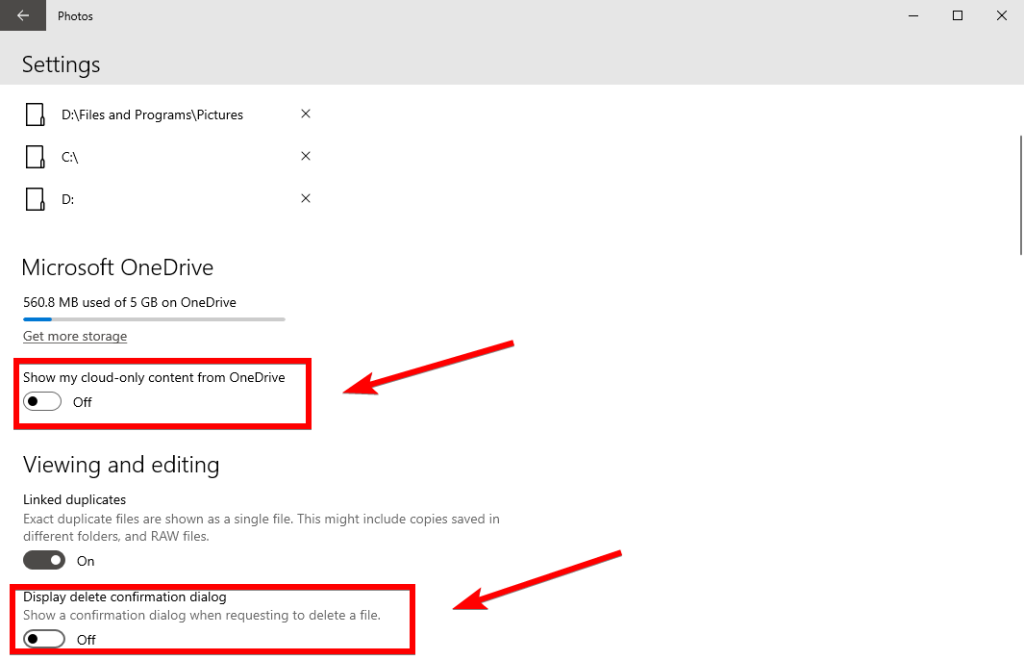
3. Turn off the option labeled Show my Cloud only content from OneDrive.
4. Additionally, toggle off the Display delete confirmation dialogue option.
5. Scroll down and turn off the option labeled Use hardware-accelerated video encoding when available.

6. The Photos app may consume a significant amount of memory while loading a pictures folder, causing high activity and usage, so turn off the indexing option that reads Disable indexing parts of your library stored on Network Locations.
Runs Apps Troubleshooter
1. Open the Settings window by pressing the Windows key + I.
2. Click on Update & Security in the Settings window.

3. In the same window, click on Troubleshoot > Additional troubleshooter.
4. On the right-hand side of the Settings window, scroll down and click on Windows Store Apps. Then, click on Run the Troubleshooter.

5. The troubleshooter will scan your computer for any issues with the app and suggest possible solutions.
6. Click Next to attempt the recommended solution and follow the on-screen instructions.
7. Reboot your computer to apply the changes to fix the Windows Photos app.
Restore the Libraries to Default
1. Open the Start menu and type Folder options.
2. Select File Explorer Options.
3. Go to the View tab and check the Show Libraries box.
4. Click Apply and OK buttons.

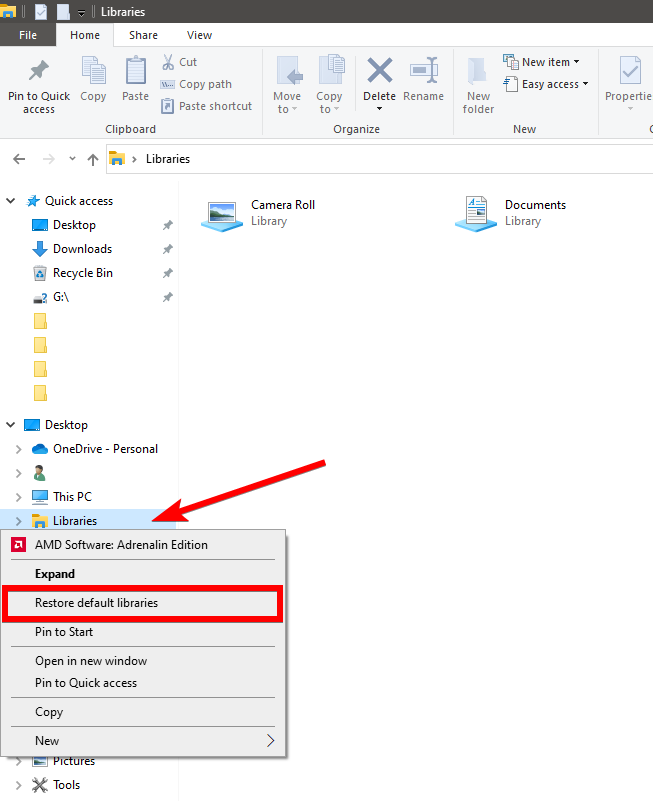
4. Open File Explorer and right-click on Libraries, then select Restore default libraries.
Install Updates in MS Store
1. Launch Microsoft Store.
2. Click on the downloads and updates icon in the top right corner of the Microsoft Store screen.
3. Click the Update All button to update all Microsoft Store app products.

4. Allow all the products to get updated, including Microsoft Photos. If the app needs an update, it will be installed automatically, resolving bugs.
Clear the Microsoft Store Cache
You can try clearing the cache for Microsoft Store manually by using the built-in command-line tool (WSReset.exe) to see if it resolves the issue.
Using Registry Fix
This fix involves modifying the Windows registry and restoring the classic Windows 7 photo viewer app to Windows 10.
1. Press Windows key + R to open the Run dialog.
2. Type regedit and hit OK.
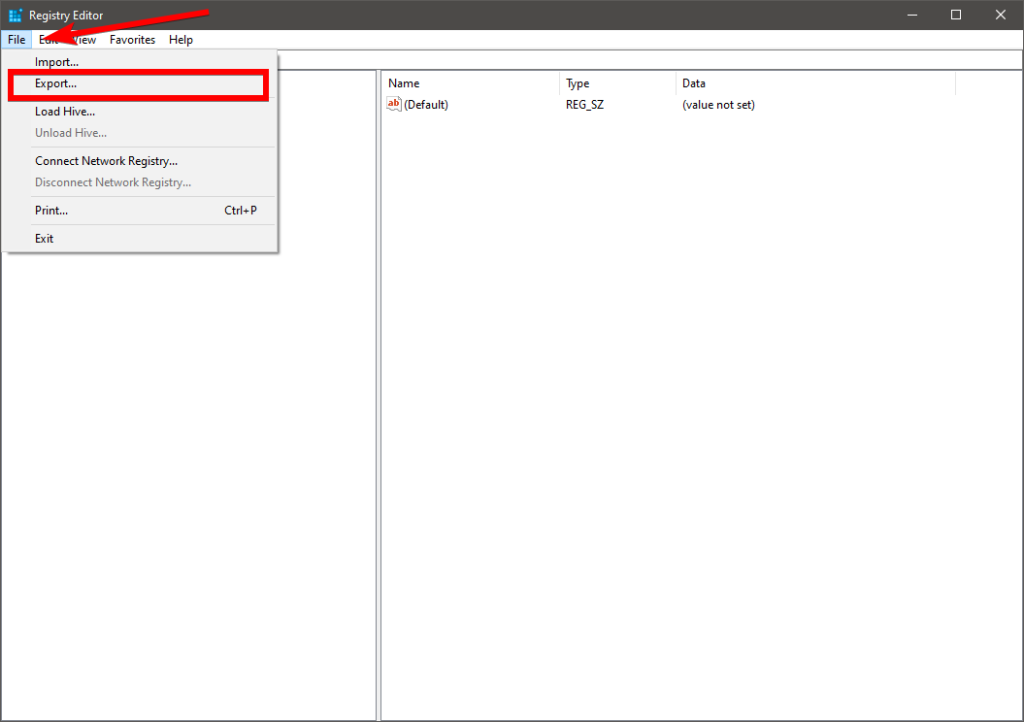
3. Once the registry editor opens, it’s recommended to back up your registry by clicking File > Export.
4. Open Notepad.
5. Copy the registry code provided below and paste it into Notepad:
Windows Registry Editor Version 5.00 [HKEY_CLASSES_ROOT\jpegfile\shell\open] “MuiVerb”=hex(2):40,00,25,00,50,00,72,00,6f,00,67,00,72,00,61,00,6d,00,46,00,\ 69,00,6c,00,65,00,73,00,25,00,5c,00,57,00,69,00,6e,00,64,00,6f,00,77,00,73,\ 00,20,00,50,00,68,00,6f,00,74,00,6f,00,20,00,56,00,69,00,65,00,77,00,65,00,\ 72,00,5c,00,70,00,68,00,6f,00,74,00,6f,00,76,00,69,00,65,00,77,00,65,00,72,\ 00,2e,00,64,00,6c,00,6c,00,2c,00,2d,00,33,00,30,00,34,00,33,00,00,00 [HKEY_CLASSES_ROOT\jpegfile\shell\open\command] @=hex(2):25,00,53,00,79,00,73,00,74,00,65,00,6d,00,52,00,6f,00,6f,00,74,00,25,\ 00,5c,00,53,00,79,00,73,00,74,00,65,00,6d,00,33,00,32,00,5c,00,72,00,75,00,\ 6e,00,64,00,6c,00,6c,00,33,00,32,00,2e,00,65,00,78,00,65,00,20,00,22,00,25,\ 00,50,00,72,00,6f,00,67,00,72,00,61,00,6d,00,46,00,69,00,6c,00,65,00,73,00,\ 25,00,5c,00,57,00,69,00,6e,00,64,00,6f,00,77,00,73,00,20,00,50,00,68,00,6f,\ 00,74,00,6f,00,20,00,56,00,69,00,65,00,77,00,65,00,72,00,5c,00,50,00,68,00,\ 6f,00,74,00,6f,00,56,00,69,00,65,00,77,00,65,00,72,00,2e,00,64,00,6c,00,6c,\ 00,22,00,2c,00,20,00,49,00,6d,00,61,00,67,00,65,00,56,00,69,00,65,00,77,00,\ 5f,00,46,00,75,00,6c,00,6c,00,73,00,63,00,72,00,65,00,65,00,6e,00,20,00,25,\ 00,31,00,00,00
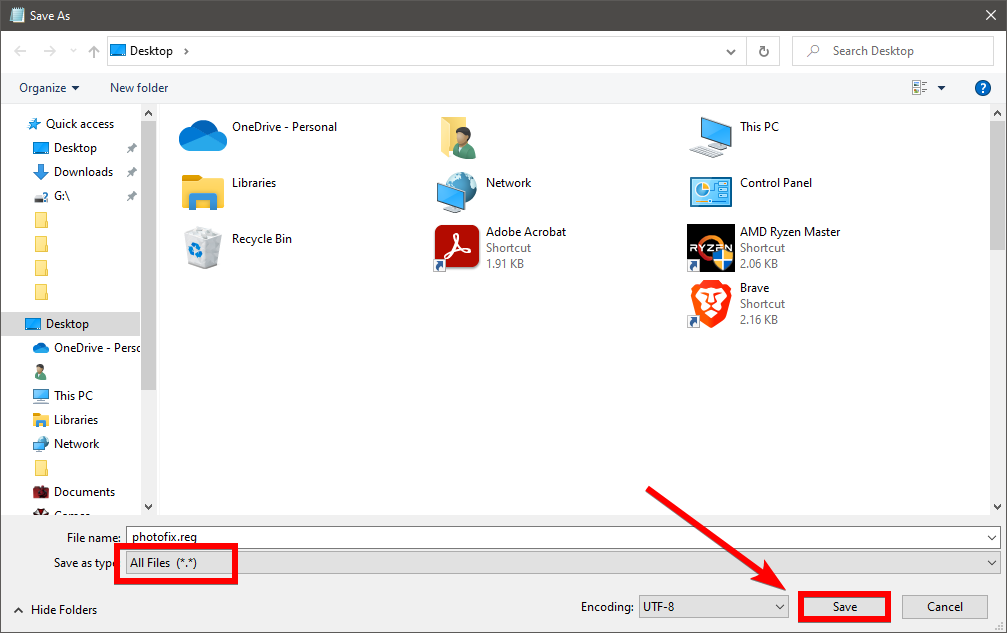
6. Click File > Save as.
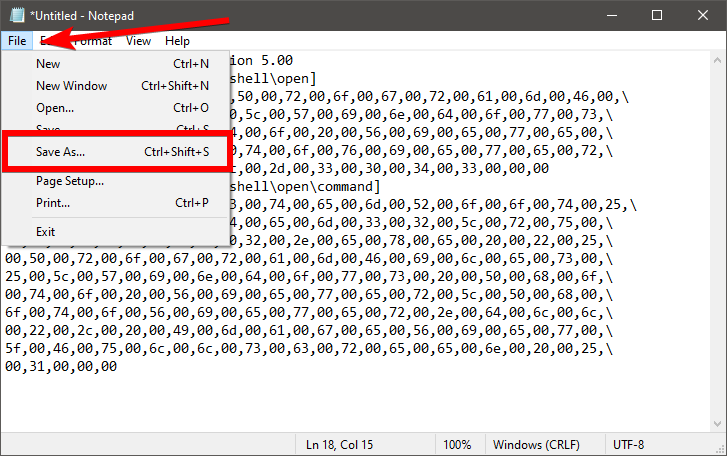
7. Name the file photofix.reg.
8. In the Save as type drop-down menu, choose All Files and click Save.
9. Right-click on the photofix.reg file you just created and select Merge.
10. Right-click on any image, select Open with, and then choose another app.

11. From the list of apps, select Windows photo viewer.
Update Windows
1. Open the Settings app.
2. Click on the Update & Security option in the Settings window.
3. Click the Check for updates button in the Windows Update section.

4. Windows will now check for any available updates. If updates are available, they will be downloaded and installed automatically.
5. Once the updates have been installed, you may need to restart your computer for the changes to take effect.
Install Windows Media Pack (Windows 10 N and KN)
1. Click on the taskbar search box and search for About your PC.
2. Click on About your PC from the search results.

3. Check the OS Build information. If you see a letter N or K in the OS Build, proceed to the next step.
4. Download the Media Feature
Pack.
5. Install the Media Feature Pack on your Windows 10 device.
Use a Professional Photo App
If the problem persists even after downloading and installing the latest Windows updates, it might be necessary to explore alternative solutions. One such option is to leverage the advanced editing features, organizing automation, and other capabilities professional photo editing tools offer.
To address the issue, consider investing in a photo editing or management tool that caters to your specific needs. With a wide range of options available in the market, you can choose a software solution that can help you manage your photos more effectively without encountering as many issues.
Perform a System Restore
If none of the above solutions work for you, you can try system restore to revert the changes to the previous working state. Here are the steps you can follow:
1. Type recovery in the start menu search and select the first result.
2. In the new window, click Open System Restore and then follow the prompts to select a restore point.

3. Choose a restore point before your Photos app problems start, ideally, and proceed with the process.
4. Alternatively, restore the old Windows Photo Viewer from here.
Get Back to Enjoying Your Photo Viewing Experience With Our Helpful Troubleshooting Steps and Fixes
Troubleshooting Windows 10 Photos App Issues: Get your photo viewing back on track with our comprehensive guide to fixing common problems in the Photos application. Explore our step-by-step solutions and enjoy a seamless experience with your cherished memories.