![[Repair Guide] Wi-Fi Sense Needs Attention Windows Error](https://cdn.techloris.com/app/uploads/2023/05/wifi-sense-needs-attention.png)
[Repair Guide] Wi-Fi Sense Needs Attention Windows Error

Wi-Fi Sense
Devices can connect automatically to wireless networks through Wi-Fi Sense in two different situations. The first is when the device is connected to open Wi-Fi hotspots linked to by other Windows 10 users with Wi-Fi Sense enabled. The term others refer to these users. The second scenario is when the device is connected to Wi-Fi hotspots that your friends have connected to in the past, regardless of whether they are open.
Microsoft defines friends as your Facebook, Outlook.com, or Skype contacts. It is worth noting that even if these networks are password-protected, you can still connect to them through Wi-Fi Sense without seeing the passwords as the system automatically connects you.
Problems With Wi-Fi Sense in Windows 10
There are two issues associated with Wi-Fi Sense on Windows 10. Firstly, sharing your Wi-Fi with everyone on your contact list is undesirable. Ideally, you may want to share it only with a few trusted members of your family or friends you know offline. However, the default setting enables everyone on your Facebook, Outlook, and Skype contact lists to access your Wi-Fi as long as they are within range.
Secondly, even though the password is encrypted when sent to both your friends’ computers and Microsoft, there is a risk that it could still be hacked. Moreover, cybercriminals will always attempt to breach the Microsoft database, which poses a potential threat.
How to Disable Wi-Fi Sense and Why
Microsoft stores the passwords in its database, posing a potential security risk since breaches can occur anytime. If it can happen to LastPass, it can happen to any other company, including Microsoft. No one can ever guarantee 100% security.
While it is unclear what type of encryption is used to store the passwords, it is only mentioned that they will be encrypted. Despite this, it is assumed that the encryption employed by Microsoft will be of high quality.
To configure Wi-Fi Sense in Windows 10, follow these steps:
1. Open the Settings app by pressing Win + I.
2. Click on Network & Internet.
3. Scroll down to find Manage Wi-Fi Settings.
4. Click on it to open the next panel.
In this window, you will be given the following options:
Connect to suggested open hotspots
Connect to networks shared by my contacts.
5. Set the second option to Off to prevent others from accessing your computer and to avoid the risk of being hacked.

6. Uncheck the three available options: Outlook.com contacts, Skype contacts, and Facebook friends.
After completing the steps outlined in the previous response, close the Settings app. This will turn off Wi-Fi Sense, which means that others won’t be able to use your Wi-Fi, and you won’t be able to use theirs either. I have turned off this feature as I consider it potentially dangerous, similar to using public hotspots.
Fix Action Needed for WiFi Prompt That Shows Up Repeatedly
Typically, the Wi-Fi prompt’s Action needed message pops up when the system detects a new Wi-Fi connection. Nonetheless, it can become bothersome when this message appears repeatedly for old trusted networks on the system.
When you select the Action needed for the Wi-Fi prompt, the browser window opens and directs you to the Microsoft Connection Test Page. This problem of encountering the prompt for trusted networks arises after a system upgrade.
This article will explore two methods for turning off the Action needed for the Wi-Fi prompt.
Using Registry Tweak
To begin with, let’s grasp the purpose of the registry tweak. Windows employs the Network Location Awareness (NLA) service to recognize a network and its modifications. The Network Connectivity Status Indicator (NCSI) module is embedded in this service.
It’s responsible for verifying the system’s successful network connection and identifying the type of network, such as the internet or intranet. Any alterations to the system’s network interfaces trigger the Action Needed prompt. By implementing this registry tweak, we will be deactivating the Active Probing attribute of the NCSI component.
1. Press the Win Key + R buttons on your keyboard to open the Run window.
2. Type regedit and press OK.

3. Click Yes in the User Account Control (UAC) window that appears.
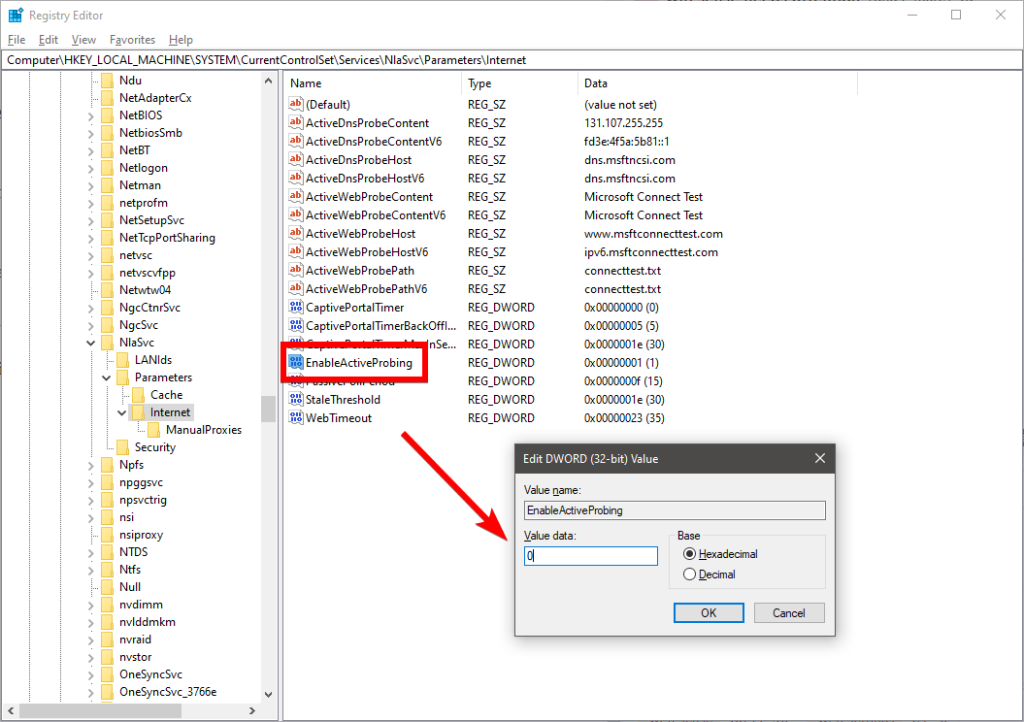
4. In the Registry Editor window, Navigate to the following location: HKEY_LOCAL_MACHINE\SYSTEM\CurrentControlSet\Services\NlaSvc\Parameters\Internet
5. Double-click on EnableActiveProbing in the right-hand side pane.
6. In the Edit DWORD window that opens, change the Value to 0, and click OK.
7. Navigate to the following location: HKEY_LOCAL_MACHINE\Software\Policies\Microsoft\Windows\NetworkConnectivityStatusIndicator.
8. Right-click on a space on the right side, choose New, then select DWORD (32-bit) Value.

9. Name the newly created DWORD as NoActiveProbe.
10. Double-click NoActiveProbe, change the Value to 1, then click OK.

11. Create one more key within the NetworkConnectivityStatusIndicator registry key named DisablePassivePolling.
12. Double-click on DisablePassivePolling and modify its value to 1.
13. Finally, click OK to save the value.
Using Group Policy Editor
Policy Editor is a powerful tool in the Windows operating system. It allows users to modify existing policies, create new ones, and apply them to their computer or network environment. With Policy Editor, administrators can configure their system’s user interface, set user access restrictions, define security settings, and even control how applications are used.
This makes it an important part of any IT department’s strategy for maintaining secure systems and ensuring compliance with company standards. Policy Editor can customize settings across multiple computers or an entire organization’s network.
1. Search for gpedit.msc in the Windows search box.
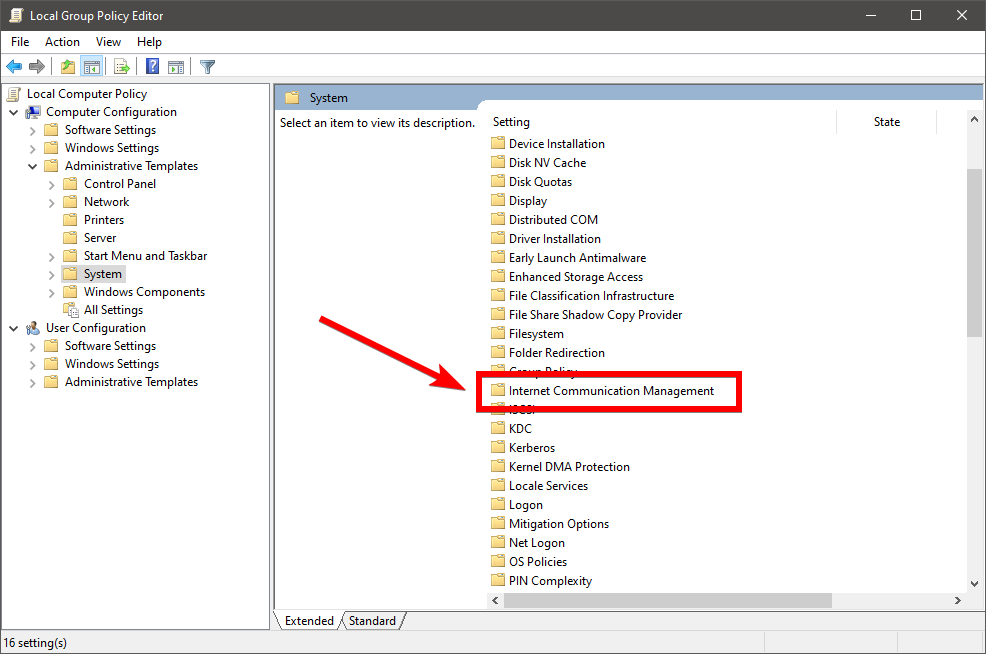
2. Navigate to Computer Configuration > Administrative Templates > System.
3. Double-click on Internet Communication Management on the right side.
4. Click on Internet Communication settings.
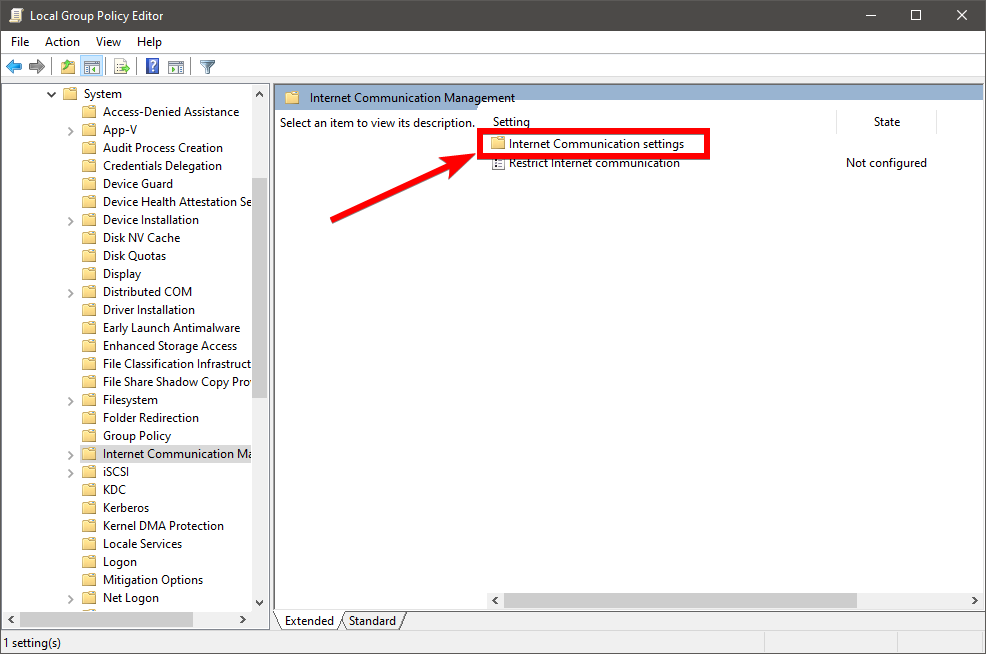
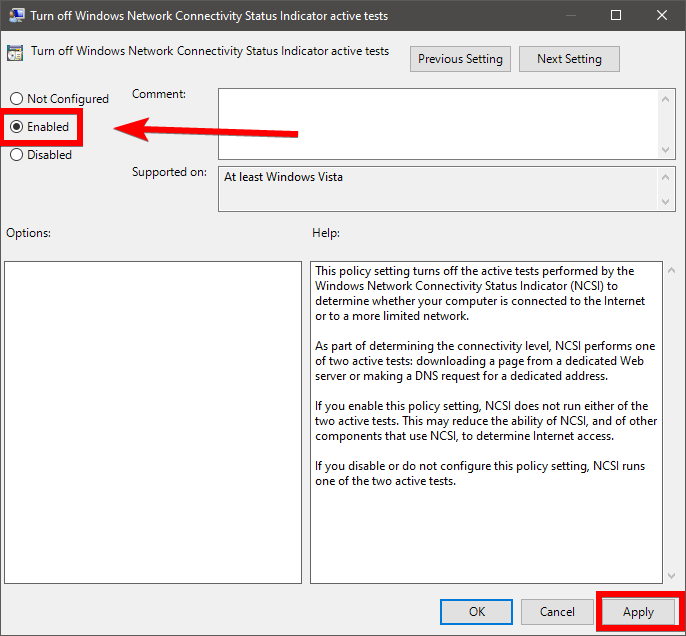
5. Double-click on Turn off Windows Network Connectivity Status Indicator active tests.
6. Choose the Enabled option.
7. Click on Apply.
8. Similarly, go to Computer Configuration > Administrative Templates > Network in Group Policy.
9. Double-click on Network Connectivity Status Indicator on the right side.

10. Double-click on Specify passive polling status.
11. Choose the Enabled option.
12. Click Apply and then OK.
Disconnect and Reconnect to the Wi-Fi
1. Click on the Wi-Fi icon located in the Taskbar.
2. Click on the WiFi Network you are currently connected to.
3. Click on the Disconnect button.

4. Right-click on the connection again and choose to Forget.
5. Click on the Wi-Fi connection and select Connect.
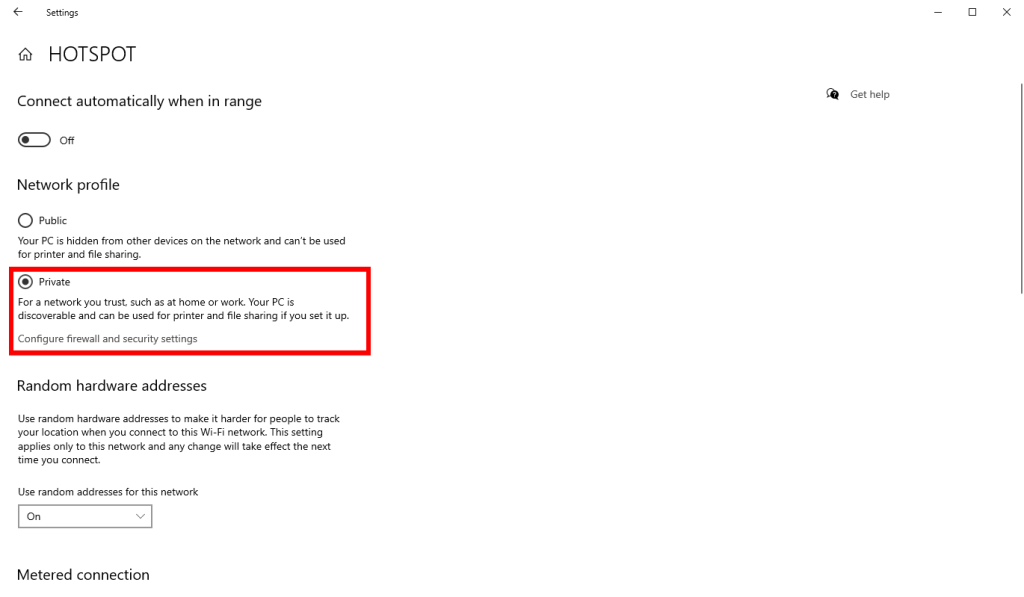
6. Once connected, click on the Properties below your connected Wi-Fi name.
7. Change the Network Profile from Public to Private.
Turn off Fast Startup
Windows Fast Start-Up is a feature that allows Windows to start up quickly and resume sleep mode faster than normal. It loads kernel data from the disk during the shutdown process, allowing the system to jump straight into startup when powering back on. This means users can instantly access their desktops and applications without waiting for the system to boot up.
1. Press the Windows key, type, and open Power & Sleep Settings,

2. Click on Additional Power Settings in the right pane.

3. Click on Choose What the Power Buttons Do.

4. Next, click Change Settings That Are Currently Unavailable and uncheck the Turn on Fast Startup option.

5. Save the changes and reboot your PC.
Tweak the PC’s Power Settings
1. Open the Windows search box.
2. Type Device Manager in the search box and click on the first result to open the app.
3. Locate the Network Adapter section in the list.
4. Right-click on your adapter and select Properties.
5. Go to the Power Management tab.

6. Uncheck the box next to Allow the computer to turn off this device to save power.
Keep Your PC Updated
When updating your PC, you should ensure that all the latest updates and patches have been installed. This includes both system and software updates, as well as any available security patches. Not only do these ensure that your computer is running optimally, but they can also help protect your Wifi sense on Windows from malicious attacks or errors.
These updates provide additional security measures for your device, such as enhanced encryption techniques and improved firewall protection. Regularly updating helps keep your programs up-to-date so they can perform more efficiently and accurately. This can be especially helpful in keeping your Wifi sense on Windows safe from potential problems or errors.
Ensure That You Are Staying Up to Date With Your Internet Provider
It is important to keep your internet provider’s maintenance up-to-date to ensure you have an optimal connection to the web. Keeping the internet provider’s maintenance current helps prevent any wifi sense issues with Windows, as these are related to network security settings and protocols.
Ensuring that your internet provider’s maintenance is always kept up-to-date ensures that all of your devices connected to the same network have secure access to the web. This helps to protect your personal information and prevents any issues related to wifi sense that may arise. Additionally, it can help ensure faster speeds for internet browsing, streaming, and downloading content.
Get Your Wi-Fi Back on Track: Resolve Wi-Fi Sense Attention Error With Ease
In this comprehensive guide, we have explored the Wi-Fi Sense Needs Attention error in Windows and provided step-by-step solutions to troubleshoot and resolve it. Following the methods outlined in this guide, you can regain control of your Wi-Fi and eliminate the Wi-Fi Sense Needs Attention error. Whether adjusting your Wi-Fi settings, updating drivers, or disabling Wi-Fi Sense, these solutions will help you overcome the issue and enjoy a seamless wireless connection on your Windows device. Say goodbye to the Wi-Fi Sense Needs Attention error and experience uninterrupted connectivity again.
Frequently Asked Questions About WiFi Sense Not Working
Why Is My WiFi Sense Not Connecting to the Internet?
Your My Wifi Sense might not be connecting because of router settings. Your router could be set up so that it doesn’t allow certain devices (like My Wifi Sense) to access the Internet. Try checking the settings on your router, and see if there’s any way to change them so that My Wifi Sense can reaccess the Internet.
What Does WiFi Sense Do on Windows?
Wifi Sense is a feature built into Windows 10 that allows you to easily connect to nearby wireless networks without entering your password each time. It also helps you share access with friends and family when in range, so they don’t have to bother asking for the password every time.
What Causes WiFi Sense to Stop Working?
Hardware issues are one possible cause of Wifi Sense not working correctly, including faulty cables, dirty router contact points, and incorrect power sources. To check for these issues, review your router setup to ensure that all cables and ports are accurately connected. Additionally, check to see if the power source adequately supplies energy to the router.