![[Usage Guide] How to Setup Scheduled Tasks in Windows](https://cdn.techloris.com/app/uploads/2023/04/A-Guide-for-Scheduled-Task-in-Windows.png)
[Usage Guide] How to Setup Scheduled Tasks in Windows

How to Create an Automated Task Using Task Scheduler on Windows 10
This guide will demonstrate creating and scheduling your first task using Task Scheduler on Windows 10. This powerful tool enables users to automate tasks by executing programs, running commands, and performing script functions at specified times or in response to particular events.
While Task Scheduler is typically used by the system and certain applications for maintenance, anyone can utilize its capabilities. By monitoring system time and events, Task Scheduler executes tasks when specific conditions are met. We will cover basic and advanced task-creation methods and provide a step-by-step walkthrough.
How to Create a Basic Task on Task Scheduler
1. Open the Start menu, type Task Scheduler, and then open the app.

2. Right-click the Task Scheduler Library branch and select the New Folder option.

3. Type a name for the folder, such as Tasks1, and click OK.
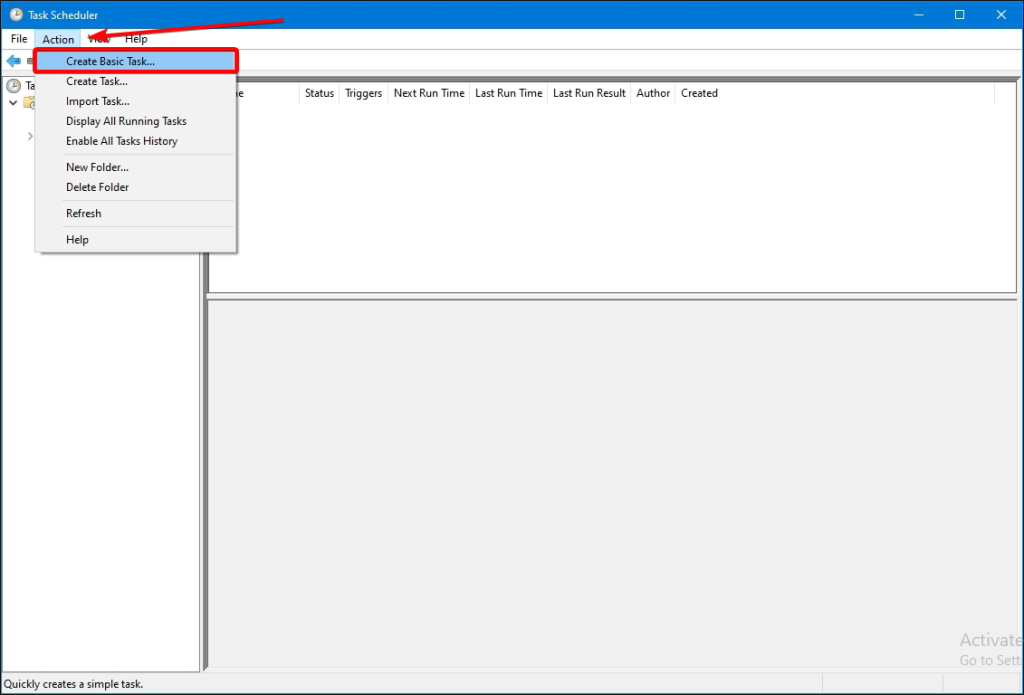
4. Expand the Task Scheduler Library branch, select the Tasks1 folder, and click the Action menu.
5. Choose the Create Basic Task option.
6. Type a name and optional description for the task, and click Next.
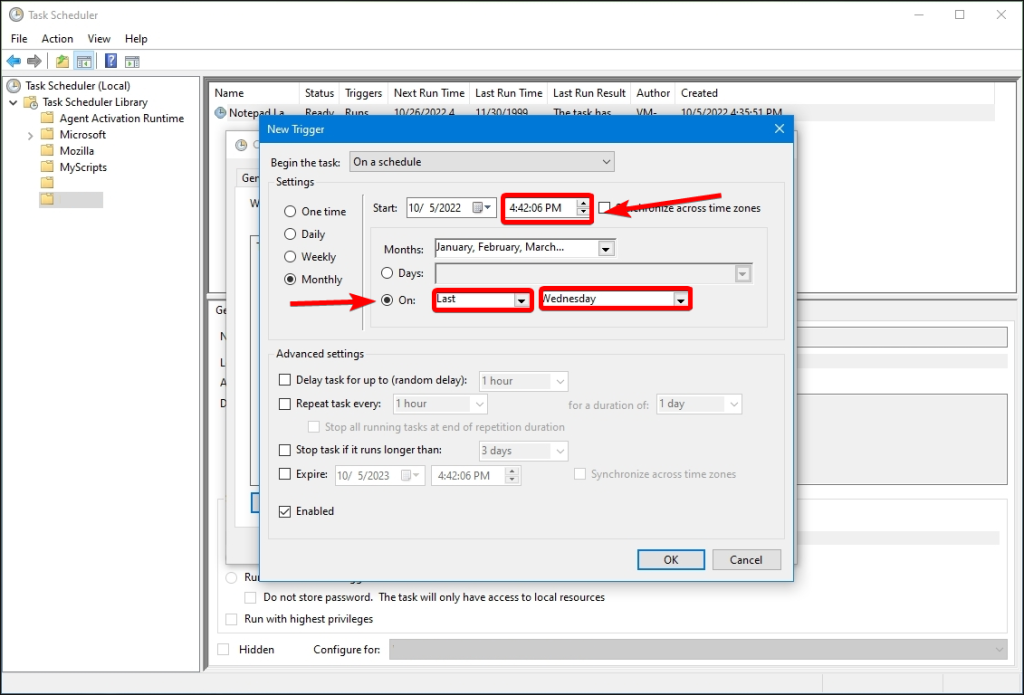
7. Select the Monthly option and click Next again.
8. Use the Start settings to specify when and at what time the task should run.
9. Use the Day or On drop-down menu to specify the days of the week on which the task will run.

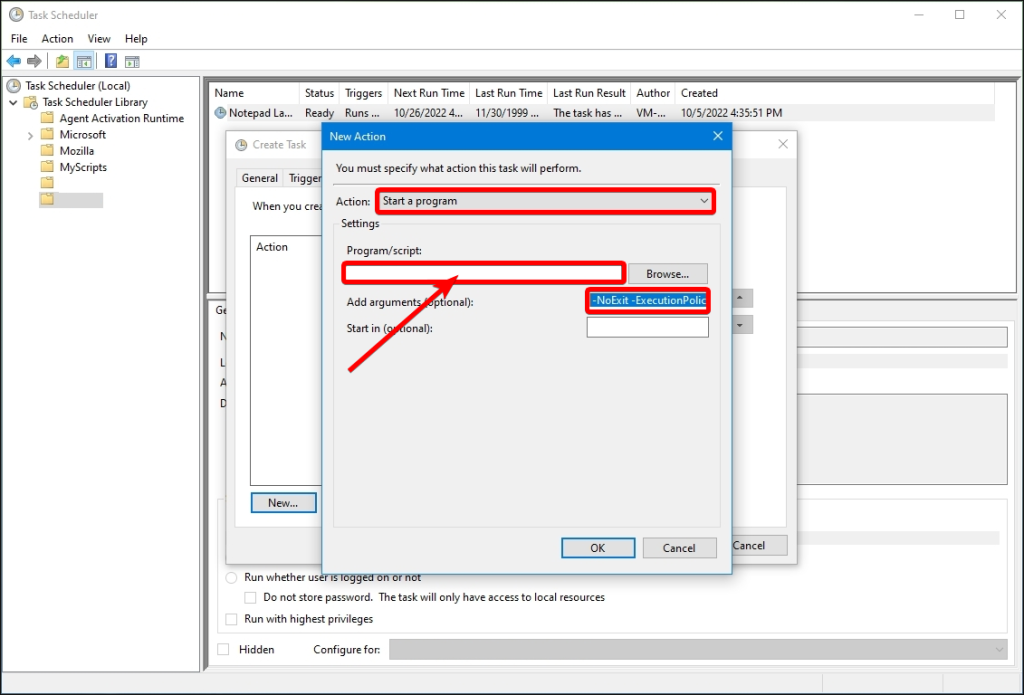
10. Click Next and select the Start a Program option.

11. Specify the path for the application and, if necessary, add arguments and/or specify the starting folder, then click Next.

12. Click Finish. Once these steps are completed, the task will be saved and run automatically according to the specified schedule.
How to Create an Advanced Task on Task Scheduler
1. Open Task Scheduler.
2. Right-click the Task Scheduler Library branch and select the New Folder option.
3. Type a name for the folder – for example, OurTasks. Click the OK button.
4. Expand the Task Scheduler Library branch, and select the OurTasks folder.
5. Click the Action menu. Select the Create Basic Task option. This will open create task window.
6. In the Name field, type a short descriptive name for the task.

7. In the Security options section, you can configure which administrator account can run the task.

8. Click the Triggers tab, then click the New button.
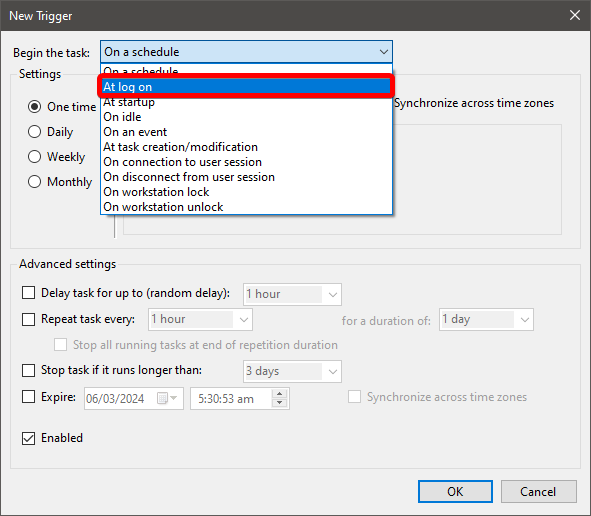
9. Use the Begin the task drop-down menu to select one of the many triggers, including On a schedule, At startup, On workstation unlock, and many others. (For this guide, select the On a schedule option.)
10. Using the Start settings, specify when the task should start running and the time (very important).
11. Select the Monthly option from the left side.
12. Use the Months drop-down menu to select the months the task will run.

13. Use the Days or On the drop-down menu to specify the task’s duration.
14. Click the OK button.
15. Click the Action tab and select New.
16. Select the Start a Program option from the Action drop-down menu.
17. Under the Settings section, specify the application’s path in the Program/script field.
18. Click the OK button.
19. Click the Conditions tab.
(Optional) The Conditions tab includes settings that, combined with the Triggers settings, will determine when the task should run.
20. Click the OK button.
21. Click the Settings app.
(Optional) The Settings app includes additional options that will directly affect the behavior of the task.

22. Click the OK button.
How to Run, Edit, and Delete a Task on Task Scheduler
You can view all your tasks on the page along with details like the triggers, the last run time, and the next scheduled run time. Alternatively, you can choose a task and utilize the Actions pane on the right to carry out tasks such as running, quickly ending, disabling, or editing the job.
1. Start Task scheduler app
2. Expand the Task Scheduler Library branch.
3. Select the folder with your tasks.
4. To run a task on demand, right-click it and select the Run option.
5. To edit a task, right-click it and select the Properties option.
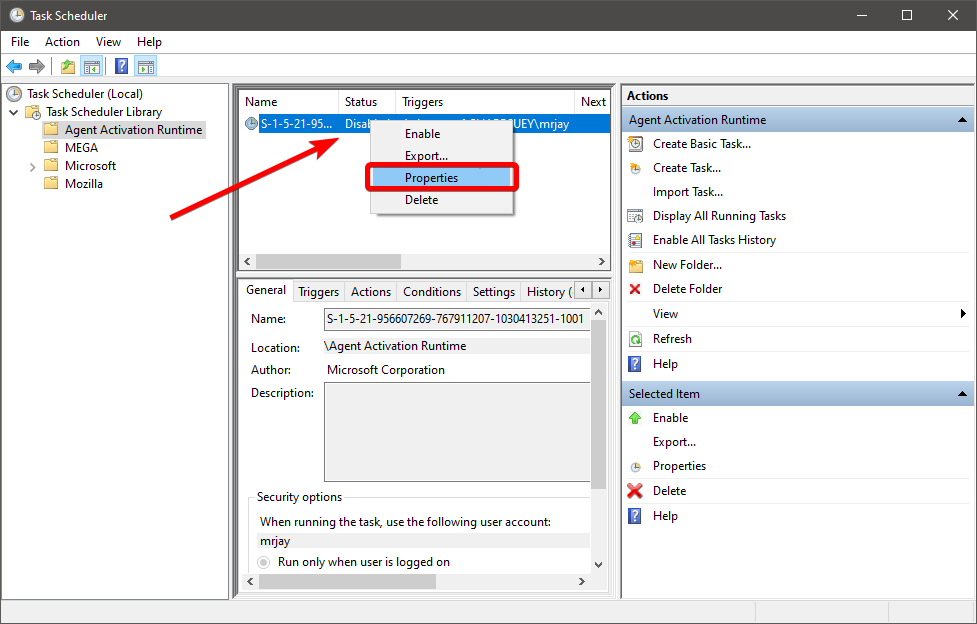
6. To delete a task, right-click it and select the Delete option.
From Command Line
If you want to include a scheduled task in a script, you can add it through the command line. This involves using the schtasks command along with parameters that specify the schedule for the task.
To schedule a task using Command Prompt, you can use the schtasks command followed by various parameters that define the task’s settings. Here’s an example command:
schtasks /create /tn “Task Name” /tr “Executable File Path” /sc daily /st 12:00 /du 24:00
This command will create a task named Task Name that runs the specified executable file daily at 12:00 PM, and lasts 24 hours.
Here’s a breakdown of the parameters used in the command:
/create: specifies that a new task should be created.
/tn “Task Name”: sets the name of the task.
/tr “Executable File Path”: sets the path to the executable file that should be run by the task.
/sc daily: sets the schedule to daily. Other options include “weekly”, “monthly”, “once”, and more.
/st 12:00: sets the start time of the task to 12:00 PM.
/du 24:00: sets the duration of the task to 24 hours.
You can customize the parameters to suit your specific scheduling needs.
From GUI
You can schedule tasks using the Task Scheduler graphical user interface (GUI) by following these steps:
1. Open the Task Scheduler in Windows by typing Task Scheduler into the Start menu and selecting the top result.
2. Click Create Task in the Actions pane on the right-hand side of the Task Scheduler window.
3. In the General tab of the Create Task dialog box, enter a name and description for the task, and choose whether to run the task with the highest privileges (if needed).

4. In the Triggers tab, click New to create a new trigger for the task. Set the schedule and frequency for the task, and click OK.

5. In the Actions tab, click New to create a new action for the task. Choose whether to run a program, send an email, or display a message, and then provide the necessary details and settings.
6. In the Conditions tab, choose any conditions that need to be met before the task will run (e.g. only when the computer is idle or plugged in).

7. In the Settings tab, choose any additional settings for the task (e.g. whether to stop the task if it runs longer than a certain amount of time).
Click OK to create the task and schedule it according to your chosen settings.
Once the task is created, you can view and manage it in the Task Scheduler library.
Types of Triggers

To create a task, the initial step involves identifying the trigger that will activate the task. A trigger consists of a set of conditions that, when met, initiate the task.
You can locate the triggers for a task in the Trigger tab, which can be accessed through the Task Properties or the Create Task menu. If you want to create new triggers for your task, you can do so from the Create Task menu.
Triggers for Schedule
This type of trigger is scheduled to activate the task based on settings configured by you. You can determine the trigger frequency through the trigger settings, such as a one-time occurrence, daily, weekly, or monthly.
You can schedule a task using time-based triggers guided by your computer’s date and time. You can choose to synchronize the time interval with Coordinated Universal Time (UTC) by selecting the Universal box. This feature allows you to coordinate multiple tasks independently in different time zones.
There are several types of time-based triggers available in the Task Scheduler. The One time trigger allows you to enter a specific date and time for the action.
The Daily trigger is based on a recurrent system, and you can choose the starting date and time and the interval between each repetition (e.g., every other day).
If you prefer a Weekly trigger, you can select the date and time to start the schedule, choose the days for the task to run, and specify how often to repeat it. The recurrence interval is similar to the Daily trigger, with the task repeating weekly, every two weeks, and so on.
The Monthly trigger is similar to the others, but you only need to select the week and day for the task to run. The recurrence system is the same, with one month’s minimum repetition interval.
Triggers for Logging On
This trigger type activates an action when a user logs onto the computer. It includes a customization feature that lets you specify whether the action should occur for all users or only specific users.
Triggers for Idle State
This trigger specifies the action when the computer enters an idle state. You can configure the trigger conditions through the Conditions tab in the Create Task menu or the Task Properties window.
Triggers for an Event
The event-based trigger specifies the action to occur after a particular event occurs. You can select from a predefined list of events or define a specific event.
Only one event from the specific event log is required to trigger a task with the Basic trigger settings. With the Custom trigger settings, you can enter an XML event query or a custom filter for the events that activate the task.
Triggers on Workstation Lock
This trigger type activates the task when the computer is locked. You can configure whether this action should be available for any user or only for specific users through the settings. The same options are available for the unlocking station process.
Advanced Settings of Triggers

You can add a delay between the trigger and the task using the Delay task for up to (random delay) feature. This allows you to set a random time for the delay between the trigger and the task execution. For instance, if you set a time-based trigger for 5:00 PM and a 30-minute delay, the task will run anytime between 5:00 PM and 5:30 PM.
Another useful feature is Repeat task every, which allows you to specify a time interval for the task to repeat after the initial trigger. Once the task is triggered, it will wait for the designated time before triggering again. This process will continue until the allocated period is over.
Type of Actions

In Task Scheduler, an action refers to the specific task or part of a task executed when the trigger conditions are met. Each task can have up to 32 actions, and each action comes with its own set of settings that dictate how the task is carried out.
Action That Activates a Program
This type of task action is designed to initiate the execution of a program or script.
In the Actions tab’s Settings menu, you can specify the name of the script or program you want to run. If the program or script requires command line arguments, you can modify them by adding, deleting, or editing them in the Add arguments (optional) text box.
Additionally, the Start In (optional) field allows you to specify the directory where the command line for running your script or program should start. This directory should lead to the executable file or the script file that references the files used by the executable.
Action that Sends an E-mail

This action is beneficial for individuals who frequently use email for communication. To set up this action, you must provide your email address, the recipient’s email address, the email subject, the message you want to send, and the option to attach files to the email.
Action That Displays a Message
This action serves as a reminder by displaying a text message with a title on your screen. Go to the Actions menu and select the “Display a message” category to use it. Then, enter the title and message for your reminder.
Types of Task Conditions
Task conditions determine whether a task can be executed after it has been triggered. Although optional, they can help you create a more precise task based on specific operating situations.
Go to the Conditions tab in the Task Properties or Create Task menu to access task conditions. These conditions are grouped into three categories: idle, network, and power.
Idle Conditions
With this condition, tasks can only run when the computer is idle for a specified period. Every 15 minutes, Task Scheduler checks for the idle state of the computer by detecting if the screensaver is on or if CPU and memory usage is at 0%. Once the idle state is detected, a countdown begins, and the task is reset if the user resumes work.
The task can be triggered immediately upon entering the idle state by setting the time condition to 0. By enabling Stop, if the computer ceases to be idle, the task will stop running when the computer is no longer idle. To repeat the task every time the computer remains inactive, enable Restart if the idle state resumes.
Power Conditions
This condition is designed for laptops and allows tasks to run when connected to a stable power source. It can also be configured to prevent tasks from running on battery power. This condition can create a task that starts the computer from sleep mode and runs actions after being triggered. However, this can be disruptive during resting hours, so keeping the device at a distance or turning it off during these times is recommended.
Network Conditions
This condition allows you to set a task to run when a particular named network is available or any network connection is present during task activation. Additionally, if the task requires network conditions, you can configure this in the task conditions.
Task Settings

The settings determine how a task is executed, deleted, or stopped. You can access the panel containing all the available settings by navigating to the Settings tab in the Task Properties or the Create Task menu.
Allow Tasks to Run on Demand
In this section, you can determine whether the task can be run manually before or after its scheduled time by enabling the option to run it on demand. This means that the task can be initiated at any time as needed.
Run a Task as Soon as Possible After a Scheduled Start Is Missed
Enabling this setting will ensure that a task starts running even if it cannot do so at the scheduled time for various reasons, such as the device being turned off or Task Scheduler being occupied. By default, the Task Scheduler does not immediately start the task when the service becomes available. Instead, it waits for 10 minutes before initiating the process.
If the Task Fails, Restart Every Period
This setting enables the Task Scheduler to retry running a task if the previous attempt failed due to an error. You can specify the time interval between attempts and the maximum number of attempts allowed.
Stop a Task if It Runs Longer Than the Time Period
Using this setting, you can define the duration a task should run. This feature is typically employed to restrict tasks that require significant time to complete, allowing you to preserve resources on your computer.
If the Task Is Not Scheduled to Run Again, Delete It After a Time Period
This function automates a task that would otherwise require manual action. When scheduling a task to run only once, you may not need it again and can avoid cluttering your task list by deleting it after use. This setting automatically deletes the task after a user-defined period following activation. It is important to note that at least one trigger with an expiration date must be included in the task to enable this option.
If a Task Is Already Running, You Must Know a Few Things
The Task Scheduler offers several options to avoid issues when running a task that already has an instance running. You can run a new instance in parallel, queue a new instance to start after the current one ends or stop the current instance from running the next one. It’s important to note that starting a new instance without proper configuration can cause the application to stop running altogether.
Mastering Scheduled Tasks in Windows: A User-Friendly Guide
In this comprehensive guide, we have explored the ins and outs of setting up scheduled tasks in Windows, empowering you to automate routine processes and enhance productivity. By following the step-by-step instructions and leveraging the built-in Task Scheduler tool, you can effortlessly schedule tasks to run at specific times or trigger events, launch programs, run scripts, or perform system maintenance. We have covered various aspects, including creating basic and advanced task schedules, configuring triggers and actions, and managing task settings. With this newfound knowledge, you can harness the power of scheduled tasks to streamline your workflow, optimize resource usage, and save time. Automating repetitive tasks gives you more freedom to focus on other important aspects of your work. Embrace the possibilities of scheduled tasks and unlock the full potential of your Windows operating system.