![[Repair Guide] Preview Pane Not Working Windows 10](https://cdn.techloris.com/app/uploads/2023/04/Preview-Pane-Not-Working-Windows-10.png)
[Repair Guide] Preview Pane Not Working Windows 10

Welcome to TechLoris.com’s extensive repair guide designed to diagnose and resolve one of the most common issues faced by Windows 10 users: the not working Preview Pane. This step-by-step repair manual will provide easy instructions to rectify this frustrating problem.
You’ll learn how to enable the Preview Pane, update your graphics driver, disable certain settings, reset File Explorer, and execute other necessary actions to regain the proper functionality of the Preview Pane in Windows 10. Be it a minor adjustment in your settings or a comprehensive malware scan to ensure system security, we address it all.
So, if you’re stuck with a non-functional Preview Pane, keep reading this guide to uncover and fix known and underlying issues. Improve your desktop navigation experience with this comprehensive troubleshooting fix.
Recommended: To easily install drivers automatically, use the tool below.
How to Repair Preview Pane Issues
Ensure to Enable the Preview Pane
If the preview pane is not working error is appearing on the screen, or you cannot reach folder options windows in file explorer, then the issue is linked with the preview handlers. Make sure the preview pane is enabled on the device. Here are the steps to check or enable the preview pane in this context.
Step 1: Launch file explorer from the Windows main menu. Click the Windows icon and scroll in the list of options. Select the icon for file explorer and double-click it to launch. Alternatively, click the Windows key+ E shortcut keys on the keyboard to open file explorer.
Step 2: In the file explorer window, navigate to the view tab in the headers menu. Click the tab and select the option of the preview pane. It will be enabled.

Enable Show Preview Handlers
If you want the preview pane to work appropriately on the device in file explorer, you should enable the option to show preview handlers, which can be enabled from the advanced settings in folder options. Here are the steps to follow for fixing the preview pane not working.
Step 1: Launch file explorer from the Windows key+ E shortcut from the keyboard.
Step 2: In the file explorer menu, move to the view tab and click it.

Step 3: Click options to launch the folder options window in the view tab menu.
Step 4: In the folder options window, navigate to the view tab, and under the section of advanced settings, check the box for the option of Show preview handlers in preview pane. Click ok to complete the action.

Disable the Always Show Icons Setting
If you have enabled the option for show icon settings, then the preview pane not working error would hinder the preview pane from functioning in file explorer. In this context, disabling always show icon settings can resolve the preview pane not working issue. It will restore defaults for file explorer settings. Here are the steps to follow:
Step 1: Launch file explorer from the Windows main menu. Type file explorer in the taskbar’s search and double-click the option in the list to open the menu.

Step 2: In the file explorer window, view tab and click options at the end of the ribbon. It will launch the folder options pop-up window.
Step 3: In the folder options window, click the View tab, and under the advanced settings section, uncheck the box for the option of Always show icons, never thumbnails. Click apply, followed by clicking ok to save changes.
Restart Windows Explorer
Any issue with the file explorer may lead to the preview pane not working. The files explorer provides a graphic user interface for all the files and folders on the device. If file explorer is the reason behind the preview pane not working error, restarting the Windows file explorer via task manager can resolve the preview pane option problem. Here are the steps to follow:
Step 1: Launch task manager from the Windows main menu. Type task manager in the taskbar’s search and double-click the option to open.

Step 2: In the task manager window, navigate to the processes tab and click it. From the list, locate the option of Windows Explorer.
Step 3: Click the option of windows explorer process followed by clicking restart at the bottom of the window.

Reset File Explorer
If restarting the windows explorer service didn’t help the preview pane to work, then resetting the file explorer is the next option. Here are the steps to follow:
Step 1: Launch file explorer from the Windows key+ E shortcut keys, and in the menu, click the view tab, then select the options tab to launch the folder options window.
Step 2: In the folder options window, move to the option general tab, and under the privacy section, click the button for restore defaults.

Step 3: In the next step, click the View tab, and under the advanced settings section, click the button to restore defaults. Click Apply, followed by clicking ok to complete the action.

Change File Explorer Startup Mode
Sometimes the issue with the preview pane is associated with its startup mode, i.e., the mode in which it will open. If you have selected quick access mode for file explorer to open, then changing it to the option This PC can fix the problem with the preview pane. Here are the steps to follow:
Step 1: Launch file explorer from the Windows main menu. Right-click the Windows icon and double-click the file explorer icon to open.
Step 2: In the file explorer menu, click the view tab and the options icon to launch the folder options window.
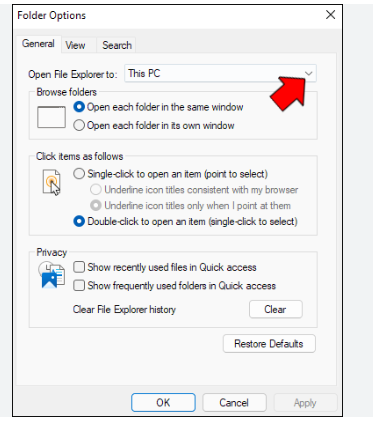
Step 3: In the folder options window, click the General tab, and in the section of open file explorer to option select This PC from the drop-down list. Click Apply, followed by clicking ok to complete the action.
Change Performance Mode
The preview pane view issue can be resolved by setting the device to its best performance mode. It can be done with advanced settings. Here are the steps to follow:
Step 1: Launch the view advanced system settings option from the Windows main menu. Type view in the taskbar’s search and double-click the option in the list to launch the pop-up window.

Step 2: In the system properties window, click the advanced tab under the performance section, and click the button settings.

Step 3: In the performance options menu, click the visual effects tab and check the box to adjust for best appearance. Click Apply, followed by clicking ok to save changes.

Check Hard Disk Response Issues
For resolving any hardware/hard disk response causing a preview pane error, one can use the Chkdsk scan. The Chkdsk command via the command prompt can fix software and hardware-associated errors. It runs a scan and fixes the error. It helps to check and correct disk errors automatically on the device. Here are the steps to follow.
Step 1: Launch the command prompt from the Windows main menu. Type cmd in the taskbar’s search and click the option in the list. Select the option of run as administrator to open a command prompt with administrative privileges.
Step 2: In the command prompt, type chkdsk c: /f /r and click enter to continue. In the next line, type Y to complete the action. Restart your device and check if the preview pane works properly.

Update Graphics Driver
Outdated windows cause several functional errors; the same goes for graphic drivers. Using outdated graphic card drivers on the device may halt the system’s functionality and cause the preview pane not to work problems. Updating the graphic drivers can resolve the error. Here are the steps to update graphic card drivers on the device.
Step 1: Launch the Run utility by Windows key +R, and in the run command box, type devmgmt.msc and click ok to continue.

Step 2: In the device manager menu, select the option of display adapter and expand it. A list of all graphic drivers will appear on the screen.
Step 4: Right-click the desired drivers and select the update driver option from the context menu.
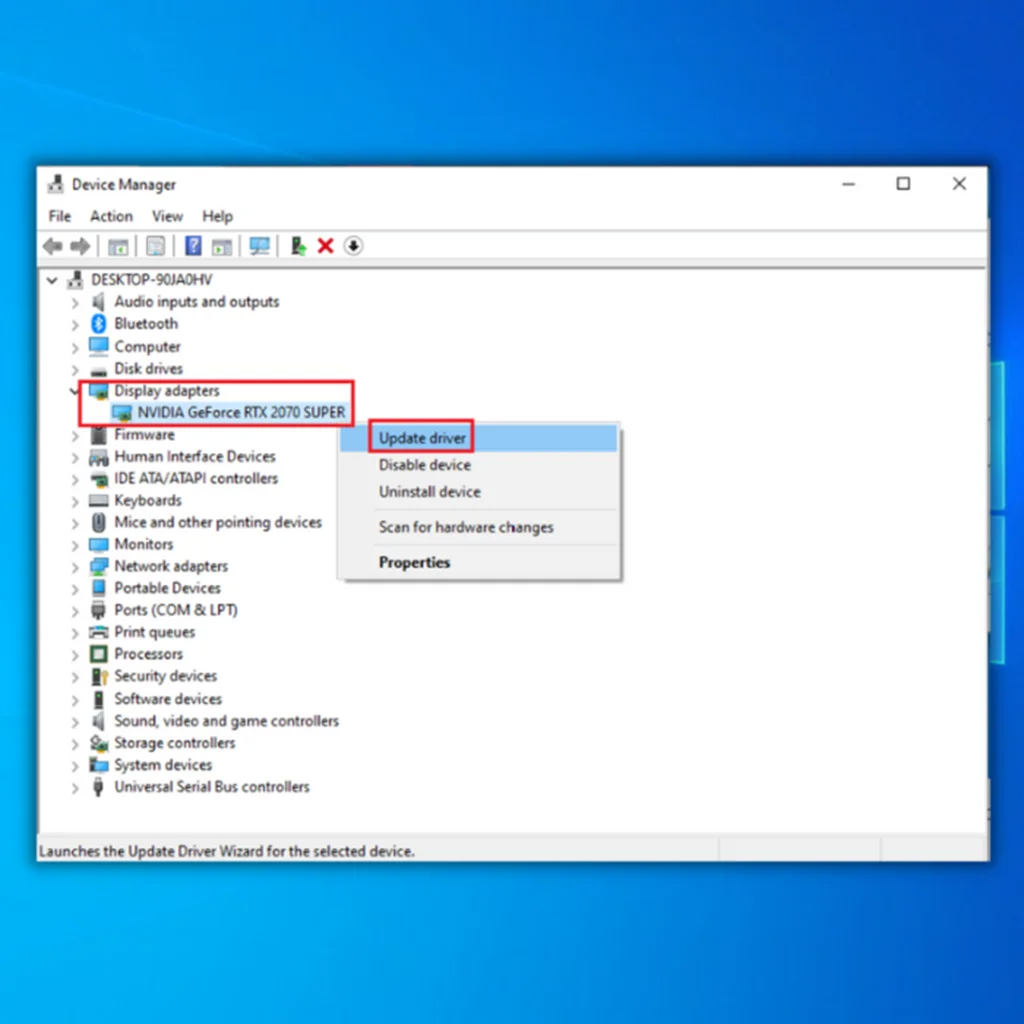
Step 5: In the next step, select the option to Search automatically for drivers. WOS will scan for all available options and install the compatible ones.
Run a Malware Scan
Any potential viruses or malware that threatens your device can result in functionality errors. The same goes for windows file explorer. If malware attacks the system files linked to windows explorer, it can result in a preview pane functionality error. Here is how you can scan the malware on the device.
Step 1: Launch settings from the Windows key+ I shortcut keys via the keyboard.
Step 2: In the settings menu, select the update and security option, then choose the option of Windows security.
Step 3: Select virus and threat protection from the left pane in the Windows security menu.
Step 4: Run the quick scan for malware in the virus and threat protection section. Follow the on-screen wizard to run the scan and fix the malware issue.

Run an SFC Scan
If the windows explorer preview pane has stopped working, it could happen due to corrupted system files of the extension. The SFC scan can detect and resolve the file’s corruption error in this context. Here is how you can run the scan.
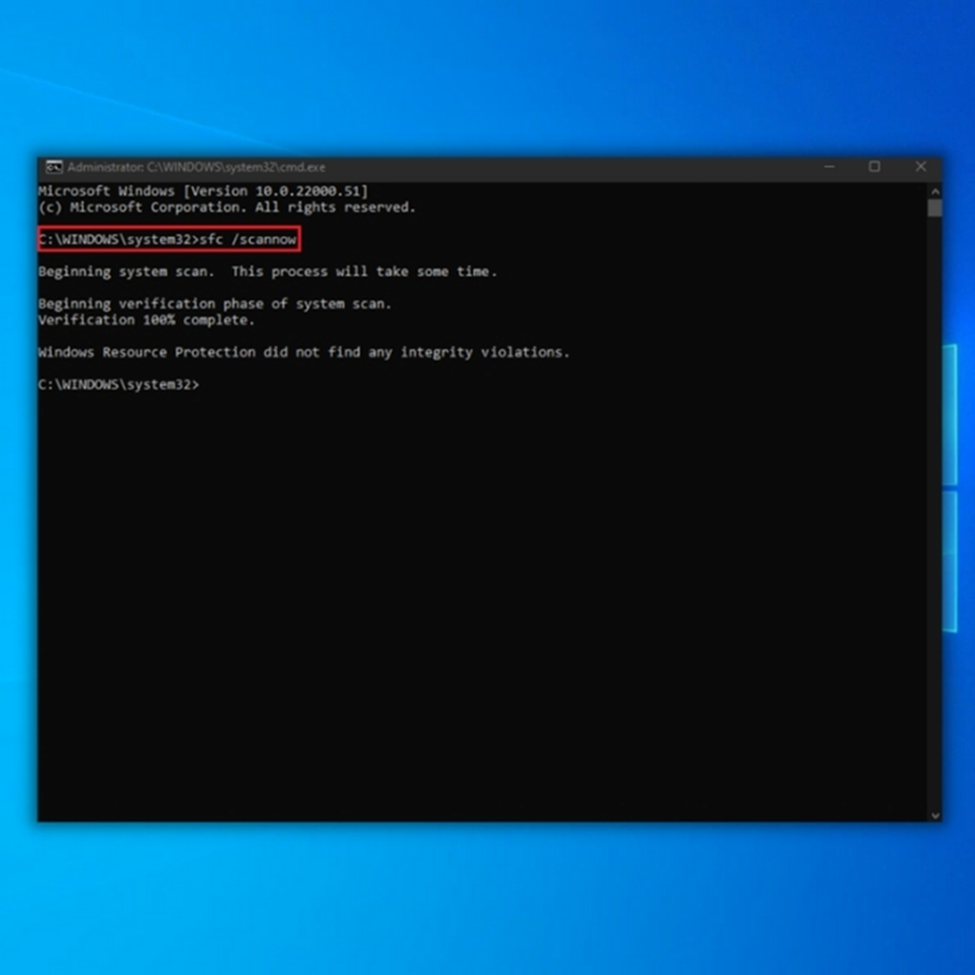
Step 1: Launch the command prompt by taskbar’s search. Type cmd in the search box and click the option to launch the command prompt. Choose the option of run as administrator.
Step 2: In the command prompt, type sfc /scannow. Click enter to continue. The SFC scan will initiate, and the issue will be resolved as soon as it completes.
Comprehensive Guide to Fix the Issue With the Preview Pane in Windows 10
In this detailed repair guide, we have provided step-by-step instructions to help you resolve the frustrating issue of the Preview Pane not working in Windows 10. By following the methods outlined here, you can troubleshoot the underlying causes of the problem and implement effective solutions to restore the functionality of the Preview Pane.
Whether it’s enabling the Preview Pane in File Explorer, updating your display drivers, or resetting the Preview Handler settings, these troubleshooting steps will help you overcome the issue and regain the ability to preview files seamlessly.
Remember to follow the instructions carefully and choose the best methods to suit your situation. With this comprehensive repair guide, you can confidently fix the Preview Pane not working issue in Windows 10 and enhance your file browsing experience.
Frequently Asked Questions About the Preview Pane Not Working in Windows 10
Why can’t I enable preview pane?
Enabling Preview Pane in Windows is a great way to quickly identify the content of a file without needing to open it. When this option is disabled, you must open every file individually to view the contents. If your Preview Pane is not enabled, there are several possible reasons.
How does the preview pane affect PDF files?
The Preview Pane is a feature of Microsoft Office that allows you to view documents, such as PDFs, without opening them. This feature can be very useful in determining whether or not a file contains the information you are looking for before opening it.