![[Full Guide] How to Join a Domain in Windows 10](https://cdn.techloris.com/app/uploads/2023/05/how-to-join-a-domain-in-windows-10.png)
[Full Guide] How to Join a Domain in Windows 10

What’s a Domain?
A domain is a network that enables users to log in to their accounts from any computer on the network. At least one computer running Windows Server and the others running Pro or Enterprise Windows versions are required to create a domain. This can be particularly useful in several scenarios, such as small offices without a dedicated computer for each employee, monitoring employee work and assigning different permissions to each of them from the server, companies with fewer computers than employees, and educational institutions.
By logging in to any computer with their username and password, users can perform their work and log out. To join a domain, all that’s needed is the domain name, a username, a password, and the server’s IP for a more reliable connection. The domain administrator is responsible for creating a user on the server and providing all the necessary information.
We’ll Begin by Setting the Server’s IP as Your Primary DNS
To configure DNS settings, open the Control Panel and select the Network and Sharing Center.

Select the connection you currently use, either Ethernet or the WIFI name. Click on Properties and select Internet Protocol Version 4 (TCP/IP4).

Then click on Properties and choose to use the following DNS server addresses. Enter the server IP you obtained as your Preferred DNS server and click OK to save the changes.

How to Join Windows 10 Computer to Active Directory Domain
Joining AD Domain From Classic System Properties on Windows 10
1. Press Win + R to open the Run dialog box.
2. Type in the command sysdm.cpl and click OK to open the System Properties dialog box.

3. Select the Computer Name tab in the System Properties window and click the Change button.

4. Switch to the Domain position and type in the domain name.

5. Specify the domain user’s credentials who can add computers to the domain.
6. You should see a message saying Welcome to the youdomainname.com domain.
7. Reboot the computer.
8. Log in under a domain account.
Verify whether your computer account object is visible in Active Directory. Launch the Active Directory Users and Computers application (dsa.msc), then go to the Computers folder and ensure that a new Computer object with your computer’s name has been added.
How to Join Windows 10 to Domain With Modern Settings App?
1. Press Win + I to open Settings and click Accounts.

2. Click the Connect button to the Access Work or School tab.

3. Select Join this device to a local Active Directory domain in the Alternate Actions section at the bottom.

4. Specify the domain name and click Next.

5. Enter the name and password of the domain account with the rights to join devices to the domain.
6. Click Join to add the PC to the domain.
7. Reboot your device by clicking Restart now.
Once connected to the domain, the sign-in screen will display the DOMAIN\User account. Simply enter your password to log in to the domain.
Once you are logged in to the domain, you will notice that some options previously available in the About setting are no longer listed. The server centrally manages your computer as part of the domain.
How to Join a Computer to a Domain With Powershell?
Here is how to add a computer to a domain via PowerShell using the Add-Computer cmdlet:
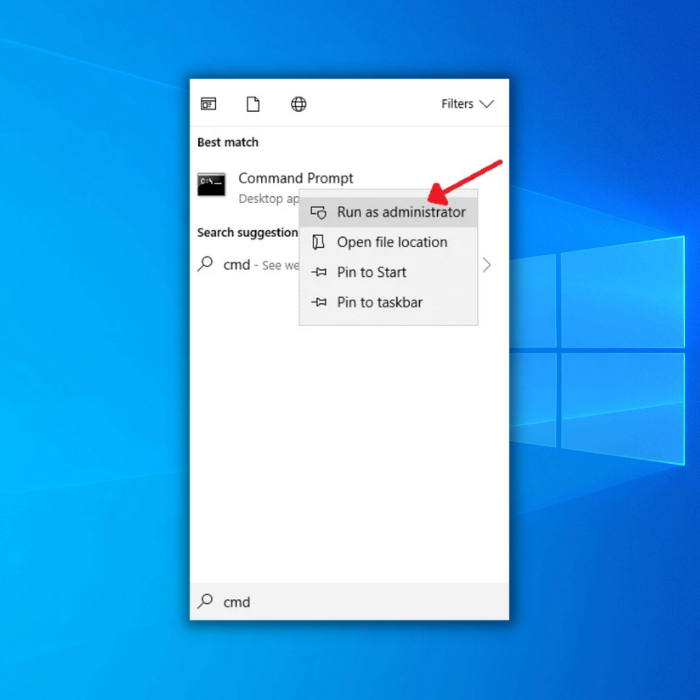
1. Open PowerShell as Administrator.

2. Run the command: Add-Computer -DomainName techloris.com –verbose
(replace techloris.com with your domain name).

3. Enter the domain user credentials you want to use to join the device to the domain.

4. Wait until the message WARNING: The changes will take effect after you restart the computer appears.
5. Restart your computer using the command Restart-Computer.
Use the following script:
Set the LDAP path for the Organizational Unit you want to use:
$ldap_path = ‘OU=Workstations,OU=London,DC=techloris,DC=com
Run the command:
Add-Computer -DomainName techloris.com -OUPath $ldap_path -Restart
(replace techloris.com with your domain name)
Adding a Local Computer to a Domain via Netdom
You have learned how to add a Windows 10 computer to a domain using the GUI, but it’s not the only way. You can also use the Netdom utility via the command line. The Netdom utility is a command-line tool included in the RSAT package.
If you have a Windows 10 workgroup computer that can access an existing domain controller, you can follow these steps:
1. Open Command prompt as an administrator
2. Run Netdom join, providing the following parameters.
When using the netdom utility with the join parameter, you need to provide a computer name. If you plan to use this command on multiple computers, you can use the %computername% variable instead to represent the local computer consistently.
netdom.exe join %computername% /domain:DomainName /UserD:DomainName\UserName /PasswordD:Password

3. Restart your computer, which will be joined into the domain.
Add a Local Computer to a Domain Via WMI
To cover all the possible ways to add a computer to a domain, this tutorial will now explore a lesser-known method involving Windows Management Instrumentation (WMI). WMI is a built-in component of Windows that provides a wealth of information about a PC and enables various actions to be performed on it.
To add a local computer to a domain using WMI, you must invoke a specific WMI method. This method achieves the same result as using either the netdom utility or the Add-Computer PowerShell cmdlet. There are many ways to invoke WMI methods, but in this tutorial, we will focus on two methods: the wmic command-line tool and PowerShell.
Using WMIC
To add a computer to a domain with WMIC:
1. Open Command prompt as an administrator
2. Run the command below:
- Uses a where query to identify the local computer: where name=” %computername%”
- Invoke the WMI method joindomainorworkgroup (call joindomainorworkgroup) that’s part of the Win32_ComputerSystem WMI class (computersystem)
- Specifies the bitwise operators necessary to join the domain successfully: join options 3
- Adds the computer to the techloris.local domain: techloris.local
- Authenticating with the labadmin user account: username= “techloris\labadmin Password= “secret.”
wmic computersystem where name=”%computername%” call joindomainorworkgroup fjoinoptions=3 name=”techloris.local” username=”techloris\labadmin” Password=”secret”

3. Restart your computer after.
Using PowerShell’s Get-WmiObject Cmdlet
Another way to invoke the JoinDomain Or Workgroup WMI method is by using PowerShell. To achieve this:
1. Launch PowerShell with administrative privileges.
2. Execute the following command, which achieves the same outcome as the aforementioned wmic command, utilizing the same parameters.
(Get-WMIObject -NameSpace “Root\Cimv2” -Class “Win32_ComputerSystem”).JoinDomainOrWorkgroup(“techloris.local”,”secret”,”techloris\labadmin”,$null,3)

3. When completed, restart the computer.
Confirming Creation of the AD Computer Account
To confirm that a computer object has been created after adding a computer to a domain, you can open Active Directory Users and Computers (ADUC).
1. To access Active Directory Users and Computers (ADUC), you can remotely connect to your domain controller via RDP or open ADUC on your local computer if you have installed the Remote Server Administration Tools (RSAT) package.
2. Navigate to the Computers container by expanding the domain name node in ADUC, and check if the computer object added in the previous step is visible.

3. On the Windows 10 computer, proceed to the login screen and click on Other User to log in with any Active Directory (AD) user account.
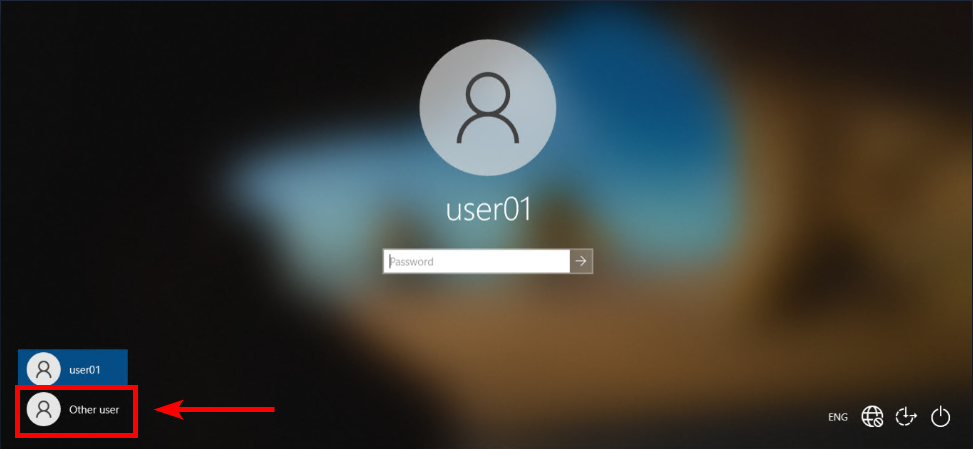
Under the Password box, you can now view your domain name, as illustrated below.
Master the Domain: A Complete Guide to Joining a Domain in Windows 10
In conclusion, joining a domain in Windows 10 opens up a world of possibilities for seamless network integration and centralized management. This comprehensive guide teaches you the step-by-step process to join a domain successfully. Following the outlined instructions, you can effortlessly connect your Windows 10 device to a domain, enabling you to access shared resources, enhance security, and streamline administration. Unlock the power of domain networking and take your Windows 10 experience to the next level.