![[Guide] How to Get Administrator Privileges on Windows 10](https://cdn.techloris.com/app/uploads/2023/05/get-admin-rights-on-windows-10.png)
[Guide] How to Get Administrator Privileges on Windows 10

Windows 10 offers two primary account types for users, Administrator and Standard User, each with different privileges to operate a device and applications. The Administrator account type provides complete system control, allowing users to modify global settings, install applications, execute elevated tasks, and perform various other actions. On Windows 10, the Standard User account type is comparatively more limiting than the Administrator account type.
While users with the standard account can still use apps, they cannot install new applications. They have limited access to change settings, and any changes they make can only affect their account and not others, making global system configurations not allowed.
If an app or command requires elevation, it will need administrative credentials to complete the task. Using an account with standard privileges is generally advised for a more secure environment, but sometimes switching between Standard User and Administrator account types may be necessary.
Fortunately, Windows 10 provides several options to change the account type, including Settings, Control Panel, User Accounts, PowerShell, and Command Prompt. This guide will provide step-by-step instructions for each method to help you change the account type on your Windows 10 device.
User Account Control: Know Your Rights
The User Account Control (UAC) shield icon, which is blue and yellow, is used by Windows to indicate computer tasks that require administrator privileges. The prompts that appear when attempting to perform an action differ for administrators and standard users.
Administrators only need to click Yes to authorize a program to make changes (sometimes it will require an administrator password), while standard users must enter an administrator’s password to proceed. This allows users to perform administrative tasks without remaining logged in as an admin all the time, as long as they know the admin password to get through UAC prompts.
How to Enable the Administrator Account in Windows Command Prompt
While the administrator account is generally hidden in Windows 11 and 10, it may be enabled using the command prompt at any moment. After you allow it, you can log in as the admin account anytime you start Windows. This solution is compatible with all Windows editions, including Windows 11 and 10 Home.
1. Open Windows search and search for cmd.
2. Choose Command Prompt and select Run as Administrator.
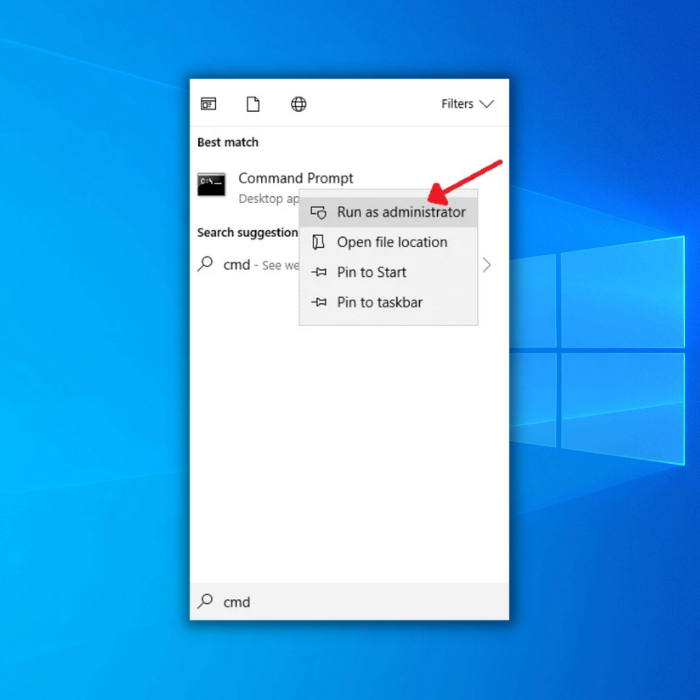
3. In the Command Prompt, type in net user administrator /active:yes and hit enter.

4. Wait for the confirmation and restart your computer.
5. Once your computer has restarted, log in using the administrator account.
How to Get Administrator Privileges on Windows 10 via Windows Settings
If you want to quickly provide your account with administrator privileges on a Windows 10 computer, the best way to do so is by using the Accounts Settings option. The following are step-by-step instructions to guide you through the process.
1. Right-click the Start menu and select Settings.

2. Navigate to Accounts on the Windows Settings screen.
3. On the left-hand pane of the Your info page, select Family & other users.
4. Click on the account you want to grant administrator privileges from the Other Users section.
5. Select the Change account type option.

6. Select Administrators from the Account type drop-down menu.
7. Click OK at the bottom right of the window to save your changes.

8. Return to the Family & other users screen to confirm the new admin account.
How to Get Administrative Privileges via Control Panel
You can create new accounts with administrative privileges on your computer through the Control Panel, provided that there is already an existing administrator account.
Here are the steps to change an account type to Administrator using the Control Panel on Windows:
1. Type Control Panel in the Windows search bar and select the app from the search results.

2. Click on User Accounts.

3. Click on Manage another account.

4. Select the user that you want to change.
5. Click on Change the account type.
6. Choose the radio button next to Administrator to gain admin privileges.
7. Click on Change Account Type.

8. The changes will be reflected when you return to the previous screen.
How to Get Administrator Privileges on Windows 10 With Command Prompt
Here are the steps to get administrator privileges on Windows 10 using Command Prompt:
1. Open the search box and type Command Prompt or cmd.
2. Run the Command prompt as an administrator.
3. Type the following command to list all users on the computer and press enter:
net user

5. Copy the username of the user you want to grant administrator privileges.
6. To grant administrator privileges to the user, type the following command and press enter:
Net Localgroup Administrators UserName /add
7. Replace UserName with the username of the user you want to add to the administrators’ group.

8. If the command returns The command completed successfully, you have successfully granted the user administrator privileges.
9. To remove the administrator privileges, type Net Localgroup Administrators UserName /Delete in the Command Prompt and press enter.
How to Change User Account Type Using User Accounts
Here are the steps to set an account to Standard user or Administrator type using User Accounts (netplwiz):
1. Press Win + R to open the Run dialog box.
2. Type netplwiz and press Enter to open the User Accounts experience.
3. Select the account you wish to change and click the Properties button.

4. Go to the Group Membership tab.
5. Select the Administrator account type, then click Apply and OK buttons.

After following the abovementioned steps, you need to restart your device to apply the changes. Once the device restarts, you can use the new administrator account type you selected.
How to Get Administrator Privileges on Windows 10 via User Management Tool
An alternative way to enable the Windows administrator account is by using the Administrator Properties. By default, this account has no password protection, so it is recommended to set one for security purposes. Once enabled, you will see the administrator user login screen every time you start Windows.
1. Open Administrator Tools from the Windows Start menu or Control Panel.
2. Select Computer Management and navigate to the Local Users and Groups folder.
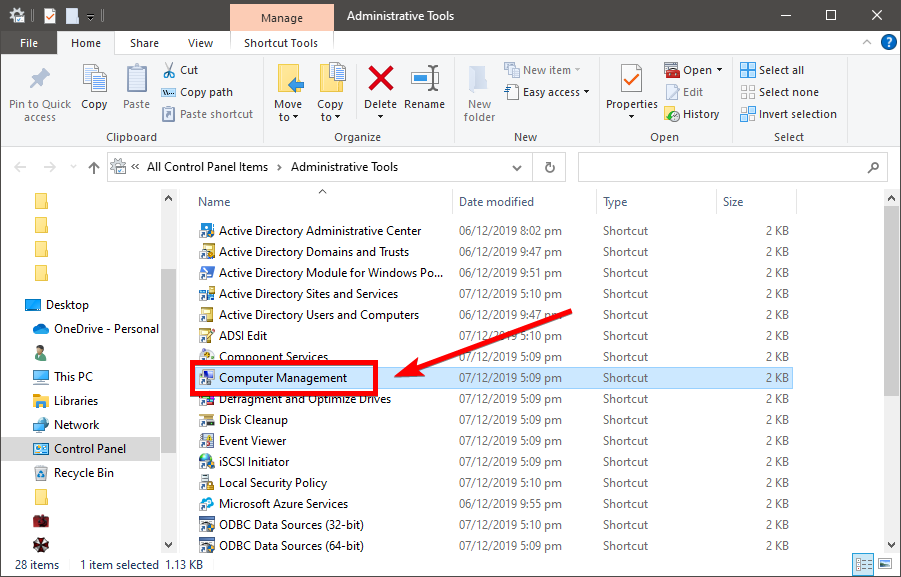
3. Open the Users folder and double-click on the Administrator account.
4. Right-click on Administrator and select Properties to open a new Administrator Properties window.

5. Uncheck the Account is Disabled option and click OK or Apply to confirm and enable the administrator account on Windows 10.

How to Get Administrator Privileges on Windows 10 With Group Policy
1. Press the Win + R to open the Run box.
2. Type gpedit.msc and press Enter.
3. Navigate this path: Click on Computer Configuration > Windows Settings > Security Settings > Local Policies > Security Options.
4. In the right pane, locate Accounts: Administrator account status and double-click on it.

5. Change the setting to Enabled to activate the built-in Windows administrator account.

6. You can now access the administrator privileges on Windows 10.
How to Get Windows Administrator Privileges Without Password
Without administrator privileges on a Windows PC, you may be limited in performing various tasks. Being an administrator provides complete access to the system. However, if you have forgotten your administrator account password and lost access to your Windows PC, there are ways to regain administrator privileges without it.
Get Administrator Privileges by Login as a Built-in Administrator Account
1. Start or restart your computer.
2. Press the F8 key repeatedly(the key may vary depending on your manufacturer) until the Advanced Boot Options menu appears.
3. Select Safe Mode from the menu to boot into Safe Mode.
4. Log in as the built-in Administrator account.
5. Type an incorrect password when logging in as an administrator.
6. When The user or password is incorrect prompt appears. Close it.
7. Click on the Switch User option.
8. Type Administrator as the username to log in to the built-in Administrator account
Gain Full Control: Master the Steps to Obtain Administrator Privileges on Windows 10
In this comprehensive guide, we have explored various methods to obtain administrator privileges on Windows 10. By following the step-by-step instructions, you can unlock full access and take control of your system. Whether you need to perform advanced tasks or manage user accounts, acquiring administrator privileges will empower you to navigate Windows 10 with confidence. Remember to exercise caution and use these privileges responsibly to ensure the security and stability of your operating system.