![[Full Guide] How to Free up Ram on Your Computer](https://cdn.techloris.com/app/uploads/2023/04/How-to-Free-Up-RAM-on-PC.png)
[Full Guide] How to Free up Ram on Your Computer

What is RAM?
A computer’s Random Access Memory (RAM) is a computer memory chip that temporarily stores data currently being used by the computer. Whenever a program is run, it’s loaded into RAM for quick access by the computer’s processor.
RAM can read and write data faster than a hard disk or solid-state drive. That’s why having more RAM can help improve computer performance by allowing more programs and processes to run simultaneously without slowing down.
However, RAM is volatile memory, meaning data is lost when the computer is turned off. It must be stored on a storage device like a hard disk or solid-state drive to save data permanently.
How to Free up RAM on Your Windows Computer
Restart Windows PC

Restarting your computer is an effective way to troubleshoot various problems because it clears the contents of RAM and restarts all active processes. Although it won’t increase the maximum amount of RAM available, restarting your computer can help free up memory by shutting down background processes that may consume it without your knowledge. Regularly restarting your computer can help prevent it from becoming sluggish, particularly if you use it frequently.
Clear RAM cache
Clearing the RAM cache removes unnecessary data from the computer’s memory, freeing up space for other applications and processes. The RAM cache stores frequently accessed data to speed up processing. Still, over time, it can become filled with unnecessary data like temporary files and browser cache, slowing down the computer.
By clearing the cache, the computer can allocate more memory to other processes, resulting in faster and more efficient performance. However, clearing the RAM cache won’t increase the maximum RAM available on your PC.
1. Press the Windows key + R on your keyboard to open the Run dialog box.
2. Type cmd and press Enter to open the Command Prompt.

3. In the Command Prompt window, type ipconfig /flushdns and press Enter. This will clear the DNS cache.

4. Next, type netsh int ip reset and press Enter. This will reset the TCP/IP stack.
5. Finally, type netsh winsock reset and press Enter. This will reset the Winsock catalog.
6. After completing these steps, restart your computer to clear the RAM cache.
Update Software to the Latest Versions
Updating your software to the latest version can help free up RAM on your computer because newer versions are often optimized to use less memory than previous versions. Developers make changes to the software to improve its efficiency and reduce resource usage by fixing memory leaks, optimizing code, or using new algorithms that require less memory.
When you update your software to the latest version, you’re installing these changes and improvements, which can result in the software using less RAM and freeing up memory for other applications and processes.
However, it’s important to remember that not all updates will reduce RAM usage because some updates may introduce new features or functionality requiring more memory. It’s always a good idea to keep your software up to date to ensure you’re using the most efficient and stable version of the software.
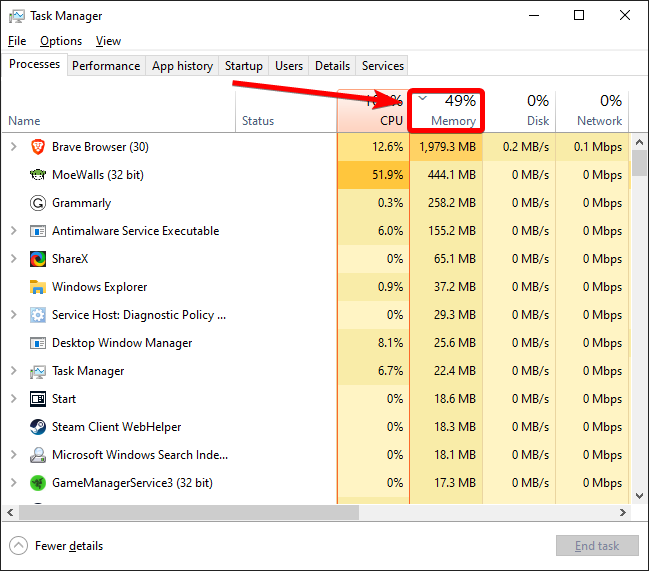
Check RAM Usage With Windows Tools
1. Open the Task Manager by searching for it in the Start menu or using the Ctrl + Shift + Esc shortcut.
2. Click More Details to expand to the full view if needed.
3. Go to the Processes tab and click the Memory header to sort processes from most to least RAM usage. Keep in mind that heavier apps need more RAM.
4. For more detailed information, switch to the Performance tab and click Open Resource Monitor at the bottom. This will take you to the Memory tab of the Resource Monitor.
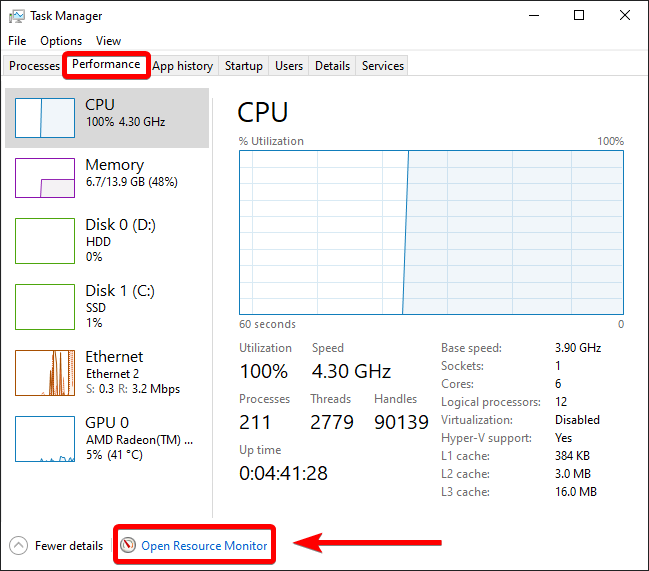
5. Check the chart at the bottom to see how much RAM you have for free. To see which programs use the most RAM, sort by Commit (KB) on the top list.

Uninstall Unused Programs
1. Open the Start menu and type control.
2. Select Control Panel from the list of options.
3. Click on Programs and Features.

5. A list of installed programs will appear. Scroll through the list and identify any programs you no longer use or need.
6. Select the program you wish to uninstall and click Uninstall.

7. Follow the prompts to uninstall the program. Depending on the program, you may be asked to confirm the action or be prompted to restart your computer once the process is complete.
Disable Background Apps
Disabling background apps can help free up system resources and improve performance, as fewer apps run in the background and use up CPU and RAM. However, remember that some apps may need to run in the background to function properly (e.g., messaging apps that need to receive notifications). Be careful when disabling background apps and ensure you’re not inadvertently causing any issues.
1. Press Win + I to open the Settings app.
2. Click on Privacy, then click on Background apps in the left sidebar.
3. Toggle off the switch for any apps you don’t want to run in the background.
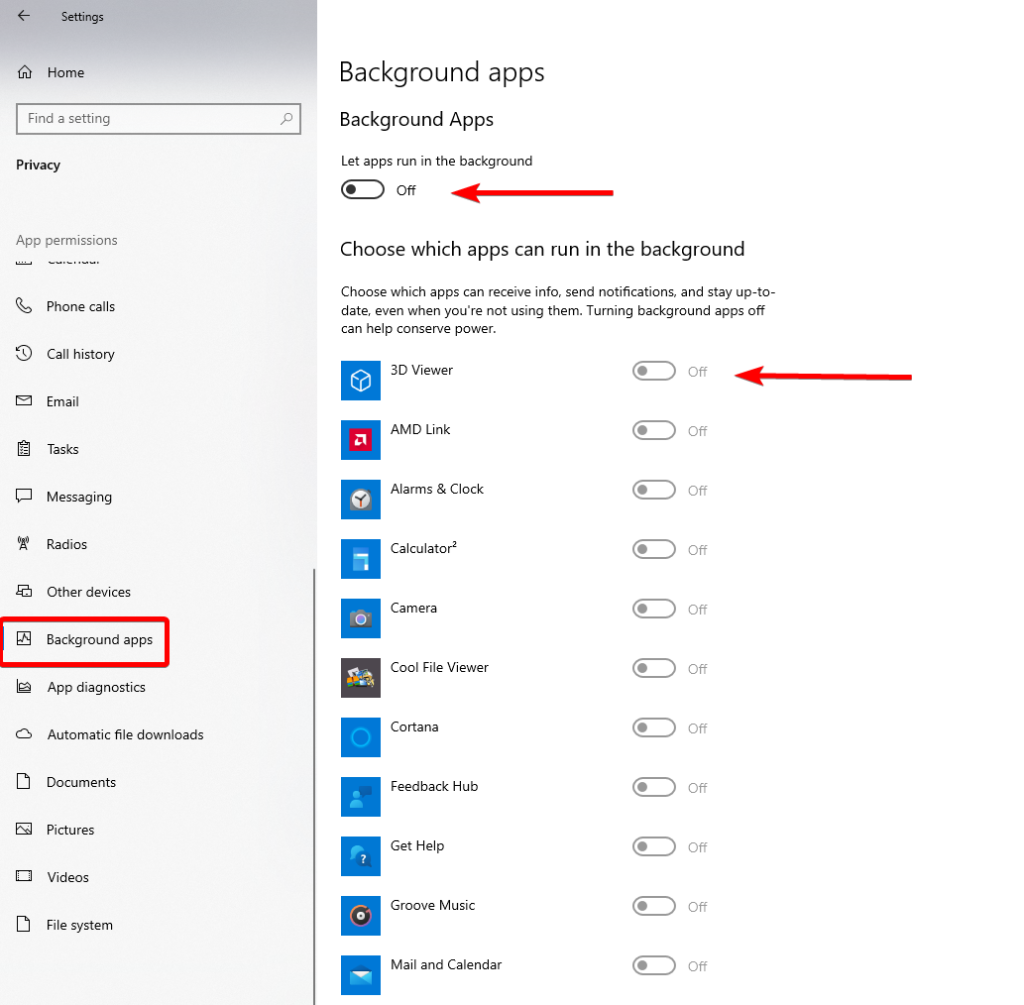
4. Alternatively, you can turn off the Let apps run in the background switch at the top of the page to disable all background apps.
Disable Startup Apps
When you start Windows 10, certain programs start running automatically, which can cause a decrease in performance due to increased RAM and CPU usage. These programs are called start-up programs. Disabling start-up programs can help to speed up your computer and free up RAM.
1. Open the Task Manager by pressing Ctrl + Shift + Esc or searching for it in the Start menu.
2. Click on the Startup tab to view the list of apps that launch automatically when you start your computer.
3. Select the app you want to disable and click the Disable button at the bottom right of the window.

4. Repeat this process for any other apps you want to disable from starting up automatically.
5. You can also right-click on the app and select Disable from the context menu.
Remember that disabling startup apps can improve your system’s performance by reducing the number of processes running in the background, but it can also impact the functionality of certain apps. So, only disable apps you don’t use regularly or that you’re sure won’t affect your computer’s performance.
Use Lighter Apps and Manage Running Programs
One effective way to free up RAM is to use lighter apps that consume fewer resources. For example, suppose you are using a web browser. In that case, you may use a more lightweight browser like Mozilla Firefox or Google Chrome rather than heavier alternatives like Microsoft Edge or Safari. Similarly, you can use a text editor like Notepad or Sublime Text instead of a more feature-rich word processor like Microsoft Word.
Another way to free up RAM space is to manage running programs. This involves closing any unnecessary applications that may be running in the background. For instance, if you have opened multiple tabs or windows of a web browser, you may lose some of them when you are done with them.
You can also disable any startup programs you do not need to start automatically when you turn on your computer. Using lighter apps and managing running programs can free up RAM and ensure your computer runs smoothly and efficiently. This can also help extend your computer’s life and reduce the likelihood of crashes or system errors.
Scan for Malware
Malware is software designed to cause harm or damage to your computer, and it can consume significant amounts of system resources, including RAM.
When malware is present on your computer, it can run in the background and perform tasks you’re unaware of. These tasks can consume a large amount of your computer’s RAM, leaving less available for other applications and processes.
By running a malware scan, you can detect and remove any malicious software that may be running on your computer. This can free up RAM space previously used by the malware and allow your computer to run more efficiently.
1. Open Windows Security by clicking the shield icon in the taskbar or searching for Windows Security in the Start menu.
2. Click on the Virus & threat protection tab.
3. Click on Scan options.

4. Choose the type of scan you want to run, such as a quick scan or a full scan.

5. Click on Scan Now to start the scan.
Adjust Virtual Memory in Windows
1. Open Windows Settings > System > About.

2. Click Advanced system settings on the right side of the window.

3. Under the Advanced tab, click on Settings under the Performance section.

4. In the Performance Options window, click on the Advanced tab.
5. Under the Virtual memory section, click on Change.

6. Uncheck Automatically manage paging file size for all drives.
7. Select the drive you want to adjust the virtual memory for.
8. Select Custom size and enter the initial and maximum size of the virtual memory.

9. Click Set and then OK to save the changes.
10. Restart your computer for the changes to take effect.
Reduce Visual Effects
1. Open Windows Settings > System > About.
2. Click Advanced system settings on the right side of the window.
3. Under the Advanced tab, click on Settings under the Performance section.
4. In the Performance Options window, select the Adjust for best performance option to turn off all visual effects.

5. Alternatively, you can select the Custom option to choose which effects to turn off individually.
5. Click Apply and then OK to save the changes.
Note that turning off visual effects may make your computer look less appealing, but it can improve its overall performance by reducing the strain on your system resources.
Clean Page File
1. Access the Registry Editor by clicking Start and typing Registry Editor in the search panel.
2. Navigate to this path:
Computer\HKEY_LOCAL_MACHINE\SYSTEM\CurrentControlSet\Control\Session Manager\Memory Management
3. Double-click ClearPageFileAtShutdown data.

4. Change the value data from 0 to 1 and click OK to save changes.

5. Once done, the page file will be automatically deleted after restarting the device.
Tweak Settings to Reduce Your Browser’s Memory Use
If you find your computer’s RAM frequently occupied by web browsers, especially Chrome, you may want to examine your browsing habits to free up memory. Fortunately, there are several tips you can follow to reduce the amount of memory consumed by your browser.
Close Unused Tabs Open in Your Browser
Opening a new tab is a quick and easy way to access information, but it can consume a lot of RAM. Having too many tabs open at once can slow down your computer. To optimize your computer’s performance, it is important to habitually close tabs that are no longer needed to free up RAM space.
Uninstall Unnecessary Browser Extensions
Using browser extensions can enhance your browsing experience, but they might also consume a significant amount of your browser’s memory. To avoid this, reviewing the extensions you have installed is important.
If you’re using Chrome, you can check the memory usage of each extension in your Task Manager. If you can’t uninstall the extension, disable it when you’re not using it. This way, the extension will still be in your browser, but it won’t use up too much of your computer’s memory.
Improve System Performance by Updating Your OS
1. Click on the Start button and select Settings.
2. Click on Update & Security from the Settings menu.

3. Click on the Windows Update tab.
4. Click on the Check for updates button to see if there are any available updates.

5. If updates are available, click the Install button to download and install them.
6. Restart your computer to complete the installation process.
Optimize Computer Performance With a Trusted Cleaning Program
Optimizing computer performance is essential for maintaining productivity and efficiency, especially if you use your computer daily. A trusted cleaning program can help you achieve this goal by scanning your system for junk files, broken registry entries, and other unnecessary data that could slow down your computer.
By removing these files and freeing up space on your hard drive, your computer can run faster and more smoothly. Choose a reputable program and follow its instructions carefully to ensure your computer runs at its best.
Use Disk Cleanup
Disk Cleanup is a built-in Windows tool that can free up disk space by removing unnecessary files from your computer. While it primarily targets hard drive space, it can also help free up RAM.
When you run Disk Cleanup, it can remove temporary files, system files, and other files that take up space on your computer. By freeing up disk space, it can also free up RAM previously used to store data from these files.
1. Open the Start menu and type Disk Cleanup in the search bar. Click on the Disk Cleanup app that appears in the search results.
2. Disk Cleanup will automatically scan your hard drive for files that can be safely deleted. This may take a few minutes to complete.
3. Once the scan is complete, you’ll see a list of files you can delete. These may include temporary and system files that occupy your hard drive.
4. Select the files you want to delete by checking the boxes next to them.

5. Click the OK button to confirm that you want to delete the selected files.
6. Once Disk Cleanup has finished deleting the selected files, you’ll see a message telling you how much space has been freed up on your hard drive.
Try ReadyBoost to Add More RAM
ReadyBoost is a feature in Windows that allows you to use a USB flash drive or SD card as additional memory to boost your computer’s performance. By plugging in a compatible device, Windows will use it to store frequently accessed files and data, reducing the workload on your computer’s hard drive and increasing its speed.
ReadyBoost is particularly useful for computers with low amounts of RAM. Still, it’s important to note that it’s not a RAM replacement and won’t provide the same level of performance. Nevertheless, it’s a simple and convenient way to improve your computer’s speed and performance.
Install More RAM
Adding more RAM to a computer can improve its performance by enabling it to handle more data and run multiple applications without slowing down. With more RAM, the computer can rely less on virtual memory and the hard drive’s page file, which can cause slowdowns.
However, ensuring that the new RAM is compatible with the computer’s motherboard and that the system can support the added memory is essential. Generally, adding more RAM is an effective way to enhance the performance of a computer, particularly if it’s currently running with a low amount of memory.
How To Free Up Ram For Mac Users
Fix the Finder (Close Finder Windows Too)
Each time a new window is opened in the Finder in a Mac computer, the data displayed in the window is stored as RAM. By adjusting the Finder preferences, you can configure your folders to open in tabs instead of new windows.
1. Click on Finder in the upper-left corner of your screen.
2. Right-click on Preferences from the dropdown menu.
3. In the Finder Preferences window, select Open folders in tabs instead of new windows.
Another method to free up RAM storage is to merge your Finder windows. To merge your windows, go to the “Window” drop-down menu instead of “Fnder” and select “Merge All W.”dows.” This will combine all your open Finder windows into one, which can help reduce clutter on your desktop and save storage space.
Scan Your Mac Activity Monitor for Heavy Memory Users
To monitor the RAM usage on your Mac, you can use the Activity Monitor, which displays the amount of memory used and the apps using it. You can use this tool to identify the apps that take up a lot of space and remove the ones you don’t use anymore.
1. Open the Spotlight search bar (command + space).
2. Search for Activity Monitor.
3. Click on the Memory tab.
4. Identify which apps are using the most memory.
5. Remove any unwanted applications.
Monitor Your CPU for Power Hogs
The Activity Monitor app can also monitor CPU health and usage. The CPU executes instructions from the computer software information stored as RAM. Select the “CPU” tab in the Activity Monitor app to check CPU usage. This will display which apps are using more processing power than others.
Organize Your Apps
To maintain a healthy amount of RAM storage on your computer, it’s important to keep it clean and organized. A cluttered desktop can use up storage quickly since macOS view each desktop icon as an active window. Even if you find it difficult to organize your files, putting them into a single folder can free up a significant amount of RAM.
Free Up Disk Space
If you realize that your RAM is fully utilized but still needs more storage, you can use the virtual memory function on your Mac’s drive. This function offers additional space on your hard drive to enable you to continue running your applications. Although the virtual memory feature is always active, you must ensure sufficient space on your drive to enable swapping.
Install a Memory/RAM Cleaner
If you cannot organize your computer or do not have sufficient time, memory cleaner apps can assist you in cleaning up your computer. These cleaners offer various features to remove applications or extensions and enable users to manage their startup programs.
Mastering RAM Optimization – Your Comprehensive Guide
In this comprehensive guide, we have explored various methods to free up RAM on your computer, allowing for improved performance and smoother multitasking. By following the step-by-step instructions and implementing the techniques discussed, you can effectively manage your computer’s memory usage and maximize available resources. We covered essential strategies such as closing unnecessary programs and background processes, disabling startup applications, clearing temporary files, and adjusting virtual memory settings. Additionally, we highlighted the importance of regular system maintenance and provided tips for long-term optimization of RAM usage. Whether you’re experiencing sluggish performance or simply want to enhance your computer’s responsiveness, this guide equips you with the knowledge and tools to free up RAM and optimize your overall computing experience efficiently. Take control of your system’s memory resources and enjoy a more efficient and responsive computing experience.