
Best Ways To Fix Windows Can’t Connect To This Network Error

There are several features on today’s new devices, and so many advancements are being made every year that it can be hard to keep up. While trying to learn the tools our operating systems provide us, we are still bound to run into small dilemmas and problems.
Unfortunately, connecting to your local network can be a hassle at the most random of times. Whether it’s your network provider, store, or restaurant, it can be frustrating to figure out why your device won’t connect to a wireless adapter, a local password-free Wifi, or even a Bluetooth connection. These are everyday uses for millions of individuals across the planet, and unfortunately, they share the same random connectivity problems you are facing.

- Your machine is currently running Windows 10
- Fortect is compatible with your operating system.
Recommended: To repair Windows Errors, use this software package; Fortect System Repair. This repair tool has been proven to identify and fix these errors and other Windows problems with very high efficiency.

- 100% safe as confirmed by Norton.
- Only your system and hardware are evaluated.
This article provides many solutions to help your device stay connected or connect more manageably to the desired network. Before reading this article, ensure that you have tried to reset your appliance and network for a quick fix attempt. If neither of those has worked, proceed with the article.
Check Airplane Mode if You Can’t Connect to wifi or Your Internet Service Provider
Airplane mode is a standard feature on many mobile devices that helps you disconnect from potentially distracting or harmful network adapter connections while in the air. By checking your airplane mode, you can ensure that your device is entirely disconnected from any network and that you can establish a stable connection to your local wifi or cellular network when you land.
One primary reason is that it allows you to troubleshoot any potential issues with your device’s connectivity. It also helps ensure that other devices in the area aren’t interfering with your connection.
For example, suppose multiple people are on board using their mobile devices. In that case, they may be competing for limited signal strength and slowing down your connection speed or preventing you from establishing a connection altogether.
Turning off all other devices and networks in the area allows you to connect to your network more easily without interference. Ultimately, checking airplane mode helps ensure that you have a stable and reliable connection with either your network or a local wifi network when landing so that you can get back to work or stay connected with loved ones during your journey.
Here are the steps to disable airplane mode.
Step 1: In the taskbar on the main screen of your device, click the notification icon in the extreme right corner, and it will pop up in the notification panel.

Step 2: In the notification panel, click the option of airplane mode. In the following list, toggle the disable button if airplane mode is on. Now reconnect your device to the network and check if the error persists.
Check Network Settings and Reconnect to Network Adapters
Most of the time, network error occurs due to faulty or incorrect credentials. You cannot access the network without updated credentials for any change made by the provider. In this context, forgetting the network and then reaching the network with a new login ID and password is the only solution. Here are the steps to follow:
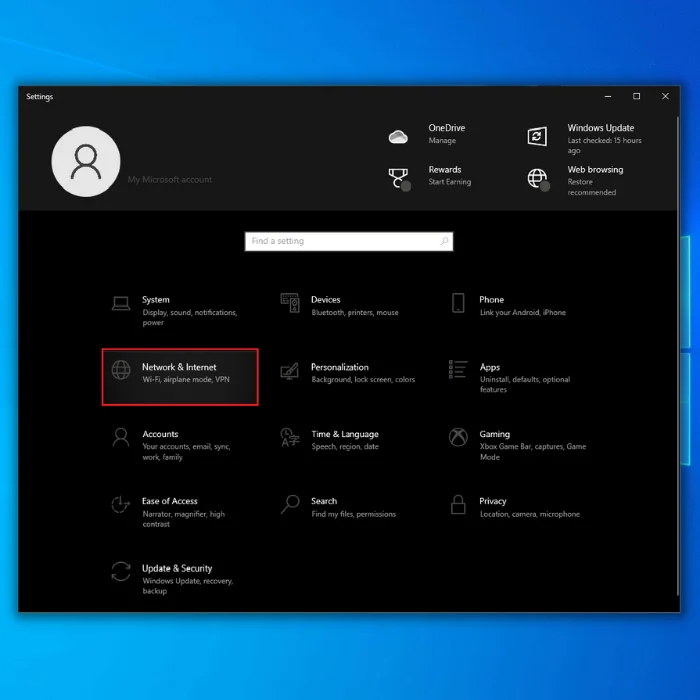
Step 1: Launch the settings menu from the main menu of your device. In settings, select the option of ‘network and internet.’
Step 2: In the next window, select the option of ‘Wifi’ from the left pane, followed by selecting ‘manage known networks.’

Step 3: Now select your network, and below it, click the option of ‘forget.’

Step 4: In the taskbar of the main menu, click on the network icon and select the network from the list, add valid credentials and check the connection.
Reset the Wifi Network for Connected Devices
There are several reasons why resetting your network might help improve your internet connection. One possible explanation is that resetting your network can clear out any temporary glitches or errors that might be causing interference with your connection. Also, resetting your network can help optimize your devices’ routing and signal strength, improving overall performance and speed.
There are a few different ways that you can reset your network, including through your wireless router settings, by unplugging and re-plugging all of the cables connected to your network equipment, or by rebooting your computer or device. Resetting and restoring the networks is relatively easy in windows 10 and 11.
After resetting, one can quickly restore the network settings to the last default mode. Here are the steps to reset the network and eliminate network errors.
Step 1: Launch settings from the main menu and select the option of ‘network and internet’ in the settings menu.
Step 2: In the next window, select the option of ‘status’ followed by clicking on ‘network reset.’

Step 3: Select the option of ‘reset now’ to complete the action. Restart your device to check if any network error exists.

Uninstall/Reinstall Your Network Adapter Driver if You Can’t Use Your wifi Connection
Like other system files in OS, respective drivers are responsible for the accurate functioning of related utilities on your device. In case of network errors, the faulty or outdated network driver might be causing the error.
Therefore, uninstalling the drivers and letting your device reinstall the appropriate driver is a quick fix. The reinstallation of your wifi adapter can also route out any other major or minor issues that cause problems with your wireless network and other internet connections. Here are the steps to follow:
Step 1: launch the device manager by right-clicking the start menu and selecting ‘device manager’ from the list or clicking the Windows key + X on the keyboard.

Step 2: In the device manager window, select the option of ‘network adapters’ followed by clicking ‘wireless drivers.’
In the drop-down menu, select ‘uninstall the device.’ Once uninstalled, your device will automatically reinstall the network adapter’s latest and most accurate driver.

Use Network Troubleshooter if You Can’t Connect to wifi with Your Internet Service Provider
A network troubleshooter is a tool that can help you identify and resolve common issues with your internet connection. This tool can quickly diagnose problems with your network settings, internet connectivity, and more.
There are many different reasons why using a network troubleshooter can be helpful for your internet connection.
- It provides increased accuracy in identifying and diagnosing network issues. Because a network troubleshooter is designed to recognize and fix problems related to your network settings, it can often provide a more accurate diagnosis than other tools or methods.
- Ease of use and accessibility. Unlike many other diagnostic tools, the network troubleshooter is simple and can be accessed directly from your computer or device without additional software or downloads. This makes it quick and easy to run whenever you need it, no matter where you are or your computer.
- Troubleshooter provides faster fixes and resolutions for common issues. By running an automated scan with a network troubleshooter, you can typically get more immediate results than trying to fix the problem on your own or by contacting technical support for assistance. This means you can get back online and continue your work more quickly than ever.
Here are the steps to follow:
Step 1: launch settings from the main menu or use the shortcut by clicking the Windows key + I.
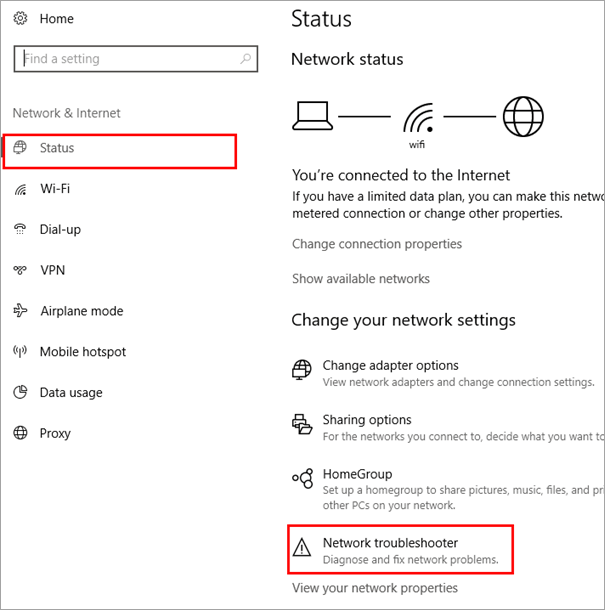
Step 2: In the settings window, select the option of ‘network and internet.’ For the next presented window, click on the ‘Status’ tab from the left pane and click ‘network troubleshooter.’
Let the troubleshooting complete, restart your device, and then connect to the internet to check if the error is resolved.
Use Adapter Troubleshooter if You Can’t Use Your Internet Connection on Your wifi
A network adapter helps the device communicate with the local area network. For wireless networks, adapters use the device’s signals and convert them to radio waves for communication with LAN. Network errors can also pop up due to a faulty network adapter. Hence, running a network adapter troubleshooter to identify and fix the issue is a safe option. Here are the steps to follow:
Step 1: Launch the setting from the main menu or click the windows key + I simultaneously on the keyboard.

Step 2: In the settings menu, select the option of ‘update and security.’
Step 3: In the update and security window, select the option of ‘troubleshoot’ from the left pane, then choose the ‘network adapter.’

Step 4: Click the option of ‘run the troubleshooter’ to complete the action. Restart your device and check if the error is still there or not.
Add New Connection to Your wifi Network on Smart Devices
If the added network is continuously giving network errors, then adding a new network manually to your device is a quick fix to resolve network errors. In Windows 10 and 11, one can easily add a new network. Here are the steps to follow for adding a new network manually.
Step 1: In the search box of the main menu, type the control panel and double-click the option from the list to launch the utility.
Step 2: In the control panel window, select the option of ‘network and internet’ followed by choosing the option of ‘network and sharing center.’

Step 3: In the dialogue box popping up on the window, click the option of ‘set up a connection or network.’

Step 4: In the following dialogue box, select the option of ‘manually connect to a wireless network.’ Click ‘next’ to continue.

Step 5: Enter the proper credentials for the added network and click ‘next’ to complete the action. Your device would connect to a new connection added manually without any other network error.

Check Adapter and Network Security Compatibility With Your Internet Service Provider
Every network connection, even wireless (wifi), is protected with security. Each security carries a preferred setting or type. Compatibility between network security and your device’s security is essential for any network to provide a connection, and wifi network errors usually occur for this reason. Here are the steps to check adapter and network security compatibility.
Step 1: Launch the control panel from the search box and select the option of ‘network and internet.’
Step 2: In the network and internet window, select ‘network and sharing center’ followed by clicking the ‘Wifi’ icon on the right.

Step 3: In the next window, select the option of ‘wireless properties.’

Step 4: In the properties menu, verify the security and its type and click ‘ok’ to complete the wizard.
Check IP settings if You Can’t Connect to the wifi Network
One of the most important things you can do to improve your internet connection is to check your IP setting. This involves making sure that your computer’s network settings are correctly configured so that you can access the internet and browse online content smoothly.
Some key factors that contribute to having a good IP setting include having a strong and stable connection, using an up-to-date browser, and ensuring that no other devices on your network could be causing interference or slowing down your connection speed.
Fortunately, checking and optimizing your IP setting is relatively simple, and many internet providers offer tools or resources to help you assess and adjust your network settings as needed.
Here are the steps to disable the IPv6 on your device.
Step 1: In the taskbar of the main menu, click on the wifi icon in the extreme right corner. Right-click the icon and select the option of ‘open network and sharing center’ from the list.
Step 2: In the next window, select the option of ‘change adapter settings.’

Step 3: From the list, right-click the network you are currently using, and from the drop-down, click on ‘properties.’

Step 4: In the dialogue box, navigate and search for ‘Internet Protocol Version 6 (TCP/IPv6)’. If enabled, uncheck the box and click ‘ok’ to complete the action. Restart your device to check if the error is resolved.

Change Network Mode for Stronger Internet Connection
Changing your network mode on your PC can help improve your wifi connection in several ways. One reason that changing your network mode is helpful is that it can allow your PC to make more efficient use of available bandwidth, resulting in faster and more reliable connectivity. Additionally, changing your network mode can also help optimize how your PC receives and processes data, making it easier for you to access content and perform tasks online.
An appropriate mode for connecting to a network connection is essential, and an accurate wireless mode following your network will allow you to access it easily. Hence, configuring the network mode to correct settings would resolve the ‘can’t connect to this network’ network error. Here are the steps to follow:
Step 1: Launch the control panel from the search box and double-tap the result to launch the utility.
Step 2: In the control panel, select the option of ‘network and internet’ followed by choosing the option of ‘network and sharing center.’
Step 3: In the next window, select ‘change adapter settings.’ Right-click on the network you are using, and from the drop-down, select the option of ‘properties.’

Step 4: In the properties dialogue box, select ‘configure’ followed by clicking ‘advanced’ to reach the ‘wireless mode.’

Step 5: Select accurate wireless mode, i.e., ‘802.11b/g’, and click ‘ok’ to complete the action.
Try Connecting an Ethernet Cable if You have Connection Problems
Ethernet cables are a popular choice for connecting devices to the internet because they are reliable and provide fast speeds. These cables use Ethernet technology, designed to optimize data transfer between devices.
One significant benefit of using an ethernet cable is that it can help improve your connection speed and stability. This is because Ethernet technology helps reduce interference from other devices on your network and any outside interference like weather or electrical interference.
Other advantages of using an ethernet cable include its ability to support large amounts of data simultaneously and its relatively low cost compared to different network connections. Overall, an ethernet cable may be the right choice if you want a reliable, high-speed connection to keep up with your online activities.
Frequently Asked Questions
Why does my wifi say, “Cannot Connect to this Network”?
The error message “Cannot connect to this network” can mean several things. The most common cause is that the wifi network is not broadcasting its SSID (Service Set Identifier), which is the network’s name.
This can be due to the router’s settings, so you’ll need to check with your network administrator to see if the SSID is being hidden. If the SSID is visible, the problem could be with your device’s wireless adapter or driver.
How do I get my Network connection back?
There can be many reasons your network connection may be lost or interrupted, including issues with your internet service provider, problems with your router or modem, or a faulty network card on your computer. If you are having trouble getting your network connection back, there are a few steps that you can try to help troubleshoot and resolve the issue.
One of the first things to check is the status of your wifi network driver. This can usually be done by opening up the Network Connections window on your computer and inspecting the quality of each network adapter. If one of your adapters is not connected or has a yellow warning indicator next to it, this could be the cause of your lost connection.
In addition to checking the status of your network adapters and system preferences, you should also try resetting them and restarting any devices that may be connected to them. Unplugging and reconnecting cables between devices may help resolve any errors preventing them from connecting correctly.
Other potential causes for a lost network connection to your wifi router include issues with software applications that are running on your computers, such as firewalls or antivirus programs. In these cases, temporarily disabling or removing these programs can help restore connectivity until any underlying software issues have been resolved.
What Causes Not Being Able to Connect to wifi Network?
There are a variety of reasons why wifi might not connect. One possibility is that the router is not configured correctly. Another possibility is interference from other systems or objects in the environment. Additionally, the signal strength may be too weak to establish a connection. Finally, it is also possible that the device is incompatible with the wifi network.
How do You Reset your wifi?
There are a few steps you need to take to reset your wifi. First, you need to find your router. Once you’ve found your router, look for the reset button. The reset button is usually small and red, and it’s often located on the back of the router.
Press and hold the reset button for 30 seconds. This will reset your router to its factory settings. After your router has been reset, you’ll need to reconfigure it.
What are the Common Problems with wifi?
Common WiFi problems include signal interruption, weak signals, and slow speeds. These problems can be caused by various factors, such as interference from other systems, distance from the router, and obstacles in the signal path. To troubleshoot wifi problems, it is vital to understand the factors affecting wifi performance.
How Does Reinstalling My Network Adapters Help My Network Connection?
When your wifi network adapter is not working correctly, one potential solution is to uninstall and reinstall it. This can help resolve any other problems causing your network adapter to fail or experience degraded performance.
You can take a few steps to uninstall and reinstall your network adapter. For example, you may need to go into the Control Panel on your computer and locate the “Network Adapters” section. Here, you should find a list of all the network adapters currently installed on your system.
Next, you may need to identify the specific adapter that is giving you trouble and then uninstall it from this list. This may involve right-clicking on the entry for the faulty adapter and choosing an option like “Uninstall” or “Remove.” After uninstalling the adapter, restart your computer and visit your device manufacturer’s website to download and install a new version of the network adapter driver software.
Why is My Device Manager Showing I That I Have Connectivity Issues With My Internet Speeds?
The device manager indicates that you are having wifi connection issues because there may be a problem with your network or connectivity settings. This could be due to various factors, such as poor connection or interference from other systems. To resolve this issue, it is essential first to identify the cause of the problem and then take steps to address it.
You might start by checking your network connection status and verifying that your device is correctly connected to the internet. Additionally, you may want to try running a diagnostic tool on your device to check for any potential network or connectivity issues.
If any problems are found, you can take steps to address these issues and restore proper connectivity on your device. It is essential to remain patient and persistent when dealing with wireless adapter connection issues. By taking the time to troubleshoot these problems carefully and thoroughly, you can typically resolve them and get back online in no time.
How Do I Improve My Phone’s Wifi Connectivity?
Wifi connectivity can sometimes be tricky, especially for older or less powerful phones. Thankfully, there are several strategies you can use to improve your phone’s wifi connection problems and help ensure that you always have a strong and reliable connection.
One of the most important things to remember when trying to improve your phone’s wifi connectivity is to ensure that you have installed the latest version of your phone’s operating system. This will ensure that your device’s software and hardware are up to date, which can help prevent compatibility issues or other technical issues from affecting your wifi connection.
In addition to updating your phone’s operating system, you may consider resetting or restarting your device. This simple step can often help clear out any temporary glitches in the system that may be causing problems with your wifi signal strength or speed.
Another valuable strategy for improving your phone’s wifi performance is to move around and try different locations within the range of your network. Sometimes even a slightly different layout in the room where you’re trying to connect can significantly affect signal strength and connectivity speeds.
If you struggle with poor network connection on your mobile device, it may be time to seek expert advice from a trusted technician or IT professional. With their help, you should be able to diagnose and resolve any issues preventing you from enjoying fast, reliable internet access on your phone.
How do I change my Administrator Password for My Network?
Ensuring that all your accounts are secure and protected when working with a network is essential. One of your network’s most important account settings is your admin password, which controls access to your network’s administrative settings and functions, so you must keep it secure.
If you need to change your admin password for your network, there are a few different steps you can take. Generally, the process will involve accessing your administrative panel or dashboard from within your network and then using this interface to update your password settings.
Some networks may offer additional security features or options that allow you to customize or protect your admin password. These may include things like two-factor authentication or other advanced security measures.
The process is relatively straightforward, whether you need to change your admin password for routine maintenance or in response to a suspected security breach or attempt. With just a few simple steps, you can ensure that your account is always adequately secured and protected on your network.
Why is My Wifi Icon Showing that I’m Connected to wifi When I’m Not?
Wifi is a wireless networking technology that allows devices to connect to the internet and communicate with each other without the need for physical cables. If your wifi icon shows that you’re bound to wifi when you’re not, this could indicate many different issues.
One possible explanation is that your device is experiencing interference from other electronic devices or signals in your environment. For example, if you are near a microwave while using your device, the microwave’s electromagnetic radiation may interfere with your device’s wifi network connection.
Another potential factor is faulty network hardware or software. Any issues with your router, modem, or other network components can lead to dropped connections and unreliable connectivity. Similarly, misconfigured settings on your device or router can cause problems connecting to wifi networks.
If you are experiencing trouble connecting to wifi networks despite having good signal strength and reliable hardware, it may be helpful to consult an IT professional for troubleshooting assistance. By understanding the underlying factors that may be causing issues with your wifi connectivity, you can take steps to resolve these issues and ensure that you stay connected at all times.