![[Guide] Windows 10 Automatic Updates: How to Turn Them Off](https://cdn.techloris.com/app/uploads/2023/01/turn-off-automatic-updates.png)
[Guide] Windows 10 Automatic Updates: How to Turn Them Off

Disable Automatic Updates
Suppose you’re comfortable leaving your computer unprotected for an extended period. In that case, you can choose to disable automatic updates in Windows 10 indefinitely, or at least until you opt to install them manually.
Recommended: To easily install drivers automatically, use the tool below.
This can be a viable option if you want to wait until a particular patch or update is released before you install it on your system. To do this, follow the instructions below.
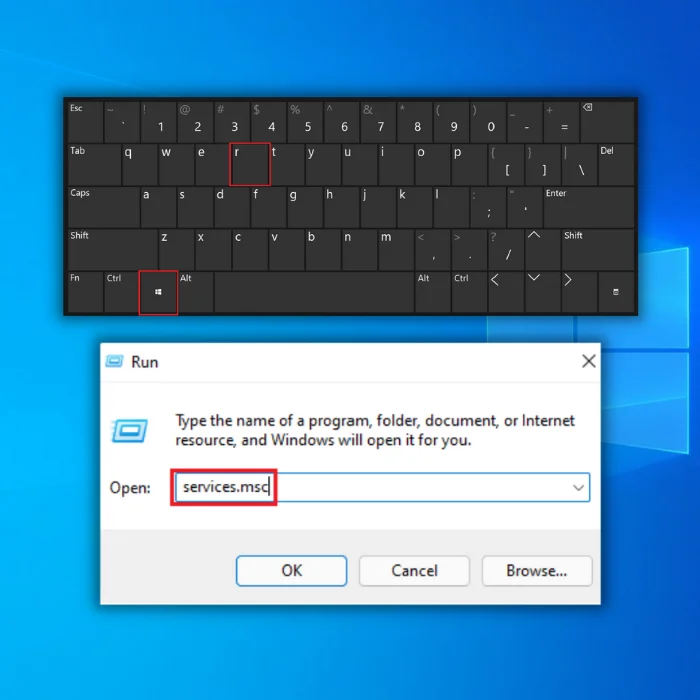
Step 1: Press Win + R to open the Run box.
Step 2: Type services.msc then click OK.
Step 3: Scroll down and locate the Windows update.
Step 4: Right-click and select Properties

Step 5: In the General tab, click on the Startup type drop-down menu and select Disabled.

Step 6: You can now install updates manually. Go to Settings, Click Update & Security, and Select Windows update.
Step 7: Click the Check for updates button.

Use Metered Connection
An easy way to prevent Windows 10 from automatically downloading updates is to set the Wi-Fi connection on the computer as Metered. This will prevent the updates from downloading. However, users should know that selecting a connection as Metered may limit their access to certain Windows features.
Step 1: Additionally, users may be able to control the frequency of Windows updates by customizing their update settings in the Windows Update section of the Settings menu.
Step 2:Open Settings by pressing Win + I on your keyboard.

Step 3: Click on Network & Internet.
Step 4: Select Wi-Fi and click on your Wi-Fi Network.

Step 5: Toggle on the Set as metered connection on the next window.

If you are connected to the Internet via Ethernet, go to the Network & Internet settings in your computer’s Control Panel. Select Ethernet in the left pane, and then choose your active Ethernet Network in the right pane. On the next screen, enable the Set As Metered Connection option, which will help you monitor and manage your data usage more effectively.
This is especially useful if you have a limited data plan since it allows you to control how much of your data is used at any given time.
Delay Automatic Updates
Delaying automatic updates in Windows 10 is an important step to take if you want to maintain control over the updates installed on your computer.
With Windows 10, automatic updates are enabled by default, which can lead to potential problems if the updates are incompatible with other applications or hardware. Fortunately, Windows 10 allows users to delay automatic updates to manually review and install the most important updates for their system.
Step 1: Open the Start menu and search Settings.
Step 2: Go to Update & Security and select Windows update.
Step 3: Click on the Pause updates for 7 days in the right pane.

If you need to, you can continually click on the Pause Updates for 7 more Days option up to 35 days, at which point the Pause Updates option will be disabled. After that, you will need to address any postponed updates manually.
Delay Automatic Updates Until a Selected Date
As technology advances, so does the need to keep software up to date. Keeping up with updates can be daunting, especially for those with limited technical knowledge.
Thankfully, there is an option to delay auto updates until a selected date. This feature allows users to decide when they want their device to be updated, making the process much more convenient. With this feature, users can keep their devices up to date without worrying about being interrupted by updates at inconvenient times.
It also allows users to research any potential issues that may arise from updating, giving them the peace of mind that their device will be secure. Furthermore, delaying updates until a selected date can benefit those with limited bandwidth, as updates can require a significant amount of data.
Step 1: Open the Start menu and search Settings.
Step 2: Go to Update & Security.
Step 3: Select Windows update and click on the Advanced options.

Step 4: On the next window, click on the Select date drop-down menu.
Step 5: Choose the Date to which you wish to prevent Windows Auto Updates from occurring.

By choosing a date in the drop-down menu, you can delay Windows Updates on your computer until then. On the selected date, Windows will automatically download and install any pending updates on your system, ensuring your computer is updated with the latest security patches and feature improvements.
To ensure your computer is up to date with the latest updates and security fixes, it’s important to set a reminder to check for updates and install them as soon as possible.
Limit Windows Update
On Windows 10 Pro, the Local Group Policy Editor is a powerful tool that allows users to configure a wide range of settings, such as permanently disabling automatic updates or changing the update settings to specify when patches should be installed on the device. This can help you stay ahead of the curve and ensure you are always up-to-date with the latest security patches, bug fixes, and feature updates.
Additionally, the Local Group Policy Editor can configure settings for other users on the same device, giving administrators more control over the environment.
Step 1: Open the Start menu
Step 2: Type gpedit.msc and click open.

Step 3: Navigate this path: Computer Configuration > Administrative Templates > Windows Components > Windows Update
Step 4: Double-click the Configure Automatic Updates.

Step 5:Click the Enable option. Under Configure automatic updating, click the drop-down menu.
Step 6: Select 2- Notify for download and auto-install. Next, Click Apply, then the OK button.

Disable Automatic Updates Using Registry
Using the Registry is one of the ways to disable automatic updates on Windows 10. However, it can be a risky process. Making a backup of your PC before making any changes to the Registry is strongly recommended, as mistakes can cause irreparable damage to your installation.
There are two different methods for using the Registry to disable automatic updates on Windows 10 – one involves editing the Windows Update service, while the other involves editing a group policy. It is important to note that the specific steps you need to take may vary depending on your version of Windows.
Recommended: Fortect System Repair Tool – Fix Errors & Speed Up Windows Automatically
Disable Updates
Step 1: Open the Start menu, type regedit, then click Open.

Step 2: Locate HKEY_LOCAL_MACHINE\SOFTWARE\Policies\Microsoft\Windows
Step 3: Right-click the Windows folder.
Step 4: Click New and select Key.

Step 5: Name the folder key WindowsUpdate and press enter.
Step 6: Right-click the Window Update folder key, select New, then select Key.
Step 7:Name the folder key to AU.
Step 8: Right-click the AU key folder and select New, then click DWORD (32-bit) Value

Step 9: Name the key to NoAutoUpdate and press enter. Then, double-click the created key and change the value data to 1.

Step 10: Click the OK button. Restart your PC.
Once you are done following the steps outlined, your device will no longer install automatic updates. Nonetheless, you still have the option to manually download the updates by visiting the Windows Update settings page and clicking the Check for Updates button.
It is important to note that you must check for updates regularly to ensure your device stays up-to-date and secure.
Disable Windows Update Task
Windows Update is an essential tool that helps keep your computer secure and up-to-date. However, sometimes it can be unpleasant when Windows Updates are scheduled to run inconveniently or when you don’t want them to run.
Fortunately, there are ways to disable specific Windows Update tasks so that you can control when and how often Windows Updates occur.
Step 1: Open the Start menu and type Task Scheduler.

Step 2: Click the open button.
Step 3: Navigate this path: Task Scheduler Library > Microsoft > Windows > WindowsUpdate.
Step 4: Right-click on the Scheduled Start. Then, select Disable and close the Task scheduler.

Frequently Asked Questions About Turning Off Automatic Updates in Windows 10
Can I Disable Automatic Updates in Windows?
To disable automatic updates in Windows, you must navigate to Windows Update Settings and choose one of the options for managing when and how your device downloads and installs software updates. You can choose between allowing all updates to install automatically, selecting which updates you want manually, or disabling automatic updating completely.
Is Every Windows Update Essential to PC?
Windows Updates are essential to keep your PC running smoothly and securely. However, not all updates are necessary or beneficial for every computer. Understanding which updates you need and which ones can be skipped or delayed. Security updates are crucial, but optional antivirus updates should be reviewed before downloading.
What are Automatic Updates in Windows 10?
Automatic Updates in Windows 10 ensure that your device stays up to date with the latest security patches, feature updates, and bug fixes. This helps protect your computer from any malicious software or virus attacks. Once you’ve installed Windows 10, all future updates are downloaded and installed automatically.
How do I Configure Automatic Updates in Windows?
When keeping your computer safe, one of the most important things you can do is configure automatic updates in Windows. This way, you’ll always have the latest security patches and bug fixes installed on your system as soon as Microsoft releases them.
What is Windows Update Service?
Windows Update Service is a Windows component that enables automatic updates for the OS and other applications installed on your computer. It regularly checks online to see if any new updates are available and then downloads them onto your device. This ensures that your computer is up-to-date with security patches, bug fixes, and feature improvements.
What is a Windows Update Entry?
A Windows Update Entry is a record of changes made to Windows systems. These entries are stored by Windows and can be used for system maintenance and troubleshooting. They include patching, security updates, driver updates, application installations, and other software-related changes that have been made to your system.
Can I Disable Windows Update Service?
Yes, you can disable the Windows Update service if you wish. This can be done through the Services Manager of Windows. To do this, open the Run dialog box (by pressing Win + R) and type in ‘services.msc’. Here, locate the Windows Update service and double-click on it. Click on Stop to stop the service and set the Startup type to Disabled.