![[Fixed] How To Fix Time Synchronization Failed In Windows](https://cdn.techloris.com/app/uploads/2023/03/How-to-Fix-Time-Synchronization-Failed-in-Windows.png)
[Fixed] How To Fix Time Synchronization Failed In Windows

Time synchronization is essential for any computer system that maintains accurate time and date information. Windows users may encounter issues with time synchronization, leading to incorrect times and dates on their system. One common error that users may encounter is a synchronization failure with time.windows.com time.
This error can be frustrating, as it can cause problems with various system applications, including network connectivity, software updates, and security features. Fortunately, users can take several troubleshooting steps to fix time synchronization errors in Windows and ensure that their system’s time is accurate. This article will explore some of the most effective solutions to resolve time synchronization issues in Windows.
Recommended: To easily install drivers automatically, use the tool below.
Why Does the Synchronization Fail?
There are several reasons why Windows time synchronization can fail with time.windows.com. See if you’re experiencing one of these:
- Internet Connectivity Issues: The Windows time synchronization service relies on an internet connection to communicate with time.windows.com and retrieve accurate time information. If there are issues with the user’s internet connection, such as intermittent connectivity, high latency, or network congestion, the time synchronization process can fail.
- Firewall or Security Software: Windows Firewall or other security software installed on the user’s computer can block the time synchronization service from communicating with time.windows.com. This can cause the time synchronization to fail and lead to incorrect time and date on the system.
- Outdated System Components: Outdated or missing system components can prevent the Windows time synchronization service from functioning correctly. Users can check their system components and ensure they are up to date and functioning correctly by running Windows updates or performing a system scan for errors.
To resolve this issue, check out the solutions below:
How to Repair Time Synchronization Failed
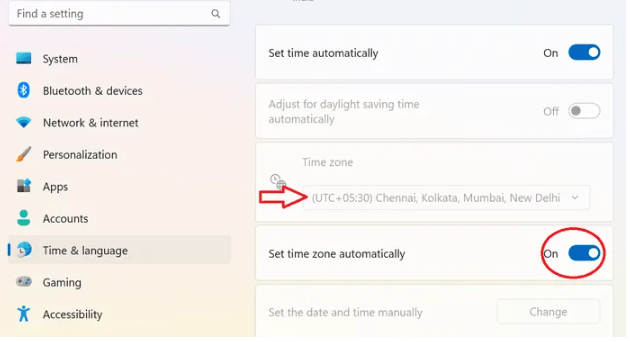
Enable Set Time Automatically
If you are experiencing time synchronization issues, the first step is to verify if you have enabled the “Set time automatically” option on your computer.
1. Open the Settings menu on your computer by pressing the Windows + I keys simultaneously.
2. Select “Time & language.”

3. In the right sidebar, click on the “Date & time” section.

4. Toggle the “Set time automatically” option on the right sidebar.

5. Set the correct time zone under the “Time zone” drop-down. Set it to automatic by toggling on “Set time zone automatically.”
Restart the Windows Time Service
Windows Time is a built-in background service that synchronizes time in Windows operating systems. Sometimes, this service may experience unexpected issues, leading to time synchronization errors. To resolve this issue, you can restart the service via the Services console by following these simple steps:
1. Press the Windows + R buttons to initiate the Run dialog box.
2. In the Open field, type “services.msc” and click OK.

3. Locate the Windows Time service, right-click on it, and select Restart. If the Restart option is greyed out, click on Start instead.

4. Once the service is restarted, exit the Services console.
Restarting the Windows Time service can often fix time synchronization issues and ensure that your computer’s clock is accurate.
Download and Run NIST Internet Time Service
To download NISTIME-32bit.exe, follow these simple steps:
1. Visit the nist.gov website and navigate to the download page for NISTIME-32bit.exe.
2. To find the download link quickly, press the CTRL + F keys and type “NISTIME-32bit.exe” in the search field.
3. Once you locate the download link, click it to download the file.
4. After downloading, right-click on it and choose “Run as administrator.”

As NISTIME-32bit.exe is a portable file that doesn’t require installation, you can run it directly on your PC to synchronize your computer’s clock with the time provided by the National Institute of Standards and Technology (NIST).
Set Windows Time Service to Automatic
The Windows Time service is responsible for maintaining synchronization with time servers on the network. However, if this service is not enabled, time synchronization on Windows 10 can fail. Here are the steps to ensure that the Windows Time service is enabled:
1. Open the Windows search box (shortcut Windows + R buttons) and type “Services.”
2. From the list of results, select “Services” to open the Services window.
3. Navigate the list to locate the “Windows Time” service and double-click on it.
4. Under the “Startup type” section, click the drop-down menu in the Properties window and select “Automatic.”
5. Click on the “Start” button to start the service, then click on “Apply” and “OK” to save the changes.

Register the Win32time Components
If a time synchronization error occurs while Windows is operating, you could try resetting the Windows Time service using the following steps:
- Press the Win + X hotkey to open the Quick Link menu, then select “Run” to open the Run command window.
- In the search box, type “cmd” and press the Ctrl + Shift + Enter shortcut key to launch Command Prompt with administrator rights.

- Type the following commands one by one in the Command Prompt (Admin) window and press Enter after each one:
net stop w32time w32tm /unregister w32tm /register net start w32time
Once the above commands are completed, close Command Prompt and reboot your PC.
Update Internet Time Settings
1. Press the Windows + R buttons to initiate the Run dialog box.
2. Type “control” and hit Enter to access the Control Panel.

3. In the Control Panel window, click on “Date and Time.”

4. In the Date and Time settings window, navigate to the “Internet Time” tab and click “Change settings.”

5. Tick the “Synchronize with an Internet time server” box > select “time.nist.gov” from the options.
6. Select “Update now” > click “OK.”

Troubleshoot Your Network Connection

If you receive a time synchronization failure due to network connectivity, that indicates an issue with your internet connection.
- Force your router to release and renew the IP address assigned to your PC.
- Power cycle or soft-reset the router.
- Clear the DNS (Domain Name System) cache in Windows.
- Connect to a different Wi-Fi network.
- Reset the network settings in Windows to their default values.
Activate the Time Synchronization Feature
1. Open the Run window by pressing the Windows + R keys, type “taskschd.msc” and press Enter.

2. In the Task Scheduler window, navigate to Task Scheduler Library > Microsoft > Windows > Time Synchronization in the left panel.
3. In the middle section, right-click on SynchronizeTime and select Enable.

4. Close the Task Scheduler window and restart your computer to apply the changes. Check if the time synchronization failed error is resolved. If not, try other solutions.
Use Registry Editor to Fix the Issue
To potentially fix the issue, you can modify the registry settings so that Windows updates the time every six hours (21,600 seconds).
Here are the steps:
1. Open the Registry Editor by searching for it in the Windows search bar and clicking on the result.
2. In the address bar at the top of the Registry Editor, paste the following line and press Enter: HKEY_LOCAL_MACHINE\SYSTEM\CurrentControlSet\Services\W32Time\TimeProviders\NtpClient

3. Find the key named “SpecialPollInterval,” double-click on it, and select “Decimal.”

4. Change the “Value data” to 21600, and click “OK.”
5. Finalize this method by closing the Registry Editor and restarting your PC to let the changes be saved.
Allow Time Syncing on Firewall
If you have a third-party network firewall on your PC, you may need to remove it and enable the Windows Firewall or permit UDP port 123, which is necessary for time synchronization. Refer to the firewall’s user guide or FAQs on how to perform this task.
If the issue persists despite using the Windows Firewall, you can create inbound and outbound rules to ensure NTP packets flow without network restrictions. Here’s how to do it:
1. Open the Run dialog box and enter “firewall.cpl,” then select OK.
2. Select Advanced settings on the left panel.

3. Right-click the Inbound rule in the left pane and choose New Rule.

4. Choose Rule Type to be Port and click Next.

5. Select UDP, enter 123 for Specific local ports, then click Next.

6. Keep the default selections in the remaining steps and click Next. Enter a name (such as NTP Inbound) on the final screen and select Finish.

7. Right-click the Outbound rule, choose New rule, and follow steps 4-6.
Check CMOS Battery
The Complementary Metal Oxide Semiconductor (CMOS) battery is responsible for powering the CMOS chip that stores essential system configuration data, such as the current date and time. In rare cases, a weak CMOS battery can lead to an incorrect time display on your PC. If you suspect this may cause your time synchronization problem, you can try resetting the CMOS to see if it resolves the issue.
Scan for Malware on Your Computer
Windows features that are crucial can be taken over by harmful software. If you encounter ongoing “Time synchronization failed” errors or experience difficulties when applying the previously mentioned solutions, conducting a comprehensive search for malware is necessary.
Here are some steps to follow:
1. Click the Windows Security icon in the system tray, then pick “View security dashboard.”

2. On the left menu, select “Virus & threat protection.”
3. Click “Scan options.”

4. Choose “Full scan” > click “Scan Now.”

Sync Your Clock With Precision: Quick Fixes for Time Synchronization Failed in Windows
It is essential to note that the effects of this error can vary from minor inconveniences to significant disruptions in your system’s functionality, depending on the severity and frequency of the error. Regardless of the cause, it is crucial to stay vigilant and take appropriate measures to address the error promptly to maintain the integrity of your system’s time and ensure its smooth operation.