![[Usage Guide] Microsoft Outlook View Changed](https://cdn.techloris.com/app/uploads/2023/05/outlook-view-change.png)
[Usage Guide] Microsoft Outlook View Changed

If you primarily use Microsoft Outlook for email, you might have noticed an unexpected change in how your inbox is displayed. This can be quite irritating, especially if you’re accustomed to a particular email arrangement. In this article, we’ll examine some possible causes of this problem and provide you with steps you can take to rectify it.
We’ll also address how to avoid a recurrence of this issue in the future. Suppose you’re dealing with an altered Outlook inbox view and wish to restore it to its former state. Your inbox view in Microsoft Outlook may have changed for several reasons. It’s possible that you changed a setting accidentally, your Outlook application became corrupted, or your user profile was damaged.
Recommended: To easily install drivers automatically, use the tool below.
If there are any profile-related issues, you may remove or create a new profile, restoring the view to its default settings. Changing its view can be inconvenient if you depend on the Compact layout for better inbox management.
However, the good news is that it is typically simple to revert the Outlook app layout to your preferred settings. You can apply either of the solutions below depending on the most suitable method.
Check for the Default View
If you’ve inadvertently altered your inbox view, you may need to revert it to its original compact format. This will prompt Outlook to present your inbox messages in a single row, although you also have the option to set a more condensed view as the default.
1. Open Outlook and click on the View tab in the ribbon menu.
2. Click on the Change View button in the Current View group.

3. Select Manage Views from the drop-down menu.

4. Look for the view with (Default) next to it in the Manage All Views window.
5. If you see a view with (Default) next to it, that is the current default view in Outlook. If not, you can set a view as the default by selecting it and clicking the Set as Default button.
Revert to the Older View via the Reset Icon
To revert to the older view via the Reset icon in Outlook, follow these steps:
1. Open Outlook and navigate to the inbox folder where you want to reset the view.
2. Click on the View tab in the ribbon menu.
3. Click on the Reset View button in the Current View group.

4. In the Reset View dialog box, select the Reset button to revert the outlook layout.
5. Confirm that you want to reset the view by clicking Yes.
6. Click the Change View button in the top-left corner, then select Compact View.

6. Your folder view will be reset to the original default view.
Reset Outlook View via Run Command
To reset all custom views and displays to default settings in Outlook, follow these steps:
1. Open the Run dialog box by pressing the Windows key and R simultaneously.
2. Type outlook.exe /cleanviews into the text field.
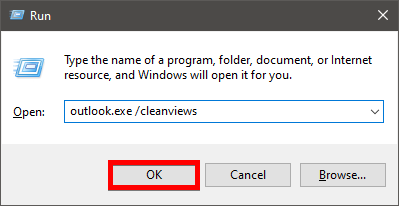
3. Click on the OK button to execute the command.
This command will relaunch the Outlook application and restore all custom views and displays to their default settings.
Run Outlook in Safe Mode or Disable Add-Ins
To troubleshoot Outlook view issues in Safe Mode and disable add-ins, follow these steps:
1. Open the Run dialog box by pressing the Windows key and R simultaneously.
2. Type outlook.exe /safe into the text field.

3. Click on the OK button to start Outlook in Safe Mode.
4. Click Yes on the Microsoft confirmation prompt.
5. Go to the File menu at the top of the screen, then click on Options.

6. Click on Add-ins, then click on Go next to the Manage COM Add-ins button.

7. select the ones you want to disable from the list of available add-ins, then click the Remove button.

8. Restart your PC and check if the Outlook changing view issue has been resolved.
Update Outlook
To check for and install updates in Outlook to address view change issues, follow these steps:
1. Start Outlook in Safe Mode.
2. Click on the File menu at the top of the screen, select Office Account, and click on the Office Updates menu.

3. Click the Update Options button, then select Update Now from the drop-down menu to install any pending updates for Outlook.

4. Restart your PC and launch Outlook to see if the view change issue persists.
Create a New Outlook Profile
To create a new Outlook profile and disable the always-use-this-profile option, follow these steps:
1. Open the Start menu and type Control Panel, then click OK to open it.

2. Select Mail (Microsoft Outlook) (32-bit) from the menu.

3. Click on the Show Profiles button.

4. On the General tab, click the Add button, then uncheck the Always use this Profile option.
5. Enter a name for the new profile and click OK.
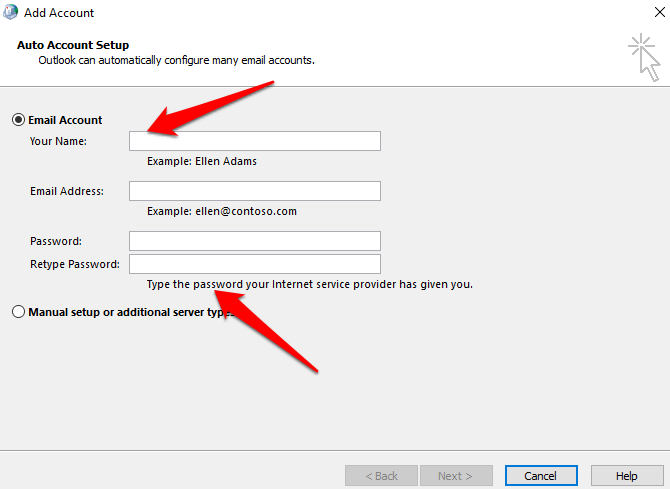
6. Add your name, email address, and password credentials, then click Next.
7. Click Apply to save the changes.
Email Sorting Options
Another option to change the way Outlook looks is by sorting emails.
Here are the steps to sort emails in Outlook:
1. Click on the arrow at the top of the message list.

2. Specify the sorting criteria in the Arrange by section of the drop-down list.

3. Click OK to save the changes.
4. If you want to return to the original sorting, click the Date option.
Disable the Group by Box Feature
The Group by Box feature may have been inadvertently enabled. To disable this feature, you must deactivate the Group by Box option.
To disable the Group By Box feature in Outlook, follow these steps:
1. Open Outlook and navigate to the View tab in the top menu.
2. Click the View Settings button in the Current View group.

3. Click the Group By button in the Advanced View Settings window.

4. Uncheck the Automatically group according to arrangement and Show in Groups checkboxes.

5. Click OK on all open windows to apply the changes.
Check Your Internet Connection
A weak or unreliable internet connection can also cause problems with your inbox view, ultimately impacting your business’s productivity and professional relationships. It is crucial to address this issue promptly by identifying its root cause and initiating the appropriate corrective measures.
Check for the Add-Ins or Plugins
Another thing to check is whether any add-ins or plugins have been added or removed from Outlook recently. If you have made any changes to your Outlook add-ins or plugins, this could potentially impact your inbox view.
1. Go to File in the Outlook menu.

2. Click on Options.
3. Click on Add-ins.

4. Review the list of installed add-ins.
5. Disable any add-ins that may be causing issues with the inbox view.
Issues With Your Email Account
If the issue is limited to a single email account, there could be a problem with that particular account. To address this, you may consider removing and adding the account again to see if this resolves the issue.
1. Go to File on the Outlook app
2. Select Account Settings from the options
3. Click on Account Settings again

4. Choose the email account that is affected by the issue
5. Click the Remove button to remove the account

6. Follow the prompts to re-add the account.
If your mailbox was recently transferred, it is important to see if the view settings have been changed on the new server. The reason is that the server migration may have affected the view settings.
Repair or Reinstall Outlook
1. Close Outlook and make sure it’s not running in the background.
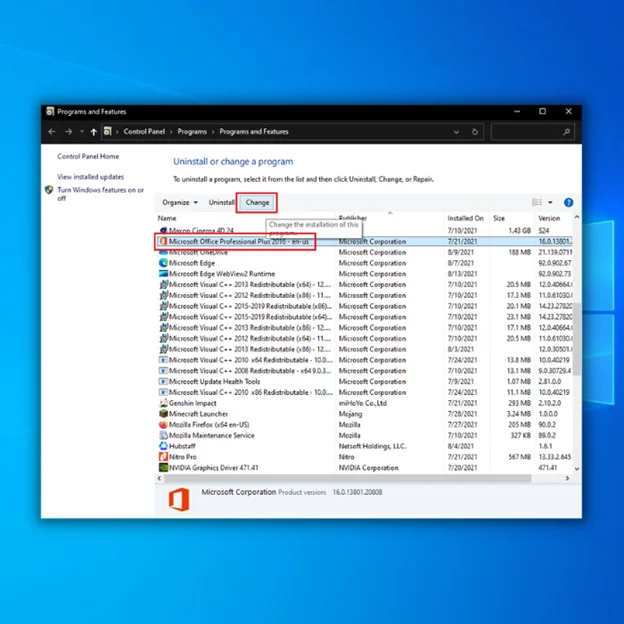
2. Open the Control Panel and go to Programs and Features.
3. Find Microsoft Office in the list of installed programs and select it.
4. Click Change and select the Repair option and click Next.

5. Follow the prompts to complete the repair process. If prompted, restart your computer.
6. If repairing Outlook doesn’t fix the issue, you may need to uninstall and reinstall it. To do this, repeat steps 1-4 above, but select Uninstall instead of Change this time. Follow the prompts to uninstall Office.
7. Once Office is uninstalled, enter your account to the Microsoft Office website.
8. Download the Office installer and follow the prompts to install it.
After installation, open Outlook and check if the issue has been resolved.
Changing the Inbox View in Outlook
Changing the Inbox View in Outlook by Selecting a Different, Existing View

- Open Outlook and click on the View tab in the Ribbon.
- Locate the Current View group and click on the Change View button.
- A menu will appear; select any listed views to apply them to your inbox. You can choose from the Compact, Single, or Preview views. By default, the Compact view is selected.
- If you want to create a new custom view or edit an existing one, click on the Manage Views… command from the menu. This will open the Manage All Views dialog box.
Changing the Inbox View in Outlook by Creating a New, Custom Views

- Click the View tab in the Ribbon to change the Inbox view.
- Click the Change View button in the Current View group.
- Select the name of any of the views listed in the menu that appears to apply to your inbox, including Compact, Single, or Preview views.
- Select the Manage Views command from the menu to create a new view.
- Click the New button at the right side of the dialog box.
- Type a name for the view into the Name of new view: text box in the Create a New View dialog box.
- Select the type of view you want to create.
- Select who can see this new view: This folder, visible to everyone; This folder, visible only to me; or All Mail and Post folders.
- Click the OK button to launch the Advanced View Settings dialog box, which has seven buttons you can click to set options for your view.
Changing the Inbox View in Outlook by Grouping Items in the View

- Click the Group By button to open the Group By dialog box.
- Use the drop-down under Group items by to select a field to group the items.
- Select up to four fields by which to the group.
- Choose whether they are grouped in Ascending (A-Z, 1-9) or Descending (Z-A, 9-1) order by choosing a sorting option at the right end of each grouped field.
- Click OK to set the grouping for your view.
Changing the Inbox View in Outlook by Changing the View’s Default Sort Order
- Click the Sort button to open the Sort dialog box.
- Select available fields from the drop-down list to choose the set of fields.
- Select the sorting fields by the drop-down under the Sort items by and Then by sections.
- You can sort these fields in either Ascending or Descending order.
- Click OK to set the sorting for your view.
Changing the Inbox View in Outlook by Filtering the Items Shown in the View

- Click the Filter… button to open the Filter dialog box.
- Choose the tab you want to use to set the criteria that include or exclude items in your view: Messages, More Choices, Advanced, or SQL.
- The Messages tab lets you choose filtering criteria by using common email fields.
- The More Choices tab lets you choose filtering criteria by assigned categories, message statuses, message option settings, and other less-frequently used fields.
- If you select the Advanced tab, you can use the Field drop-down to choose from any available fields in Outlook as a filter.
- Then, use the Condition drop-down to select a comparison condition, and if needed, type the value to which to compare the field’s value in the last text box.
- Click the Add to List button to add the filtering field to the list box above.
- The SQL tab lets you create a statement using Structured Query Language to select which items to see.
- After creating any filters, click the OK button to set the filters for your view.
Changing the Inbox View in Outlook by Adding Columns to the View
- Click the Columns button in the Advanced View Settings dialog box.
- Set the Maximum number of lines in compact mode.
- Select available columns from the drop-down menu to choose a set of fields to display.
- To add a field to your new view, select it and click the Add button.
- To change the position of the newly added field, select it and then click the Move Up and Move Down buttons.
- Click OK after adding and organizing the fields.
Changing the Inbox View in Outlook by Saving and Applying Your Advanced View Settings
- Click OK in the Advanced View Options dialog box when configuring all of the advanced settings for the view to go back to the Manage All Views dialog box.
- The newly generated view appears in the Manage All Views dialog box’s list of views.
- To use the view, click its name in the list to pick it.
- Then, click the Apply View button in the dialog box’s bottom.
- The Change View button in the Current View button group on the View tab of the Ribbon lets you choose the name of a custom view instead.
Changing the Inbox View in Outlook by Changing the Appearance of Items in the View That Match a Specific Condition
- The Conditional Formatting dialog box is opened by clicking the Conditional Formatting button.
- This dialog box already contains some rules, and you can add more.
- To add a new rule to the list, click the Add button on the right side of this dialog box.
- Enter the name of the new rule in the Name: text field.
- Once you’ve selected the criteria condition you want to apply to items that fit it, click the Font button to access a dialog box where you may adjust the font formatting.
- The font can be changed by clicking OK in the Font dialog box.
- After that, click the Condition button to specify the conditions under which your formatting will be applied.
Changing the Inbox View in Outlook by Changing the Appearance of Columns in a Table View
- Click the Format Columns button to see the Format Columns dialog box.
- From the Available fields list on the left side of this dialog box, choose the name of the field whose presentation you want to change.
- Then, modify its settings on the dialog box’s right side.
- Click OK to apply the columns after configuring their display.
Editing and Deleting Custom Mailbox Views in Outlook
- Choose the name of the custom view in the Manage All Views dialog box to edit it in Outlook.
- Then, click the Modify button on the right side of the dialog box.
- Choose the name of the custom view in the Manage All Views dialog box to delete it from Outlook.
- Next, to erase it, click the Delete button.
- Click the Close button at the bottom of the Manage All Views dialog box to close it.
Restore Your Outlook Experience: A Comprehensive Usage Guide for Resolving Unexpected View Changes
In conclusion, if you’ve noticed your Microsoft Outlook view has changed, don’t worry! There are several solutions to help you get back to your preferred view. By checking for default view settings, resetting Outlook, updating the program, or troubleshooting issues with your email account, you can easily fix this problem and get back to using Outlook.