
Nvidia Driver Install Failed: A Troubleshooting Guide

If you’re a gamer or someone who uses graphics-intensive applications, you might have encountered issues while installing Nvidia drivers on your computer. Installing the latest drivers is crucial to ensure your graphics card runs smoothly and provides the best performance possible.
However, sometimes the installation process fails, and you’re left wondering what went wrong. Don’t worry, though, as there are simple steps you can take to troubleshoot and fix this issue. In this post, we’ll walk you through some of the common causes of failed Nvidia driver installations and provide a step-by-step guide to help you get your drivers up and running in no time. So, let’s dive in!
Perform a Clean Installation
A clean installation of your operating system and drivers can often fix issues with installing or updating NVIDIA drivers. This process involves completely wiping your hard drive and starting fresh with a new operating system installation, followed by reinstalling all necessary drivers and software.
Starting with a clean slate eliminates any conflicts or errors that may have occurred during previous installations, allowing for a successful installation of the NVIDIA drivers. A clean install will remove the last version of the driver in your computer that may have gone missing or corrupt. It is important to back up any important data before proceeding with a clean installation to avoid losing any important files.
Step 1: Go to NVIDIA Downloads page and choose the appropriate driver base on your operating system.
Step 2: Click on the Download Type dropdown menu and select what type of driver you need.
- Geforce Game Ready Drivers is best for gaming.
- Studio Drivers is for design purposes such as animation, video, and photo editing.

Step 3: Click the Search button, check if you have the correct operating system, and click the Download button.

Step 4: After downloading, Run the Nvidia display driver installer as an administrator to install the driver manually.

Step 5: Select NVIDIA Graphics driver and accept the Nvidia software license agreement by clicking AGREE AND CONTINUE.

Step 6: Select the Custom installation option and click the Next button.

Step 7: Check the box beside Perform a clean installation and click Next.

Wait for the installation process to finish. It will remove all the previous drivers and install new ones. In this process, you will not need to uninstall the old drivers since this will automatically remove the old driver version and install Nvidia drivers. Hopefully, this will fix the NVIDIA installer failed error.
Close NVIDIA Processes
Ending NVIDIA processes can be useful to troubleshoot and fix the “NVIDIA driver install failed” problem. This problem is common when installing a new driver, as the old processes can interfere with the new installation. By ending the Nvidia processes, you can help ensure that the new driver can be installed correctly and without any issues.
Step 1: Press Win + X and select Task Manager.

Step 2: Go to the Processes tab, select Nvidia processes, and click the End task button.

Delete NVIDIA Files and Folder
If you have ever experienced a driver installation failure while installing an Nvidia graphics card, you know how frustrating it can be. Fortunately, one solution which has proven successful for many users is to delete any extra NVIDIA files which may be present on the system. By deleting these additional NVIDIA files, it is possible to fix the NVIDIA driver installation failed problem, allowing the installation to complete successfully.
Step 1: Press Win + E to open the Files Explorer.
Step 2: Navigate to the following NVIDIA Folders and delete them:
In ‘C:\Windows\System32\DriverStore\FileRepository’ delete ‘nvdsp. inf’ file
In ‘C:\Windows\System32\DriverStore\FileRepository’ delete ‘nv_lh’ file
In ‘C:\Windows\System32\DriverStore\FileRepository’ delete ‘nvoclock’ file
In ‘C:\Program Files\NVIDIA Corporation\’ delete ALL files
In ‘C:\Program Files (x86)\NVIDIA Corporation\’ delete ALL files
In ‘C:\Program Files (x64)\NVIDIA Corporation\’ delete ALL files
Step 3: Restart your computer.

Use Display Driver Uninstaller
Using Display Driver Uninstaller (DDU) is a great tool to fix the issue of the Nvidia driver install failed. It is a free software designed to completely remove the display drivers from your system and can be used to fix various problems related to graphics card drivers.
DDU is especially useful when the driver installation fails, or it is impossible to install the driver with the usual methods. With DDU, you can remove the existing graphics drivers from your system, leaving no trace, and then install the new driver without any conflicts or issues. This can be especially helpful when dealing with Nvidia driver install failed problems.
Step 1: Download DDU and install it.
Step 2: Press Win + I > Update & Security > Recovery > Advanced startup > Restart now.

Step 3: Choose to Troubleshoot > Advanced options > Startup Settings > Restart.

Step 4: Press F4 to boot into Safe mode and run the DDU utility.

Step 5: Check all the options under NVIDIA Specific Options in the Options window.

Step 6: Click the Select device type dropdown menu and select GPU.

Step 7: Click the brand dropdown menu and select NVIDIA.
Step 8: Click the Clean and restart button.

Step 9: The DDU will create a restore point so you can undo the change later.
Step 10: Wait for the uninstall process to finish and restart your computer.
Update Drivers
Updating drivers is important when troubleshooting and fixing problems with your computer’s hardware and software. One problem that can arise is an Nvidia driver installation failure, which can cause various issues, from poor performance to system crashes. Fortunately, updating drivers can help to resolve this issue.
By updating your drivers, you can ensure that your system is running the most recent version of the Nvidia driver, which may fix any issues you’re having with the installation process. Updating drivers can be done manually or automatically and is an important step if you’re experiencing problems with your Nvidia driver install.
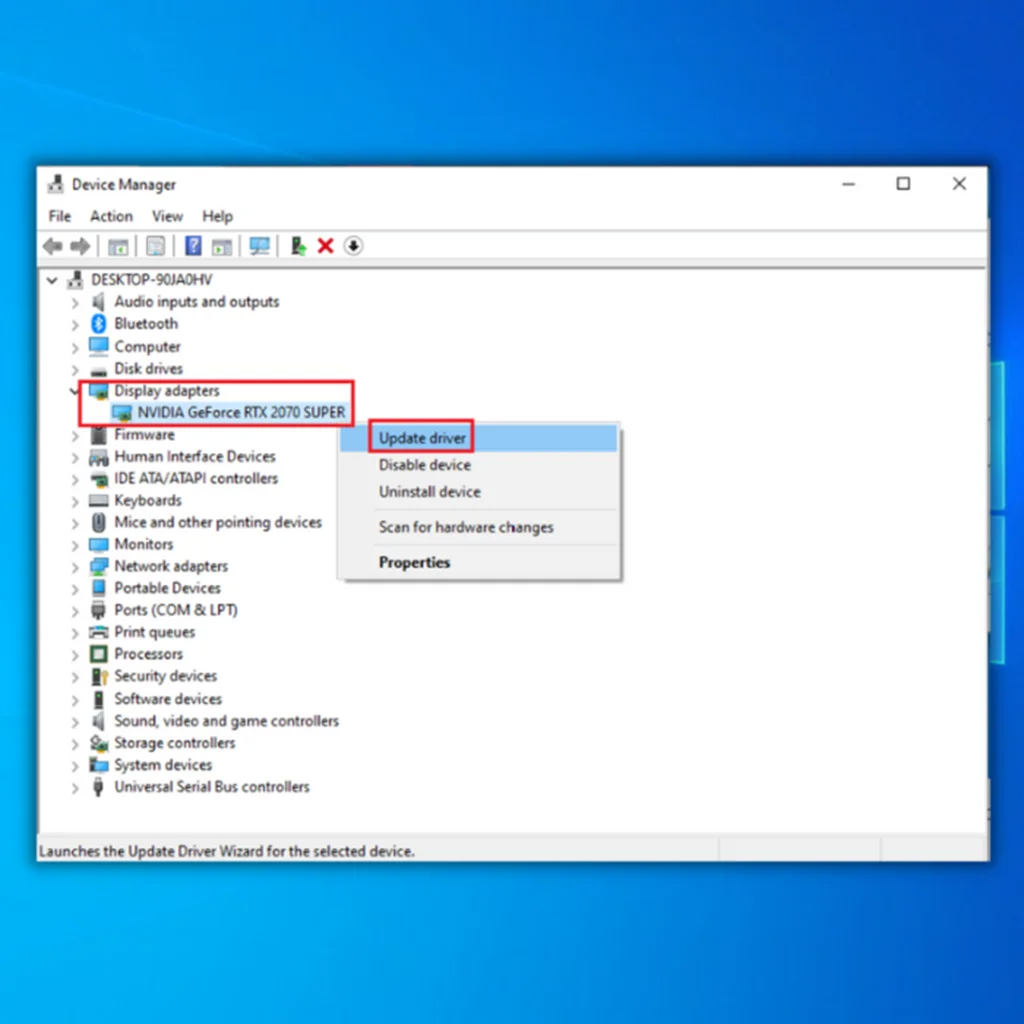
Step 1: Press Win + X and select Device manager.

Step 2: Click on Display adapters, right-click on your Nvidia graphics card driver, and select Update Driver.
Step 3: Select Search automatically for updated driver software.
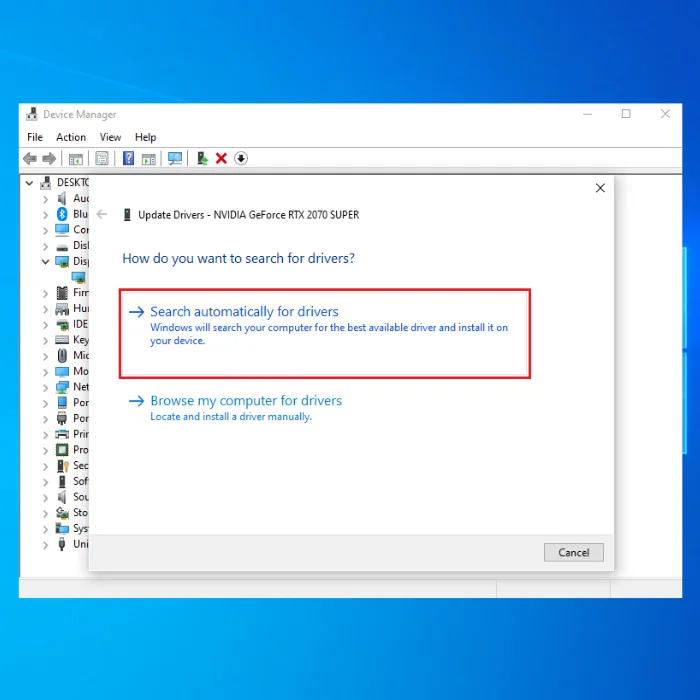
Step 4: It will search online for the latest graphics driver from Windows Update and install it on your computer.
Deleting Temp Folder
The issue is often caused by corrupted files in the Temp folder, which can prevent the driver from installing correctly. Deleting the Temp folder can help resolve this issue by removing the corrupted files and allowing the driver to install them correctly. This solution is simple, fast, and effective, so if you are having trouble getting the Nvidia driver installed, try deleting the Temp folder first.
Step 1: Press Win + R, type %temp%, and press Enter.

Step 2: Locate and right-click on the NVIDIA folder and select Properties.
Step 3: Go to the Security tab and click the Advanced button.

Step 4: Click on the Change button.

Step 5: Type your Username inside the Enter the object name field box and click the Check names button.

Step 6: Click the Apply button and check the Replace Owner button.
Step 7: Click the Apply and OK buttons.
Step 8: Delete the folder after changing its ownership.
Install NVIDIA driver from the Extraction Folder
Installing the driver from the extraction folder is a troubleshooting step that can be used to fix the “NVIDIA driver install failed” problem. This method involves manually extracting the driver files from the downloaded installation package and installing the driver using the extracted files.
This can be useful in situations where the standard installation process is not working properly, such as when the installer cannot detect the NVIDIA graphics card or when it encounters an error during the installation process. You can bypass these issues by installing the driver from the extraction folder and successfully installing the NVIDIA driver on your system.
Step 1: Press Win + X and select Device manager.
Step 2: Click on Display adapters, right-click on your Nvidia graphics card driver, and select Update Driver.
Step 3: Select Browse my computer for the drivers option.

Step 4: In the driver location, enter the location of the Nvidia extraction folder, then click on the Next button.

Step 5: Lastly, follow the on-screen instructions to complete the installation.
Restart Services and Restart Windows Update
If you are experiencing an issue where the installation of NVIDIA drivers on your Windows machine is failing, you can try a few things to resolve the problem. One potential solution is to restart the services related to the installation process, such as the Windows Update service, before attempting to install the drivers again.
Ensuring that your Windows operating system is up to date can also help ensure that the installation process proceeds smoothly. By following these steps, you may be able to successfully install the NVIDIA drivers on your system and resolve any issues you were experiencing.
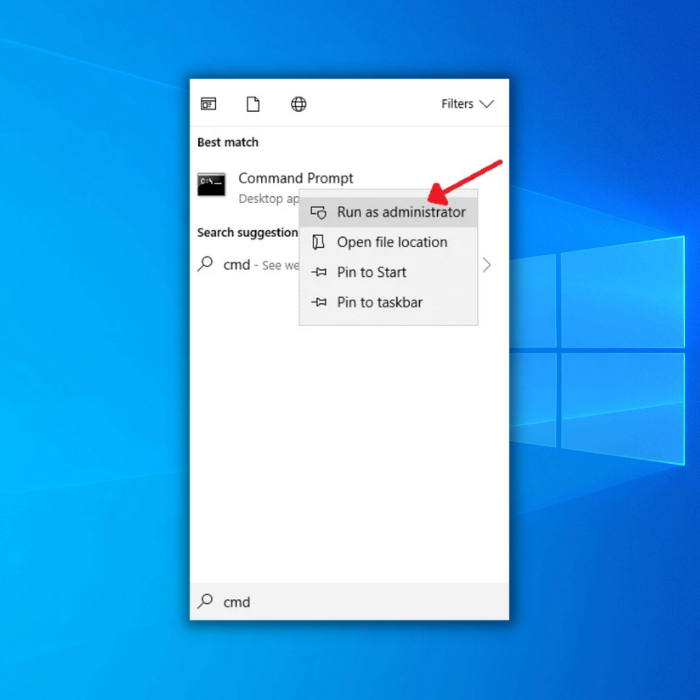
Step 1: Open the Start menu and type cmd.
Step 2: Run the Command Prompt as an administrator.
Step 3: In the command prompt window, type the following commands and press enter after each command finishes the process.
net stop wuauserv
net stop cryptSvc
net stop bits
net stop msiserver

These commands will disable the Windows Update Services.
Step 4: Rename the Windows update folder, which will initiate a new update.
Step 5: In the same command prompt, type the following commands one by one and press Enter to execute the command.
ren C:\Windows\SoftwareDistribution SoftwareDistribution.old
ren C:\Windows\System32\catroot2 Catroot2.old

Step 6: Restart the services again after the folders have been renamed. Type the following commands below.
net stop wuauserv
net stop cryptSvc
net stop bits
net stop msiserver
Step 7: Press Win + I and click on Update & Security.

Step 8: Select Windows Update and click the Check for updates button.

Step 9: Download and install the latest updates.
Install Geforce Experience
The app is a companion program for NVIDIA graphics card users, and it can automatically detect and update drivers for the user’s specific graphics card. It also provides additional features such as game optimization, streaming, and recording.
Using the GeForce Experience app to install or update drivers manually, users can ensure that the latest GPU drivers are installed and running on the most current and stable driver version, which can help fix issues such as a failed driver installation. Do not confuse GeForce Experience with the NVIDIA control panel, as it is a different NVIDIA software.
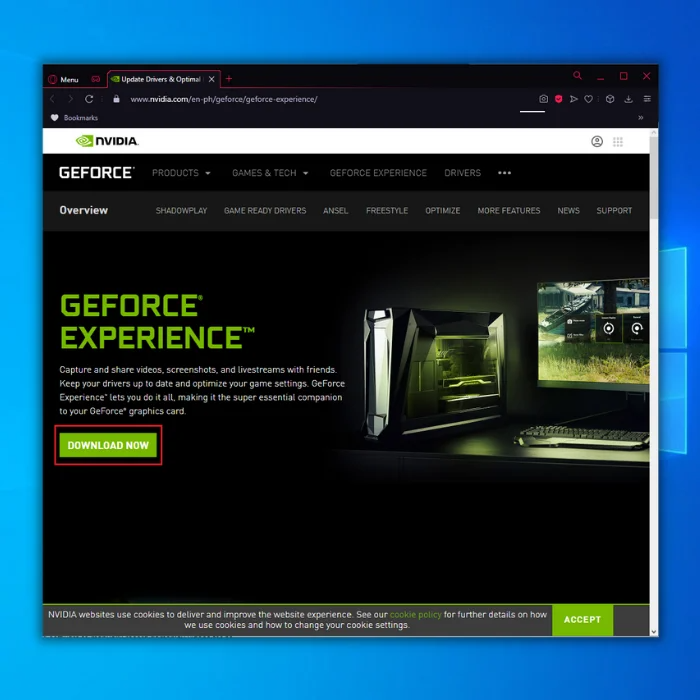
Step 1: Go to the official NVIDIA website and click the Download button.
Step 2: Install the Geforce Experience and follow the on-screen instructions after downloading.
Step 3: After installing, open the application. Click on Drivers and click the Check for updates button. It will scan for new updates.

Step 4: Click the Express Installation to proceed with the NVIDIA installation.
Reinstall Graphics Drivers
Reinstalling graphics drivers can be an effective solution for resolving a failed NVIDIA driver installation. When a driver installation fails, it can leave the system in a state where the driver is partially installed or not installed at all. This can cause conflicts and errors when trying to use the graphics card.
The previous installation is completely removed by reinstalling the drivers, and the new installation can start with a clean slate. This can help resolve any issues that may have caused the initial installation to fail and ensure that the graphics card is functioning properly.
Step 1: Press Win + X and select Device manager.
Step 2: Click on Display adapters, right-click on your Nvidia drivers, and select Uninstall Device

Step 3: Open the Control Panel and select Program & Features.

Step 4: Uninstall all the programs related to Nvidia.

Step 5: Restart your computer, go to the official NVIDIA website, and install the latest Nvidia driver.
Temporarily Disable your Antivirus Programs
Temporarily disabling antivirus programs can be a potential solution for resolving a failed NVIDIA driver installation. Antivirus programs are designed to protect a computer from malware and other malicious software but can also interfere with installing new software.
In some cases, antivirus programs may flag a driver installation as potentially harmful and block it from installing because antivirus influences the driver update. Disabling the antivirus program temporarily during the driver installation process can help ensure that the installation is not interrupted by security software.
It’s important to remember that disabling the antivirus program will leave the computer vulnerable to malware, so it should be re-enabled as soon as the installation is complete. It’s also recommended to run a scan after the installation to ensure the computer is still clean.

Enable Automatic Updates
By enabling this feature, you can keep your graphics card drivers up to date, ensuring that you are always running the latest version. This will help eliminate compatibility issues between your driver and the game or application you try to run. Additionally, automatic downloads will help keep your computer running as smoothly as possible by ensuring that you are not running outdated drivers.
Step 1: Open the Start menu, type Geforce Experience, and click open.
Step 2: Click the Settings icon.

Step 3: Go to the General tab, scroll down, click Automatically download driver updates, and then let me choose when to install the box.

Step 4: Close and then relaunch the Nvidia Client.
Perform a Clean Boot
A clean boot is a troubleshooting technique that can help fix issues with installing or updating NVIDIA drivers. This process involves starting your computer with minimal drivers and programs to determine if a background process or service is causing the problem. By starting with a clean boot, you can eliminate any conflicts or errors that may have occurred with other installed software.
This allows for a successful installation of the NVIDIA drivers. It is important to note that a clean boot may temporarily disable some features or functionality of your computer. You should consult your computer’s documentation or support website for instructions on performing a clean boot.
Step 1: Press Win + R, type msconfig, and press enter.

Step 2: Go to the General tab, Check the Load system services box, and uncheck the Load startup items.

Step 3: Next, Go to the Services tab, tick the Hide all Microsoft services box, and click the Disable all button.

Step 4: Click the Apply and OK buttons.
Step 4: Reboot your computer.
Rollback the Existing Display Adapter
Step 1: Press Win + X and select Device Manager.
Step 2: Click on Display Adapters and double-click the Nvidia graphics driver.

Step 3: In the properties window, go to the Driver tab, click the Roll Back Driver button, and click the OK button.

Step 4: Select My apps that don’t work with this driver option and click the Yes button.
Step 5: Close the Device manager and reboot your computer.