![[Guide] How to Fix Windows Update Failure 0x800700c1 Error](https://cdn.techloris.com/app/uploads/2023/01/windows-0x800700c1-error.png)
[Guide] How to Fix Windows Update Failure 0x800700c1 Error

The Windows Update Failure 0x800700c1 Error is a common problem many users face when installing computer updates. This error occurs when the updated information files are corrupted or a necessary Windows service has stopped working.
Despite the frustration such issues may cause, they can be easily resolved by troubleshooting Windows Update or deleting the update component. While in some worst-case scenarios, a reset of the machine and a fresh installation may be required, this is typically not the most effective solution for resolving the error 0x800700c1.
Recommended: To easily install drivers automatically, use the tool below.
This guide will walk you through the steps necessary to fix the Windows Update Failure 0x800700c1 Error and get your computer back to working smoothly. From basic troubleshooting to more advanced solutions, we will provide the information and tools you need to fix the problem and install updates without further issues.
Whether you’re a novice or an experienced user, this guide will be invaluable for resolving the error 0x800700c1 and keeping your computer up-to-date and running at its best.
What Are 0x800700c1 Error Codes and the Importance of Resolving Them?
Error code 0x800700c1 is a specific Windows update error code that indicates a problem with installing updates on a Windows operating system. This error code appears when the update files contain corrupted information or when a necessary Windows service that helps complete the installation has stopped working.
Resolving this error code is important as it can prevent the computer from receiving important security updates and bug fixes, leaving the operating system vulnerable to security threats and potential crashes.

Furthermore, unresolved error codes can cause software compatibility and performance issues, leading to more problems. Therefore, troubleshooting and resolving the 0x800700c1 error code is crucial to keep the operating system running smoothly and securely.
Causes of the Error Code 0x800700c1
Error code 0x800700c1 is a common issue many users face when installing computer updates. This error can be caused by a variety of factors, such as:
- Corrupted system files
- Conflicting software
- Outdated Windows
- Incomplete Windows update
Understanding the root cause of this error is essential to resolve it and to get your computer back to working smoothly. This guide will explore the various causes of the Error code 0x800700c1 and provide solutions for resolving the issue. We will provide the information and tools you need to fix the problem and install your updates without further issues.
How Can I Fix Windows 10 Error Code 0x800700c1?
Fixing the Windows 10 error code 0x800700c1 can be a challenging task. These Windows update error codes can occur for various reasons, such as corrupted system files, conflicting software, outdated Windows, or incomplete Windows update.
This section will provide effective solutions to fix this error and get your computer back to working smoothly. From basic troubleshooting to more advanced solutions, we will walk you through the steps necessary to resolve the error and keep your computer updated and running at its best.
Windows Update Error Code 0x800700c1 Support
Windows updates are automatically installed so that downloads can happen, but the problem has been identified. It could consume all the data if a consumer uses prepaid data services but they don’t know about it.
Windows updates use much information, so the problem may be due to the long time to process it, or the poor network interruption may cause errors in the updating process. The solutions can be found in the following Windows version.
Step 1: Check for updates.

Step 2: Press the Windows key + I to open the Settings app.
Step 3: Click on “Update & Security.”
step 4: Click on “Check for updates.” If any updates are available, they will begin to download and install.
Recommended: Fortect System Repair Tool – Fix Errors & Speed Up Windows Automatically
Run the SFC Scan Using the Command Prompt
SFC (System File Checker) is a built-in utility in Windows that allows you to scan for and repair corrupted or missing system files. Running an SFC scan can be useful when troubleshooting errors, such as Windows update errors.
Step 1: Open Command Prompt as Administrator.

Step 2: Run the SFC scan.
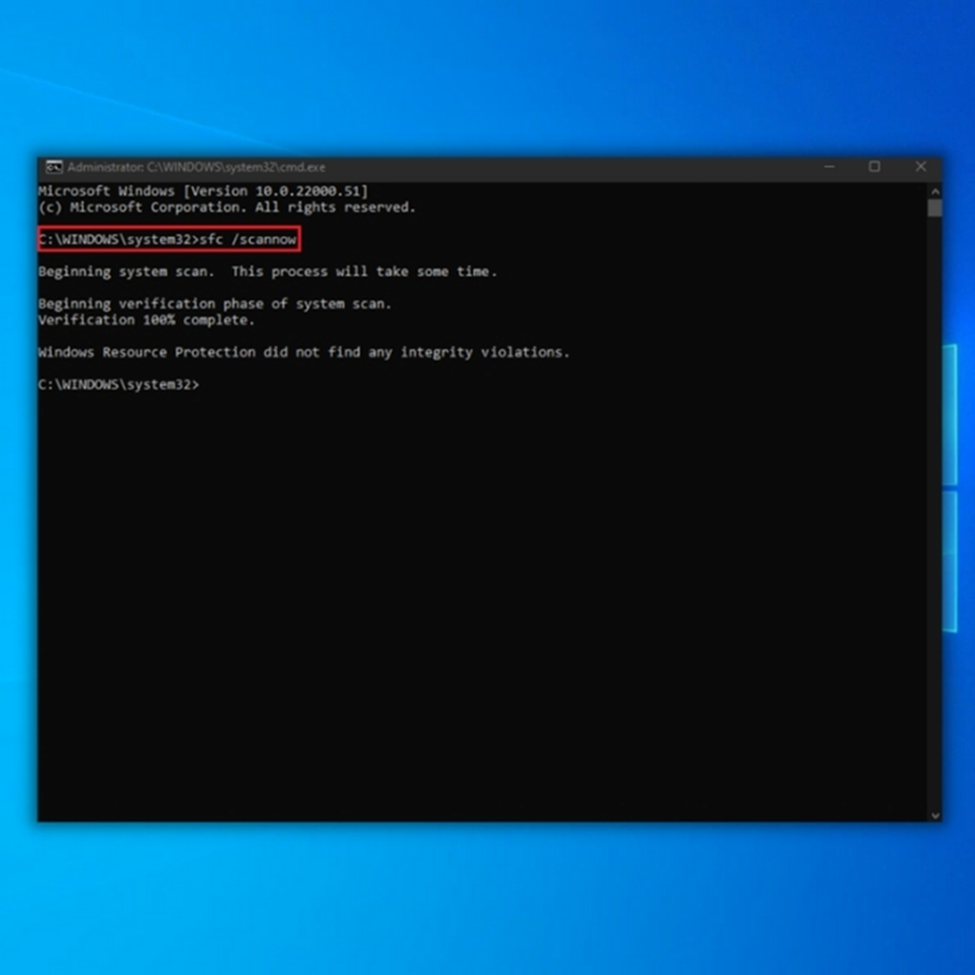
Step 3: Check the results.
Step 4: Restart the computer.
Note: If the scan found and fixed issues, you may also want to clear your Windows Update cache and run the Windows Update troubleshooter to ensure any issues with Windows updates have been resolved.
Delete Update Files From the Software Distribution Folder

Deleting update files from the software distribution folder can help resolve Windows update issues. It is important to note that this process should only be done if the Windows Update service is not functioning properly.
Step 1: Run the system file checker to check the integrity of all system files.
Step 2: Go to the “C:\Windows” folder and find the “Software Distribution” folder.
Step 3: Remove all file folders inside the “Software Distribution” folder.

Step 4: Restart your computer and rerun Windows Update. This will re-create the necessary files in the “Software Distribution” folder.

Disable or Remove the Antivirus Program
Disabling or removing an antivirus program can help resolve issues with upgrading to Windows 10. Sometimes, third-party antivirus software can interfere with the update process.
Step 1: Open the antivirus program on your computer and look for an option to disable or turn off the program temporarily. Some antivirus software will have a “disable” or “turn off” button, while others may require you to enter the settings to disable the program.

Step 2: Restart your computer and try to upgrade to Windows 10.
Step 3: If the upgrade fails, uninstall the antivirus program from your computer. To do this, go to the Control Panel and select “Programs and Features” or “Apps and Features.” Find the antivirus program in the list and select “Uninstall.” Follow the prompts to complete the uninstallation process.
Step 4: Restart your computer and try to upgrade to Windows 10 again. If the upgrade fails, check for new error messages and troubleshoot accordingly.
Run Windows Update Troubleshooter

Running the Windows Update troubleshooter is a simple way to fix issues with Windows updates. The troubleshooter is built into Windows 10 and can help resolve common problems. It is worth launching the troubleshooter if you receive an error message 0x800700c1.
Step 1: Press the Windows key + R on your keyboard to open the Run dialog box.
Step 2: Type “msdt.exe -id WindowsUpdateDiagnostic” and hit enter.
Step 3: A troubleshooter window will appear; select “Accept” to begin troubleshooting.
Step 4: Follow the prompts and instructions provided by the troubleshooter. It will automatically detect and fix problems with your update services.
Step 5: Restart your computer and check if the issue is resolved.
Clearing the Windows Update Cache

Windows Update uses a cache to store files and data used during the update process temporarily. Over time, the cache can become cluttered and cause issues with Windows Update. Clearing the Windows Update cache can help to resolve these issues and ensure that updates are installed correctly.
Step 1: Open the Command Prompt as an administrator. To do this, press the Windows key + X on your keyboard and select “Command Prompt (Admin)” from the menu.
Step 2: In the Command Prompt window, type “net stop wuauserv” and press Enter. This will stop the Windows Update service.
Step 3: Next, type “net stop cryptsvc” and press Enter. This will stop the Cryptographic service.
Step 4: Double-click on “This PC” or “My Computer” and navigate to the following folder: C:\Windows\SoftwareDistribution
Step 5: Select all the files and folders in the folder and delete them. Type “net start wuauserv” in the Command Prompt window and press Enter. This will restart the Windows Update service.

Step 6: Type “net start cryptsvc” and press Enter. This will restart the Cryptographic service. To reset Windows update components, type “net stop bits” and enter. Next, type “net stop msiserver” and press enter.
Step 7: Finally, type “net start bits” and press enter, then type “net start msiserver” and enter. Close the Command Prompt window and restart your computer.
Checking for Conflicting Software
Sometimes, conflicting software can cause issues installing new programs or updates on your computer. Checking for conflicting software can help identify and resolve these issues, ensuring your computer runs smoothly.

Step 1: Press the Windows key + R on your keyboard to open the Run dialog box.
Step 2: Type “msiexec /unregister” in the Run dialog box and press Enter. This will unregister the Windows installer service.
Step 3: Type “msiexec /regserver” and press Enter. This will re-register the Windows installer service.
Step 4: Press the Windows key + R again to open the Run dialog box.
Step 5: Type “eventvwr” in the Run dialog box and press Enter. This will open the Event Viewer.
Step 6: In the Event Viewer, navigate to Windows Logs > Application. Look for any error messages related to software installation or updates.
Step 7: Look for any software listed in the error message, and check if it is still installed on your computer. If it is, try uninstalling it.
Step 8: After uninstalling any conflicting software, try installing the program or updating again.
Step 9: Open the Control Panel, click on the Programs and Features, and look for the software that you have uninstalled; if it still exists, then click on it and select repair.
Step 10: When the new window opens, click the OK button to begin the repair process.

- Your machine is currently running Windows 10
- Fortect is compatible with your operating system.
Recommended: To repair Windows Errors, use this software package; Fortect System Repair. This repair tool has been proven to identify and fix these errors and other Windows problems with very high efficiency.

- 100% safe as confirmed by Norton.
- Only your system and hardware are evaluated.
Updating Made Easy: Fix Windows Update Failure 0x800700c1
There you have it, a step-by-step guide on how to fix the common Windows update error 0x800700c1. This guide covers the causes of this error, the importance of resolving Windows update errors, and various solutions to help fix the problem and get your computer running smoothly again.
Following the troubleshooting steps and advanced solutions provided in this guide, users can resolve the Windows update error 0x800700c1 and keep their computers updated and secure.