
Windows 10 Start Menu Not Working? How to Fix This Problem!

The start icon in your Windows 10 PC is on the bottom left corner of your display screen. The Windows 10 Start Menu allows users to access programs like Windows Explorer easily and configure Microsoft Windows. Most of the time, the Windows icon works with ease. You may occasionally click on the start icon, and nothing happens!
Recommended: To easily install drivers automatically, use the tool below.
Without the Windows 10 Start Menu functionality, you get stuck—unable to use the system. When the start button stops working suddenly, you must use the [Windows] key to open the start menu. The methods discussed here will help resolve the issue and allow you to fix the start icon.
Why Does the Start Menu Icon Stop Working
The Start Menu button can suddenly stop working after a recent upgrade or if you added a new program to your system. Sometimes Windows updates can also trigger this issue. The Windows icon plays a crucial role in allowing you to navigate around your Windows Explorer easily.
Not being able to click on the Windows icon means you have to switch from mouse to keyboard to mouse to use the Start Menu functions, which can sometimes be frustrating. This is especially true if you don’t normally use the [Windows] key on your keyboard. Thankfully, there are several ways to fix a frozen Windows icon. Read on to learn how you can rectify this issue:
How to Solve a Broken Windows 10 Start Icon Issue
There are many different ways to help resolve the problem with the Windows icon, but the one that works will depend on the reason the Start icon stopped working in the first place. The methods you should try are explained to ensure you solve the issue quickly and get your system back to normal.

- Your machine is currently running Windows 10
- Fortect is compatible with your operating system.
Recommended: To repair Windows Errors, use this software package; Fortect System Repair. This repair tool has been proven to identify and fix these errors and other Windows problems with very high efficiency.

- 100% safe as confirmed by Norton.
- Only your system and hardware are evaluated.
Re-logging Into Your Microsoft Account
This is the easiest way to fix many problems, so try this first. This method works best if the start menu issue occurs only occasionally. Here are the steps to follow:
Step #1
Press Ctrl, Alt, and Delete keys simultaneously. In the blue window that opens, click on ‘Sign out.’

Step #2
After the system reboots, go to the Login screen box and enter your password to log in once again.
Step #3
Test the Start menu icon to see if it is working now and if you can open Windows Explorer. If the problem persists, you have to go to our next solution.
Creating a New User Account
Step #1
Open the task manager by right-clicking on your taskbar.

Step #2
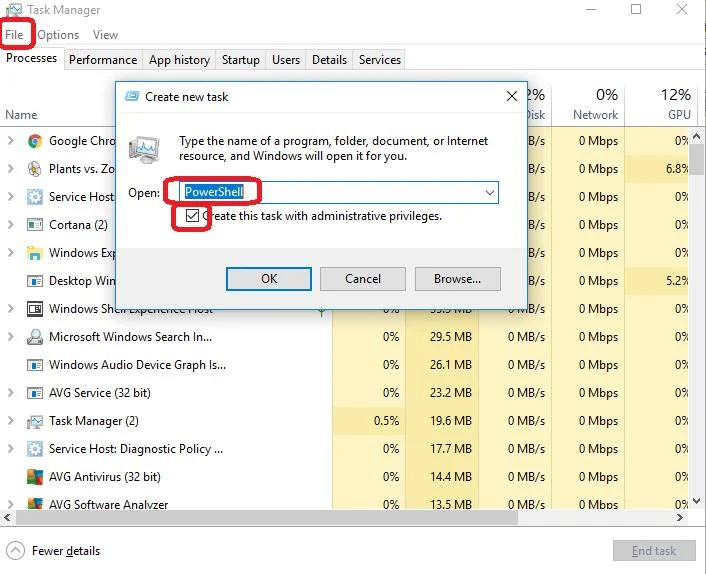
Inside the Task Manager Window, you will see ‘File’ in the top left corner. Click on it, and from the drop-down menu, choose ‘Run new task.’

Step #3
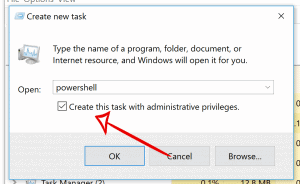
Type ‘Powershell’ into the new task window. Tick the box next to ‘Create this task with administrative privileges.’ Choose “OK” or press Enter.
Step #4
In the PowerShell window that opens, type in the following command: ‘ net user DifferentUsername DifferentPassword /add’ where ‘DifferentUsername’ is the actual new username you want for the account, and ‘DifferentPassword’ is its password.
The password is case-sensitive and must not contain a space (this is also true of the username). Now press Enter to create the new account.

Step#5
Restart the computer. At the login screen, log in with the new username and password.

The start menu should work now, and you should be able to access Windows Explorer. You can now switch your Microsoft account to the new account and move all your settings and files to it.
Reinstalling Sound and Video Card Drivers
Sometimes both the audio and video card drivers may create the problem. If this is the case, it usually happens soon after a Windows update. Reinstalling or updating a video or sound driver can also trigger the icon to stop working. Don’t worry; if this is the case, here are the steps to solve this:
Step #1
Press the [Windows] key and [X] key on your keyboard simultaneously. In the window that opens, choose Device Manager.

Step #2
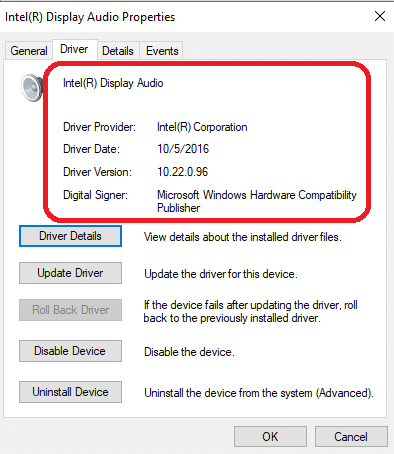
Double click on the option, ‘Sound, video and game controllers.’ Right-click on the option for the audio card driver. Choose ‘Properties’ and then click open the ‘Driver’ tab. Make a note of the driver’s details.
Step #3
Close the ‘Properties’ window and right-click again on the option for the audio card driver. This time, choose ‘Uninstall device’ from the options shown.
Step #4
You will get a notification like the one below. Tick the box next to Delete the driver software for this device. Click on the Uninstall button.

Step #5
Reboot the computer once you have uninstalled the drivers. After restarting, Windows should attempt to reinstall the drivers. If that doesn’t happen, You can visit the manufacturer’s website to find the correct driver using the information you noted in Step #2 above.
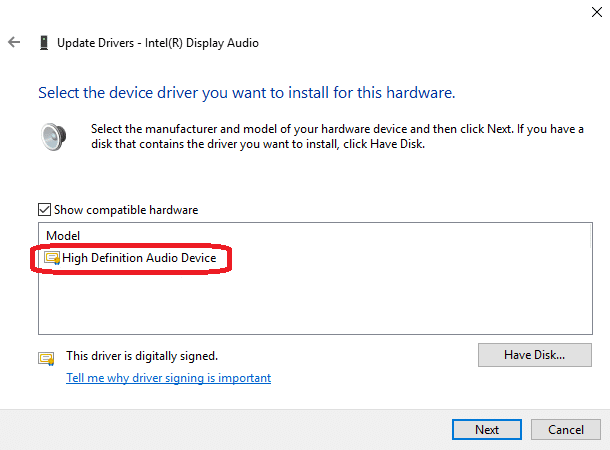
You can also use the generic audio driver provided by Windows. To do so, go to the device manager and right-click on the device. Choose’ Update driver’ from the menu that appears and browse your computer for software.
When you choose from the list of drivers, you will see ‘High Definition Audio Device,’ Windows generic audio driver. Follow the on-screen instructions to install it.
Uninstalling or Disabling Third-party Antivirus Software
You can temporarily turn the software off if you have antivirus software installed in your system, like Avast, Kaspersky, etc. Sometimes conflicting antivirus software can cause problems on your device. Nonetheless, antivirus software is crucial in scanning your personal and system files for viruses. So be sure to turn it on again once the issue is fixed.
Step #1
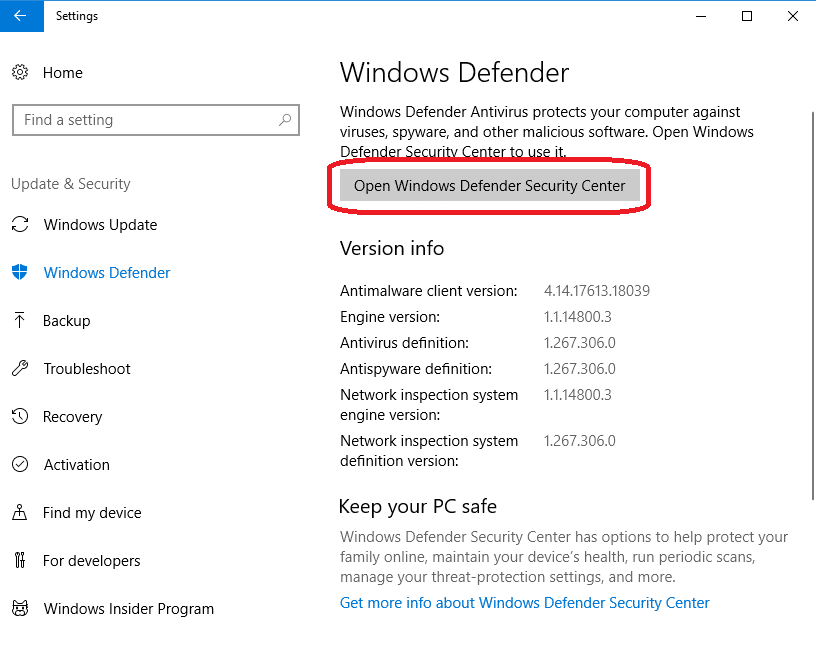
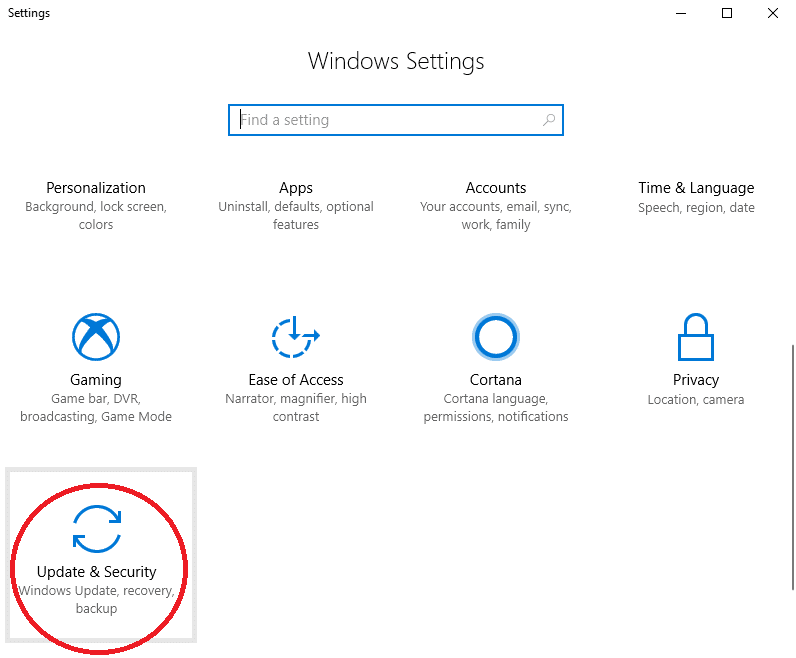
First, make sure Windows Defender is on. Press the [Windows] key and [I] key on your keyboard simultaneously to open the ‘Settings’ window. Click on ‘Update & Security’ and choose ‘Windows Defender in the left menu.’ Then click on ‘Open Windows Defender Security Center.’
Step #2
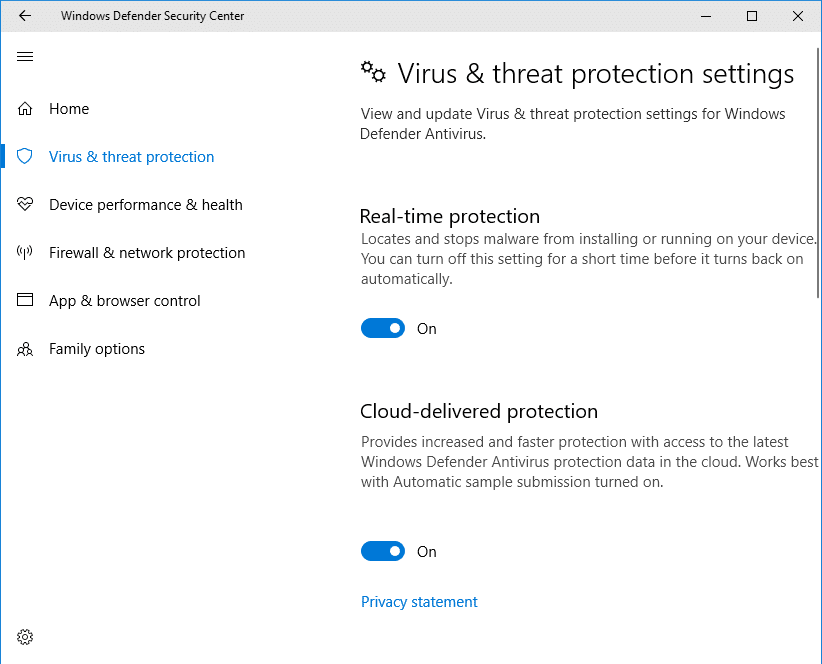
Close the ‘Virus & threat protection’ from the menu on the left side of the window. Make sure ‘Real-time protection’ is turned ‘On.’
Step #3
Now, look for your third-party antivirus icon on the taskbar. Different antivirus software uses different icons, but hovering over the icon with your cursor should tell you what it is. Since all antivirus software is different, you may be able to disable it simply by right-clicking on the icon and clicking to disable, stop, or a similar option.
In other cases, the antivirus may require you to open it by left-clicking on the icon and then using the menu options to disable it.
Step #4
Check to see if the Start menu icon is working and if you can already access Windows Explorer. If the start button works when the anti-virus is off, you must contact the software vendor to resolve the issue. If it is still not working, restart your third-party antivirus software and return Windows Defender to its initial settings. This will ensure no corrupt files infiltrate your system and all the programs inside.
Uninstalling Dropbox
In some cases, Dropbox may become incompatible with the start menu feature. Dropbox saves important personal files. However, while it is useful, it can also cause problems with your system files. Uninstall Dropbox from your computer by following the steps below:
Step #1
Simultaneously press the [R] and [Windows] keys. In the Run window that opens, type in ‘Control Panel’ and click on ‘OK.’ or press Enter.

Step #2
In the Control Panel window that opens, choose the ‘Uninstall a program’ option under the Programs category.

Step #3
Find ‘Dropbox’ in the program list and click it. Then choose the ‘Uninstall’ command that appears.

Checking and Repairing Corrupt Windows files
If you have corrupt system files, it can also trigger the start menu to stop working. You must run two inbuilt system tools to correct this problem.
Follow the steps below to do this:
Step #1
Open the task manager by right-clicking on the taskbar.

Step #2
In the Task Manager, open the File menu and choose ‘Run new task.’

Step #3
In the window that opens, enter ‘Powershell’ and mark the box for creating the task with administrative privileges. Then click “OK” or press Enter.
Step #4
In the ‘Powershell window, enter ‘sfc /scannow’ after the prompt and press Enter. Wait for the scan to finish. If the scan detects anything wrong, the computer will attempt to fix it.
Otherwise, you will see a message telling you there were no found integrity violations. If the scan finds no violations, continue to the next step to further check for issues.

Step #5
At the next Powershell prompt, copy the command below and paste it into Powershell.
DISM /Online /Cleanup-Image /RestoreHealth
Again, press Enter and wait for the scan to complete. After both scans are finished, check to see if the Start Icon is working.
Reinstalling Cortana
Step #1
Press the [X] and [Windows] keys simultaneously to open the Quick menu. Click on ‘Windows Powershell (Admin)’ to run Powershell as an administrator.

Step #2
When the Powershell opens, copy the following commands below and paste them next to the Powershell prompt. This one is if you want Cortana to only be reinstalled and re-registered for the current user:
Get-AppxPackage Microsoft.Windows.Cortana | Foreach {Add-AppxPackage -DisableDevelopmentMode -Register “$($_.InstallLocation)AppXManifest.xml”
Or, this command will work to restore Cortana for all users:
Get-AppxPackage -AllUsers Microsoft.Windows.Cortana | Foreach {Add-AppxPackage -DisableDevelopmentMode -Register “$($_.InstallLocation)AppXManifest.xml”

Step #3
When the command finishes running, Cortana will be successfully reinstalled. The start menu functionality should be restored now, and you should be able to access File Explorer.
Running Windows Update
Windows updates run frequently, with at least two major updates each year. If Windows shuts down during update installation or something else causes the update to fail, it can create problems such as the Start menu icon not working.
Step #1
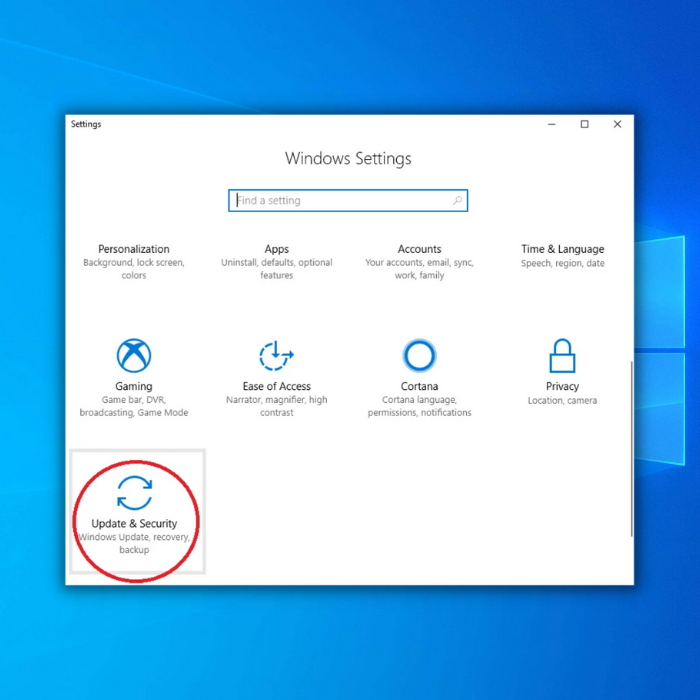
Press the [I] and [Windows] keys simultaneously to open the Windows Settings menu. Then choose the ‘Update & Security’ option.
Step #2
Click on ‘Windows Update’ in the left menu and then choose ‘Check for Updates.’

Resetting Your Computer
If all the above methods fail, you can try a simple but drastic method: reset the Windows 10 operating system. Make sure you back up all your system files and programs before you do the reset. Resetting your PC will fix any Windows Explorer issues.
Step #1
Hold down the [I] and [Windows] keys simultaneously. Then choose the ‘Update & Security’ option in the Window’s Settings window.
Step #2
In the ‘Update and Security’ window, select ‘Recovery’ from the menu on the left side of the window. This will give you the option to ‘Reset this PC.’ Click on ‘Get Started.’

Step #3
Once you choose the ‘Get Started’ option, you will see a screen that lets you choose to ‘Keep my files’ or ‘Remove everything.’ If you choose ‘Remove everything,’ all your documents and files will be deleted with the reset.

Step #4
After choosing an option, follow the on-screen instructions. This process resets Windows 10 to its factory condition. You will also see the list of applications the system will erase on reset. If you make a note of them, you can reinstall them later. You will have to confirm your choices before proceeding.
Click restart to see if the start menu not working issue has already been fixed.
Use the System File Checker To Look for Corrupted Files
Windows 10 has a built-in system file checker that fixes corrupt system files. It also adds the correct system files to restore the computer system. Launch the System File Checker (SFC) to fix various Windows Explorer issues.
- Open Run by holding the Windows Icon button, then R on your keyboard.
- Use Run to open Command Prompt by typing CMD.
- Once in the Command Prompt, type SFC /SCANNOW.
- This will instruct Windows to fix any corrupt files in your system. If that method fails, you can use a different command. From the Command Prompt, type the following command:
DISM /ONLINE /CLEANUP-IMAGE /RESTOREHEALTH
5. These commands enable the Deployment Imaging and Servicing Management (DISM) tool. DISM Online Cleanup can fix errors that prevent the System File Checker from doing its job. Once all the programs are scanned. Click Restart to check and see if the Windows start menu not working issue has already been fixed.
Turn Off The Windows Explorer Process
Turning off the Windows Explorer process is useful for various Windows desktop issues. The process may not always be the solution, but when tried, it may save you from completely reinstalling your Windows operating system and losing all your personal files.
- Right-click the Windows Start Menu icon, select Task Manager from the menu or press CTRL + Shift + Esc.
- In the Processes tab, find Windows Explorer. You’ll see another entry with a dropdown option if the Windows Explorer process is already open. Ignore that entry and choose the one without a dropdown.
- Now right-click on the process and select Restart from the menu.
This will restart your Windows File Explorer process and see if the Windows start menu not working issue has already been fixed.
Conclusion
As you can see, a broken start menu icon on your Windows 10 is not too difficult to resolve. This guide gives you plenty of methods to rectify the fault. If uncertain about what caused the fault, you can start at the top and work your way down.
The methods take only a few minutes to complete. Otherwise, you can go directly to the resolution you need.
With the right solution, your system will return to its normal working condition, so you can get back to working on your system without trying to find ways around the Windows icon.