![[Guide] How to Remove McAfee From Windows 10](https://cdn.techloris.com/app/uploads/2023/03/How-to-Remove-McAfee-From-Windows-10.png)
[Guide] How to Remove McAfee From Windows 10

McAfee is a popular antivirus software that protects against malware and other online threats. While it is a reliable tool, some users may find that it conflicts with other software or causes performance issues on their system.
If you are experiencing these problems, you may want to consider removing McAfee from your Windows 10 computer. However, uninstalling McAfee can be tricky, requiring some knowledge of Windows 10 settings and features.
Recommended: To easily install drivers automatically, use the tool below.
In this article, we will guide you through the step-by-step process of removing McAfee from your Windows 10 computer, so you can keep your system running smoothly and securely.
Here are three pros and three cons of removing McAfee from Windows 10:
Pros to Removing McAfee:
- Improved System Performance: Removing McAfee from your Windows 10 computer can help improve the overall system performance. McAfee can be a resource-intensive program and may slow down your system. Uninstalling it can free up resources and make your computer run faster.
- More Storage Space: By removing McAfee, you can also free up valuable storage space on your computer. Antivirus software like McAfee can take up a significant amount of space, and removing it can help you reclaim that space.
- Compatibility With Other Software: Some users have reported that McAfee can cause conflicts with other computer software. By removing McAfee, you may be able to improve compatibility with other software and avoid potential issues.
Cons to Removing McAfee:
- Decreased Security: Removing McAfee from your computer can leave you vulnerable to online threats. McAfee protects against malware and other online threats; without it, you may be at a higher risk of getting infected.
- Difficulty in Uninstallation: Uninstalling McAfee can be tricky, and if not done correctly, it can leave remnants that can cause issues later. This can be incredibly challenging for users unfamiliar with Windows 10 settings and features.
- Loss of Features: McAfee has various features, including firewall protection, email scanning, and spam filters. If you remove McAfee, you will lose access to these features and may need to find alternative solutions to replace them.
How to Uninstall McAfee on Windows 10
Here is a step-by-step guide on how to remove McAfee from your Windows 10 computer using the system settings:
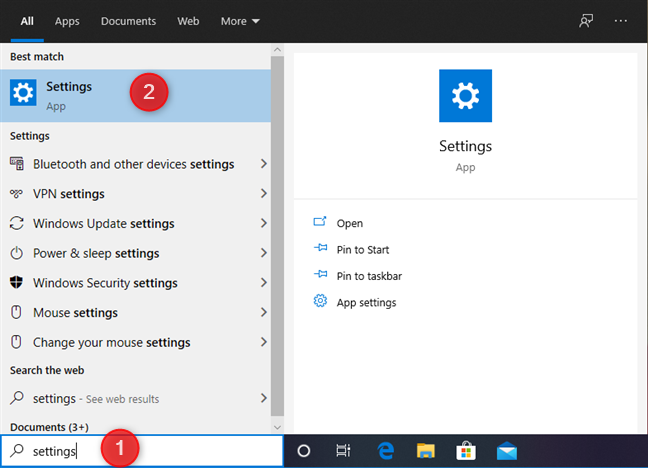
1. Click on the Windows search box or press the Windows key + S to open the search bar.
2. Type “Settings” in the search box and select the “Settings” app from the search results.
3. Select “Apps” from the list of options in the Settings app.
4. In the “Apps & features” section, type “McAfee” in the search box and select the specific McAfee product you want to remove.
5. Once you select the McAfee product, click the “Uninstall” button.

6. Confirm to proceed with the uninstall once Windows requests your permission.
7. Wait for Windows to uninstall the software, depending on the program’s size, which might take several minutes.
8. After the software has been uninstalled, close the Settings window.
9. Restart your computer to ensure the program has been successfully removed.
Following these steps, you can remove McAfee from your Windows 10 computer using the system settings.
Using the Windows Uninstaller
You can use the Windows Uninstaller to remove McAfee from your Windows 10 computer. This tool makes it easy to remove applications from your system.
1. Open the search bar and search for “Control Panel.” Click on the Control Panel option that appears.

2. In the Control Panel window, click on “Uninstall a program.”

3. Locate McAfee antivirus from the list of programs, right-click on it, and select “Uninstall/Change.”

4. A dialog box will appear. Click on the checkbox next to “McAfee Total Protection,” and then click on “Remove.”

5. From the open dialog box, click on “Remove” to start the uninstall process.

6. The uninstall process will begin, and all files associated with McAfee will be removed.

Following these steps, you can easily remove McAfee from your Windows 10 computer using the Windows Uninstaller.
How to Uninstall McAfee From Mac on Windows 10
To provide a more comprehensive guide for removing McAfee from Windows, this section of our article outlines a step-by-step uninstallation process.
Here’s how you can use the McAfee Consumer Product Removal tool to uninstall McAfee:
1. Before you start, save your work and close any open programs.
2. Download the MCPR tool.
3. Open the MCPR file you just downloaded. If a security warning appears, select “Yes.”
4. On the MCPR wizard screen, click “Next” to proceed.

5. Read and agree to the license agreement on the next page.

6. Enter the required security verification code> Click Next on the next screen.

7. Once the process is complete, a screen will appear like the one below. Click “Restart” to finish the removal process.

You can easily uninstall McAfee software from your Windows system by following these steps and using the McAfee Software Removal tool.
Uninstall McAfee Internet Security
To remove McAfee Internet Security from your computer, you can follow these simple steps:
- Open the Start menu and select Control Panel.
- Click on “Programs and Features”.
- Find and right-click on McAfee Security Center, then select “Uninstall/Change”.
- Choose to remove all files for this program by selecting the checkboxes next to McAfee Security Center.
- Click “Remove” to start the uninstallation process.
- Upon completion, restart your computer.
Uninstall McAfee Safe Connect
To remove McAfee Safe Connect from your Windows PC, you can follow these steps:
- Open Programs & Features on your computer.
- Find McAfee Safe Connect and right-click on it.
- Select “Uninstall” from the options that appear.
- Follow the prompts to uninstall the software from your PC.
By using a VPN, McAfee Safe Connect provides additional privacy and security when connecting to private networks and Wi-Fi hotspots. However, if you no longer need this tool or want to remove it, the steps above will help you do so.
Uninstall McAfee Livesafe
To remove McAfee Livesafe from your computer, there are two options you can try. The first option is to go to Settings, then Apps, find McAfee Livesafe and select Uninstall. Alternatively, you can download and use the McAfee Consumer Product Removal (MCPR) tool to uninstall the software.
Uninstall McAfee With Ease: A Step-By-Step Guide
Knowing the different options for removing McAfee from your system is always good. Whether you use the built-in Windows tools, the McAfee Consumer Product Removal tool, or the McAfee uninstaller tool, following the proper steps can make the process smoother and less stressful.
Taking the time to uninstall McAfee properly can save you a lot of headaches and ensure that your system stays protected with the antivirus software of your choice.