Recommended: Use Fortect System Repair to repair {b17dcc77-a20d-4c40-b37a-832a62190afa}.xpi errors. This repair tool has been proven to identify and fix errors and other Windows problems with high efficiency. Download Fortect here.
- ✓
The {b17dcc77-a20d-4c40-b37a-832a62190afa}.xpi file is an extension used in Firefox to add extra functionality to the browser. These extensions are often created by third-party developers and can range from adding new features to changing the appearance of the browser. The purpose of {b17dcc77-a20d-4c40-b37a-832a62190afa}.xpi will depend on the specific extension it represents, as each one serves a different purpose.
When troubleshooting issues related to {b17dcc77-a20d-4c40-b37a-832a62190afa}.xpi, it's important to understand its function and how it interacts with the browser.
Understanding Common Issues with Xpi Files
An XPI (Cross-Platform Install) file is a compressed installation archive used by various Mozilla applications, including Firefox and Thunderbird. Despite its usefulness, users may encounter several issues with XPI files. Here are a few common ones:
- Installation Errors: Users might encounter errors while trying to install an extension from an XPI file. This can happen due to various reasons like file corruption, incompatible browser version, or security settings blocking the installation.
- Issues with Compatibility: An XPI file intended for a specific Mozilla application version may face operational issues with other versions. This could cause functional disturbances or even prevent the extension from loading at all.
- Difficulty in Opening XPI Files: Some users might have trouble opening XPI files if the file associations are incorrect, or if the user is trying to open the file in an incompatible application.
- File Degradation: Should the XPI file become corrupted, perhaps owing to an incomplete download or errors on the disk, it might trigger issues when installing or operating the extension.
- Extension Discrepancies: If a user has a variety of extensions installed, an extension packed within an XPI file might come into conflict with another, leading to an unstable browser environment or potential crashes.
File Analysis: Is {b17dcc77-a20d-4c40-b37a-832a62190afa}.xpi a Virus?
The file in question, {b17dcc77-a20d-4c40-b37a-832a62190afa}.xpi, has been thoroughly scanned and shows no signs of virus detection, as evidenced by the clean results from 0 distinct virus scanners. It's always reassuring to encounter files with no known associated threats, as these pose a lesser risk to your system's integrity and performance.
Maintaining System Security
A healthy computing environment is achieved through attentive management and proactive protective measures. Keep your system's defenses updated and periodically scan files to maintain your computer's security and performance.
How to Remove {b17dcc77-a20d-4c40-b37a-832a62190afa}.xpi
If you ever need to delete the {b17dcc77-a20d-4c40-b37a-832a62190afa}.xpi file from your system, please follow these steps carefully. When dealing with system files, it's crucial to proceed with care to avoid unintended system behavior.
-
Locate the File: Begin by finding the location of {b17dcc77-a20d-4c40-b37a-832a62190afa}.xpi on your computer. You can do this by right-clicking the file (if visible) and selecting Properties, or by using the File Explorer's search function.
-
Back Up Your Data: Before making any changes, ensure you have a backup of important data. This way, your essential files are protected in case anything goes wrong.
-
Remove the File: Once you've located {b17dcc77-a20d-4c40-b37a-832a62190afa}.xpi, right-click on it and choose Delete. This action moves the file to the Recycle Bin.
-
Empty the Recycle Bin: After deleting {b17dcc77-a20d-4c40-b37a-832a62190afa}.xpi, remember to empty the Recycle Bin to completely eliminate the file from your system. Right-click on the Recycle Bin and select Empty Recycle Bin.
-
Verify System Health: After removing the file, run a full system scan using a trusted antivirus tool to ensure there are no remaining file fragments or potential threats.
Note: Keep in mind that if {b17dcc77-a20d-4c40-b37a-832a62190afa}.xpi is associated with a specific program, its removal may impact the program's functionality. If issues arise after deletion, consider reinstalling the software or consulting a tech expert for assistance.
Repair {b17dcc77-a20d-4c40-b37a-832a62190afa}.xpi Error Automatically

In this guide, we will fix {b17dcc77-a20d-4c40-b37a-832a62190afa}.xpi and other XPI errors automatically.

-
Click the Download Fortect button.
-
Save the Fortect setup file to your device.

-
Locate and double-click the downloaded setup file.
-
Follow the on-screen instructions to install Fortect.

Run the Deployment Image Servicing and Management (DISM) to Fix the {b17dcc77-a20d-4c40-b37a-832a62190afa}.xpi Error
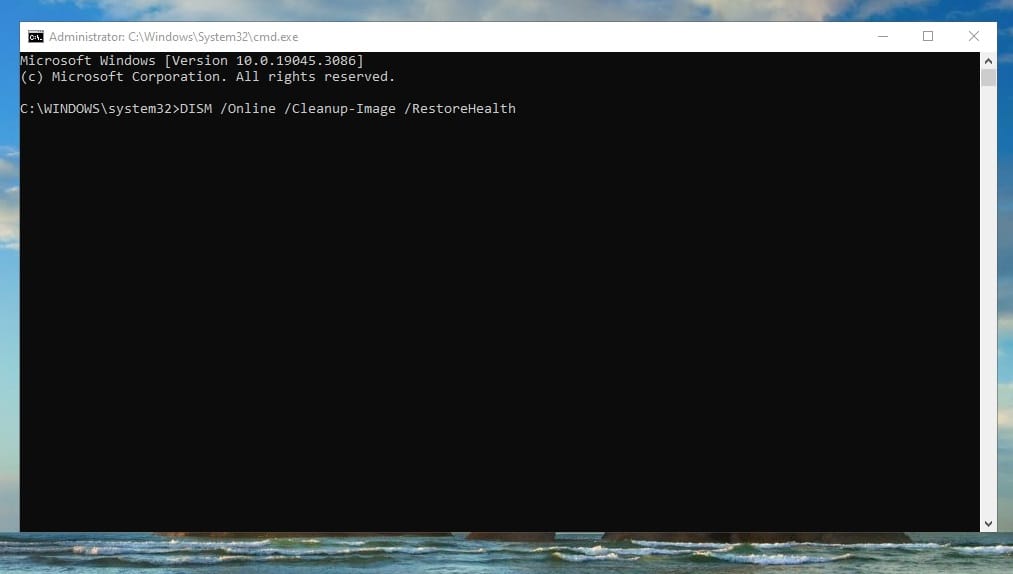
In this guide, we will aim to resolve issues related to {b17dcc77-a20d-4c40-b37a-832a62190afa}.xpi by utilizing the DISM tool to scan and repair Windows system files.

-
Press the Windows key.
-
Type
Command Promptin the search bar. -
Right-click on Command Prompt and select Run as administrator.
-
In the Command Prompt window, type
DISM /Online /Cleanup-Image /RestoreHealthand press Enter. -
Allow the Deployment Image Servicing and Management tool to scan your system and correct any errors it detects.

Perform a Repair Install of Windows

How to perform a repair install of Windows. A repair installation resets all Windows system files while preserving your personal files and applications.

-
Go to the Microsoft website and download the Windows 10 Media Creation Tool.
-
Run the tool and select Create installation media for another PC.
-
Follow the prompts to create a bootable USB drive or ISO file.
-
Insert the Windows 10 installation media you created into your PC and run setup.exe.
-
Follow the prompts until you get to the Ready to install screen.

-
On the Ready to install screen, make sure Keep personal files and apps is selected.
-
Click Install to start the repair install.

-
Your computer will restart several times during the installation. Make sure not to turn off your computer during this process.

Software that installs {b17dcc77-a20d-4c40-b37a-832a62190afa}.xpi
| Software | File MD5 | File Version |
|---|---|---|
| – | 2015.09.12... |