
Apps Not Opening in Windows 10? Here’s a Guide to Help

Check Windows Update Service
If you’re having trouble with the error apps not opening Windows 10, one way to fix the issue could be to check that the Windows Update service is working correctly. Windows Update delivers important security and performance updates to your computer and is a key component of Windows 10.
Therefore, ensuring that it is running correctly can help you receive the updates you need to keep your system running smoothly and address any potential issues causing your apps not to open correctly.
Step 1: Press Win + R, type services.msc, and press Enter.
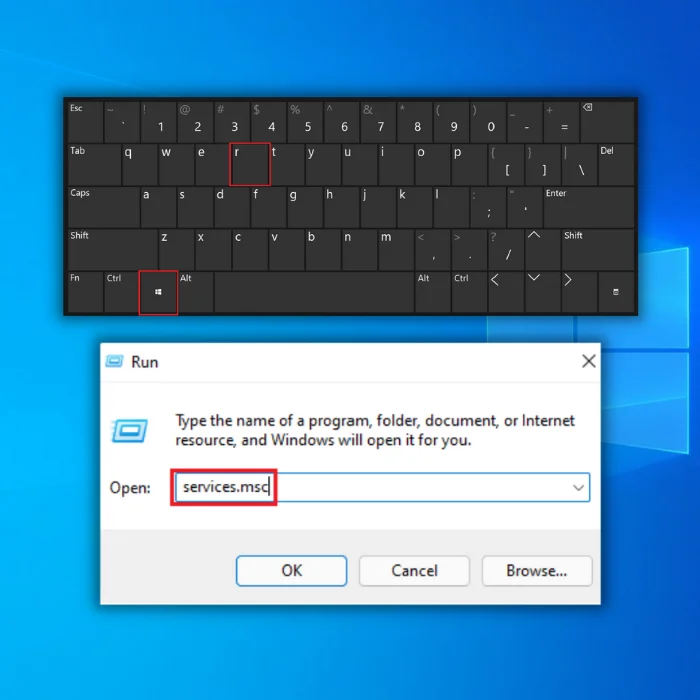
Step 2: Scroll down and locate Windows Update.

Step 3: Double-click to open the Windows Update Properties window.

Step 4: Set the Startup type to Automatic in the General tab.
Step 5: Click the Apply and OK buttons to save changes.
Run the Troubleshooter
You may feel frustrated and overwhelmed if you have encountered the “apps not opening” error on your Windows 10 computer. Fortunately, you may be able to resolve this issue by running the Windows Troubleshooter.
The Windows Troubleshooter is an automated tool that can scan and diagnose many issues, including problems with apps not opening. By running this tool, you may be able to identify the underlying cause of the error and apply the necessary fix.
Step 1: Press the Windows key + I to open the Windows Settings.
Step 2: Click on Update & Security.

Step 3: Select Troubleshoot and click on Additional troubleshooters.

Step 4: Scroll down and click on Windows Store Apps.
Step 5: Click the Run the troubleshooter button to start the Windows Store Apps troubleshooter.

Step 6: The troubleshooter will open and apply fixes for detected issues.
Make Sure Your Microsoft Store is Up to Date.
Update Microsoft Store:
If your apps are not responding or opening properly, updating the Microsoft Store may be the solution. By updating the Store, you can ensure that all of your apps installed are running the most recent versions and any important security updates.
Not only will updating the Microsoft Store fix your current issue, but it may also prevent future problems from occurring. Furthermore, updating the Store is relatively easy and only takes a few minutes.
Step 1: Open the Start menu and type store, then open the Microsoft store.

Step 2: Click the three-dotted icon in the top right corner and select Downloads and updates.

Step 3: Click the Get updates, and it will start installing automatically.

Force app updates using the command prompt:
This error can occur due to various issues, including corrupted or missing files or compatibility issues between the app and Windows 10. The command prompt can help you quickly and easily detect and fix the underlying causes of this frustrating error.
Step 1: Open the Start menu and type cmd.
Step 2: Run the command prompt as an administrator.

Step 3: In the command prompt window, type in the following command line and press Enter.
schtasks /run /tn “Microsoft\Windows\WindowsUpdate\Automatic App Update”

The command will perform an automatic update for Windows apps.
Uninstall the Application:
Uninstalling an application can help to reset the application’s settings, clear any corrupt files that might be causing the issue, and delete any unnecessary files or components that might also be causing it to malfunction. You can often get the application back to working as expected without performing any more complicated fixes or repairs by uninstalling the application.
Step 1: Open the Control Panel and select Programs and Features.

Step 2: Find the problematic app and click Uninstall.

Step 3: After the uninstallation, open the Store app and install it again.
Repair the Application
It can be very frustrating when your applications are not opening on your Windows 10 computer. This can happen for various reasons, including problems with the operating system or application.
Fortunately, one potential solution to this problem is to repair the application. By improving the application, you can restore the application to its original working state, and you may be able to get the application to open properly again.
Step 1: Open the Control Panel and select Programs and Features.
Step 2: Locate the problematic app and click on Repair.

Reset the Specific Application
Resetting an application can be a great way to fix certain errors in Windows 10. If your application is not opening, resetting it could be the best way to get it back up and running.
Resetting the application will reset all of its settings and provide a fresh start, which can often be the solution to many Windows 10 errors. It’s important to note that this process will delete any data you have saved within the application, so make sure you back up any important information before resetting it.
Step 1: Press Win + I to open settings and select Apps.
Step 2: Select the problematic application in the Apps & features tab and click Advanced options.

Step 3: Scroll down and click on the Reset button.

Step 4: Restart your computer.
Perform Microsoft Store Cache Reset
A Store cache reset is one of the most common solutions for apps not opening in Windows 10. This procedure can help resolve many issues experienced with launching third-party applications. The main aim of a Store cache reset is to ensure a smooth running of the applications on your system.
It clears out any temporary files that are stored in the cache and can help to improve the performance of the applications. It is also a relatively simple process that can address the issue of Windows 10 apps not opening.
Step 1: Open the Start menu and type cmd.
Step 2: Run the command prompt as an administrator.
Step 3: Type the following command and press Enter:
wsreset.exe

Step 4: Close the command prompt and relaunch the store app.
Check the Application Identity Services
This service allows applications to run securely by providing identity information; when it’s not running, some apps may be unable to open. Fortunately, it’s relatively easy to check if the service is running and to start it up if it is not. Doing this could potentially fix the issue of Windows 10 apps not opening.
Step 1: Press Win + R, type services.msc, and press Enter.
Step 2: Locate and Double click the Application Identity service.

Step 3: In the Application Identity Properties window, check the Service status section. If it is Stopped, click the Start button.

Step 4: Click the Apply and OK button to save the changes.
Step 5: Close the Services window and restart your computer.
Run the System File Checker
The System File Checker (SFC) is a built-in Windows 10 tool that allows you to scan for and repair corrupted system files. Running the System File Checker is a great way to fix certain application errors, such as when apps won’t open in Windows 10.
Not only can the System File Checker repair missing or damaged system files, but it can also repair system registry inconsistencies and replace incorrect versions of system files.
Step 1: Open the Start menu, type cmd and run it as an administrator.
Step 2: In the command prompt, type sfc /scannow and press Enter.
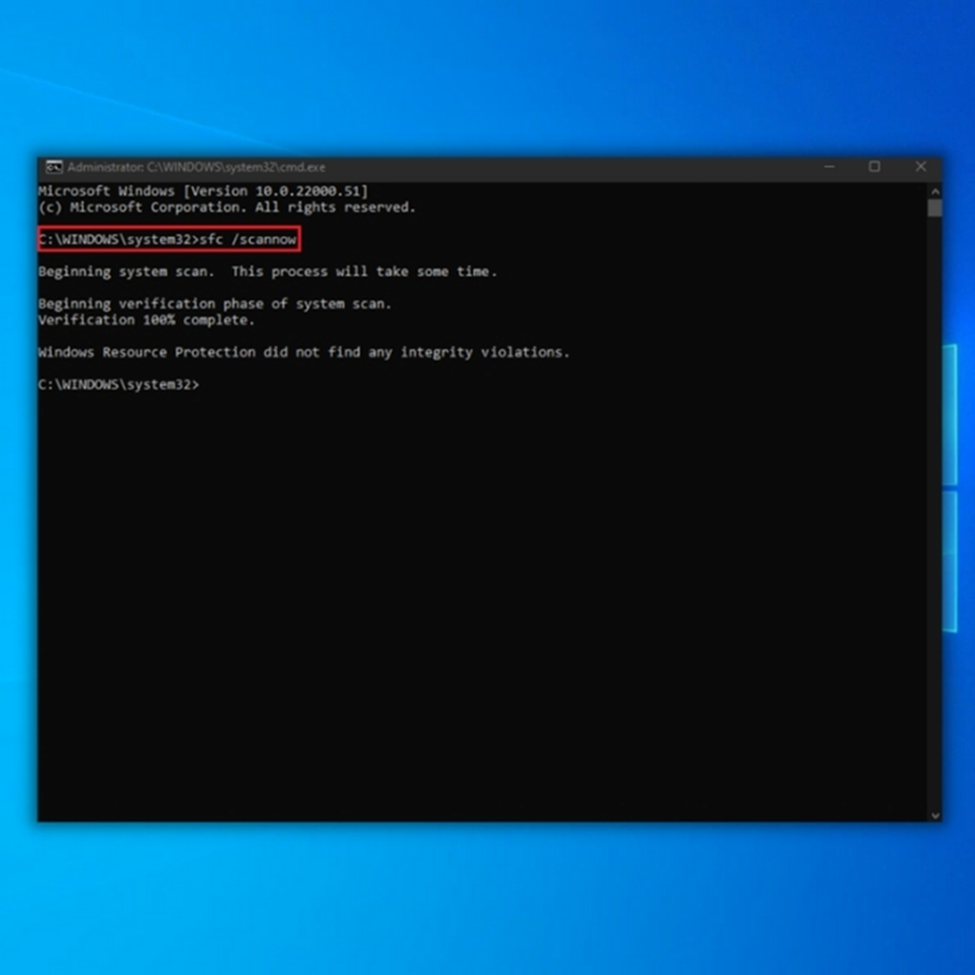
Step 3: After the scanning is complete, restart your computer.
Change Ownership of your Drive
Changing the drive’s ownership can help resolve errors where apps fail to open or run properly. By changing the ownership of the drive, you can give yourself or another user full control to access and use certain applications.
You can also set permissions for users so that specific individuals can access certain files, folders, and drives. This can be particularly useful when limiting access to certain folders or drives.
Step 1: Press Win + E to open the files explorer.
Step 2: Right-click on the C: Drive and select Properties.

Step 3: Go to the Security tab and click the Advanced button.

Step 4: In the Advanced Security Settings window, click on Change.

Step 5: Click the Advanced button in the User or Group window.

Step 6: Click the Find Now button, select the Administrators group, and click OK.

Step 7: Check the Replace owner on subcontainers and objects box.

Step 8: Click the Apply and OK buttons to save changes.
Add Full Control Permission for All Application Packages Group
This is because Windows 10 requires certain system resources to run apps, and these permissions grant applications the necessary access to function properly. By granting Full Control permission to this group, you will be able to ensure that all applications have the resources they need to run without any issues. This can help eliminate the error and ensure that your apps run smoothly.
Step 1:Press Win + E to open the files explorer.
Step 2: Right-click on the C: Drive and select Properties.
Step 3: Go to the Security tab and click the Edit button.

Step 4: Click the Add > Advanced button in the next window.
Step 5: Click the Find Now button, select ALL APPLICATION PACKAGES on the list, and click OK.
Step 6: ALL APPLICATION PACKAGES will now be added to the list. Select Full Control. Click Apply and OK to save.

Change FilterAdministratorToken in Registry Editor
Registry Editor is a tool that allows users to modify the registry, a database that stores important configuration settings and options for the Windows operating system. By changing the FilterAdministratorToken value, you can fix issues preventing certain applications from opening in Windows 10.
Step 1: Press Win + R, type regedit, and press Enter.
Step 2: Navigate to the following path:
HKEY_LOCAL_MACHINE\SOFTWARE\Microsoft\Windows\CurrentVersion\Policies\System
Step 3: If FilterAdministratorToken DWORD doesn’t exist, you can create it by right-clicking in the right pane and clicking New > DWORD (32-bit) Value.

Step 4: Double-click the FilterAdministratorToken, set theValue data to 1, and click OK to save the changes.

Step 5: Close the Registry editor and restart your computer.
Re-register the Application
Reregistering the application involves using PowerShell commands to reset the application’s settings and run a few maintenance tasks. This can help to resolve any conflicts or errors that may prevent the application from opening. Reregistering the application can also help improve its performance, as it will reset any unused files and settings that may slow the application down.
Step 1: Press Win + X and select Windows PowerShell (Admin).

Step 2: Type in the following command lines and press Enter after each line and wait for it to finish before entering a new line of code:
Get-appxpackage -packageType bundle |% {add-appxpackage -register -disabledevelopmentmode ($_.installlocation + “appxmetadataappxbundlemanifest.xml”)}
$bundlefamilies = (get-appxpackage -packagetype Bundle).packagefamilyname
get-appxpackage -packagetype main |? {-not ($bundlefamilies -contains $_.packagefamilyname)} |% {add-appxpackage -register -disabledevelopmentmode ($_.installlocation + “appxmanifest.xml”)}
Once the commands are executed, restart your computer and check if the windows will open and work without problems.
Move the Database Folder
Moving this folder can sometimes resolve the issue, allowing you to reaccess your applications. The Database folder contains important files the operating system uses, so it is important to ensure the folder is in the correct location.
Step 1: Open the Start menu, type cmd and run it as an administrator.
Step 2: Type in the following command lines and press Enter after each commands:
net user “TempAdmin1” “password1” /add
net user “TempAdmin2” “password2” /add
net localgroup administrators “TempAdmin2”

Step 3: Logout of your user account by pressing CTRL + ALT + DEL and clicking Sign out.
Step 4: Log in to the TempAdmin1 account. Users enter password1 as a password.
Step 5: Log out of the TempAdmin1 account.
Step 6: Log in to the TempAdmin2 account. Use password 2 as a password.
Step 7: Press Win + E to open the File Explorer. Click the View tab on Hidden items to reveal hidden files and folders.

Step 8: Navigate to this path:
C:\Users\Temp\Admin1\AppData\Local\TileDataLayer
Step 9: Locate the Database folder, right-click, and select Copy.

Step 10: Paste the Database folder to your main profile. Navigate to this folder:
C:\Users\YOUR_USERNAME\AppData\Local\TileDataLayer
Step 11: Locate the Database folder, and change the folder name to Database.BAD and press CTRL + V to paste the folder.
Step 12: Restart your computer and login with your main profile.
Step 13: Open the Control Panel and select User Accounts.

Step 14: Click on Manage another account, select TempAdmin1 and TempAdmin2 accounts, and click Delete Account to remove the accounts.
Modify the User Account Control Settings
Modifying the User Account Control (UAC) settings on a computer running Windows 10 can be an effective way to address apps not opening errors. UAC is a security feature that helps protect your computer from malicious software by prompting you for permission before allowing apps to change your system.
You can ensure that apps have the necessary privileges to function correctly by properly setting up the UAC. In addition, you can also configure the UAC settings to prevent apps from running without your permission. This step can help keep your computer safe and ensure that apps open without issue.
Step 1: Open the Start menu, type Change User Account Control Settings, and open it.
Step 2: Drag the Slider to Never Notify and click the OK button to save changes.
