Recommended: Use Fortect System Repair to repair D0708b5e-a0ca-4cb9-8e50-6bb28267f196.xpi errors. This repair tool has been proven to identify and fix errors and other Windows problems with high efficiency. Download Fortect here.
- ✓
The d0708b5e-a0ca-4cb9-8e50-6bb28267f196.xpi file is an extension file used by Mozilla Firefox to add new features and enhance the browser's functionality. These files can contain additional themes, plugins, or other customizations for the browser. When you install a .xpi file, it modifies the browser's behavior to incorporate the new features or changes it brings.
Understanding how to manage and troubleshoot .xpi files is essential for maintaining a stable and secure browsing experience.
Understanding Common Issues with Xpi Files
An XPI (Cross-Platform Install) file is a compressed installation archive used by various Mozilla applications, including Firefox and Thunderbird. Despite its usefulness, users may encounter several issues with XPI files. Here are a few common ones:
- Installation Errors: Users might encounter errors while trying to install an extension from an XPI file. This can happen due to various reasons like file corruption, incompatible browser version, or security settings blocking the installation.
- Issues with Opening XPI Files: Some users may face hurdles when trying to open XPI files, especially if the file associations are misaligned or if the file is being accessed through an incompatible application.
- Extension Interferences: For users with multiple extensions installed, there's a chance that an extension within an XPI file might contradict another, causing browser instability or outright crashes.
- File Degradation: Should the XPI file become corrupted, perhaps owing to an incomplete download or errors on the disk, it might trigger issues when installing or operating the extension.
- Security Risks: Certain XPI files may harbor harmful code or originate from unreliable developers, presenting potential threats to the user's system security.
File Analysis: Is D0708b5e-a0ca-4cb9-8e50-6bb28267f196.xpi a Virus?
The file named d0708b5e-a0ca-4cb9-8e50-6bb28267f196.xpi has successfully passed tests from various virus detection tools with no flagged security issues. This is certainly good news as it minimizes the risk to your computer's overall health and performance.
Maintaining Security
However, even with such reassuring results, not letting your guard down is important. Regular system updates and routine security scans are pivotal in maintaining your computer's security and operational effectiveness. This way, you can continue to confidently use d0708b5e-a0ca-4cb9-8e50-6bb28267f196.xpi as part of your daily computer activities.
How to Remove D0708b5e-a0ca-4cb9-8e50-6bb28267f196.xpi
If you find the need to eliminate the d0708b5e-a0ca-4cb9-8e50-6bb28267f196.xpi file from your system, please follow the steps provided below. As with any modification to system files, it's crucial to proceed with care to avoid unintentional changes that may cause unpredicted system responses.
-
Locate the File: Start by finding d0708b5e-a0ca-4cb9-8e50-6bb28267f196.xpi on your system. You can do this by using the search feature in your File Explorer.
-
Protect Your Data: Always have a backup of important data before changing your system files. This keeps your important files safe, even if something goes wrong.
-
Remove the File: Once you've found d0708b5e-a0ca-4cb9-8e50-6bb28267f196.xpi, remove it by right-clicking on the file and choosing Delete. This moves the file to your Recycle Bin.
-
Complete the Deletion: To get rid of d0708b5e-a0ca-4cb9-8e50-6bb28267f196.xpi fully, you must empty your Recycle Bin. Right-click on the Recycle Bin icon and choose Empty Recycle Bin.
-
Check Your System: After you've removed the file, run a full system scan using a trusted antivirus tool. This helps ensure no harmful bits of the file are left behind.
Note: Keep in mind that if d0708b5e-a0ca-4cb9-8e50-6bb28267f196.xpi is related to a specific program, deleting it could cause the program to stop working correctly. If you notice any issues after removing the file, you might need to reinstall the software or consult a technology professional for guidance.
Repair D0708b5e-a0ca-4cb9-8e50-6bb28267f196.xpi Error Automatically

In this guide, we will fix d0708b5e-a0ca-4cb9-8e50-6bb28267f196.xpi and other XPI errors automatically.

-
Click the Download Fortect button.
-
Save the Fortect setup file to your device.

-
Locate and double-click the downloaded setup file.
-
Follow the on-screen instructions to install Fortect.

Perform a Repair Install of Windows

How to perform a repair install of Windows. A repair installation resets all Windows system files while preserving your personal files and applications.

-
Go to the Microsoft website and download the Windows 10 Media Creation Tool.
-
Run the tool and select Create installation media for another PC.
-
Follow the prompts to create a bootable USB drive or ISO file.
-
Insert the Windows 10 installation media you created into your PC and run setup.exe.
-
Follow the prompts until you get to the Ready to install screen.

-
On the Ready to install screen, make sure Keep personal files and apps is selected.
-
Click Install to start the repair install.

-
Your computer will restart several times during the installation. Make sure not to turn off your computer during this process.

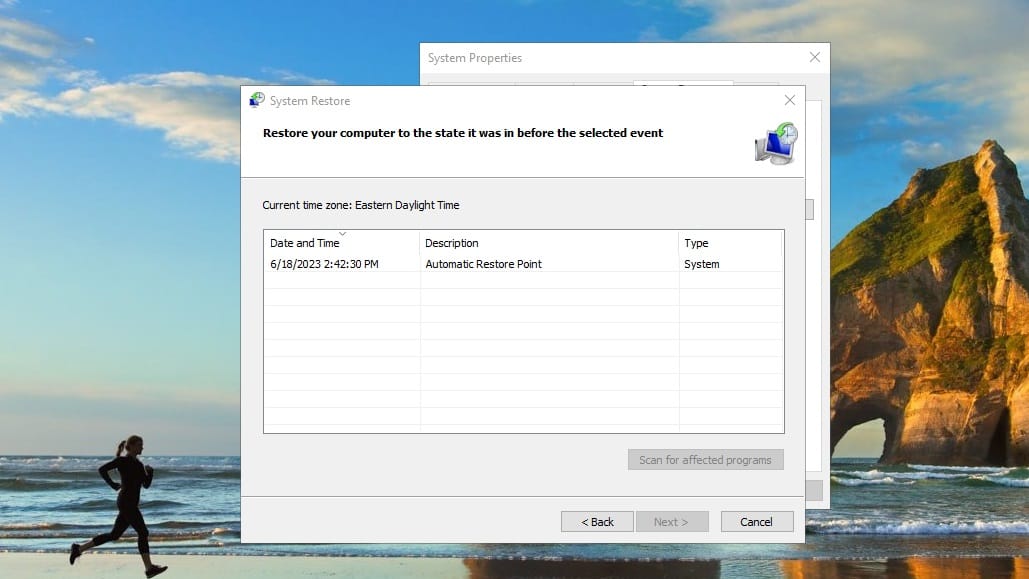
Perform a System Restore to Fix System File Errors

How to perform a System Restore to repair d0708b5e-a0ca-4cb9-8e50-6bb28267f196.xpi issues.
-
Press the Windows key.
-
Type
System Restorein the search bar and press Enter. -
Click on Create a restore point.
-
In the System Properties window, under the System Protection tab, click on System Restore....
-
Click Next in the System Restore window.
-
Choose a restore point from the list. Ideally, select a point when you know the system was working well.


Software that installs d0708b5e-a0ca-4cb9-8e50-6bb28267f196.xpi
| Software | File MD5 | File Version |
|---|---|---|
| – | 1.35.3.9 |