Recommended: Use Fortect System Repair to repair Tmgauge.ocx errors. This repair tool has been proven to identify and fix errors and other Windows problems with high efficiency. Download Fortect here.
- ✓
tmgauge.ocx is a software component commonly used in Windows operating systems. Its primary function is to provide visual representations of data through graphical gauges, such as progress bars and meters. These visual elements are often utilized in software applications to convey information to users in a clear and intuitive manner.
Developers integrate tmgauge.ocx into their programs to enhance the user experience and provide real-time feedback on processes or data.
Understanding Common Issues with Ocx Files
An OCX file, utilized as a component or control file by ActiveX forms in Microsoft applications, is typically useful. However, users might encounter a range of issues when managing OCX files. Let's delve into some of the common problems:
- File Corruption: If the OCX file is corrupted due to reasons such as an incomplete download, disk errors, or malware, it can cause issues when an application tries to use it.
- Security Concerns: As OCX files are capable of containing executable code, they could pose a threat to security if derived from untrusted developers or websites. They may include malicious code that can threaten the integrity of a user's system.
- Compatibility Concerns: If an OCX file is tailored for a particular version of an application or Windows, it might not work as intended with different versions. This could lead to functional problems or a complete inability of the component to load.
- Problems Accessing OCX Files: Users could find it hard to open OCX files if the file associations have been improperly configured, or if the user is trying to access the file with an incompatible application.
- Errors from Absent OCX Files: If an OCX file is not found in its designated spot, applications dependent on it might not run or may show errors. This situation frequently arises when the file is mistakenly deleted or displaced.
File Analysis: Is Tmgauge.ocx a Virus?
The file in question, tmgauge.ocx, has been thoroughly scanned and shows no signs of virus detection, as evidenced by the clean results from 0 distinct virus scanners. It's always reassuring to encounter files with no known associated threats, as these pose a lesser risk to your system's integrity and performance.
Maintaining System Security
A healthy computing environment is achieved through attentive management and proactive protective measures. Keep your system's defenses updated and periodically scan files to maintain your computer's security and performance.
How to Remove Tmgauge.ocx
If the need arises to erase the tmgauge.ocx file from your system, adhere to the following steps with caution. Modifying system files can have unintended consequences, so proceed carefully.
-
Find the File: Start by locating tmgauge.ocx on your computer. You can use the File Explorer's search feature to do this.
-
Protect Your Data: Always back up important data before making changes to system files. This ensures the safety of your essential files in case of any issues.
-
Delete the File: After identifying the location of tmgauge.ocx, you can delete it. Right-click on the file and select Delete to move it to the Recycle Bin.
-
Confirm Deletion: To completely remove tmgauge.ocx from your system, empty the Recycle Bin. Right-click on the Recycle Bin and choose Empty Recycle Bin.
-
Verify System Health: After removing the file, perform a thorough system scan using a reliable antivirus tool to ensure there are no remaining file fragments or potential threats.
Note: Keep in mind that if tmgauge.ocx is associated with a specific program, deleting it may affect the program's functionality. If you encounter issues after deletion, consider reinstalling the software or consulting a tech professional for guidance.
Repair Tmgauge.ocx Error Automatically

In this guide, we will fix tmgauge.ocx and other OCX errors automatically.

-
Click the Download Fortect button.
-
Save the Fortect setup file to your device.

-
Locate and double-click the downloaded setup file.
-
Follow the on-screen instructions to install Fortect.

Perform a Clean Boot
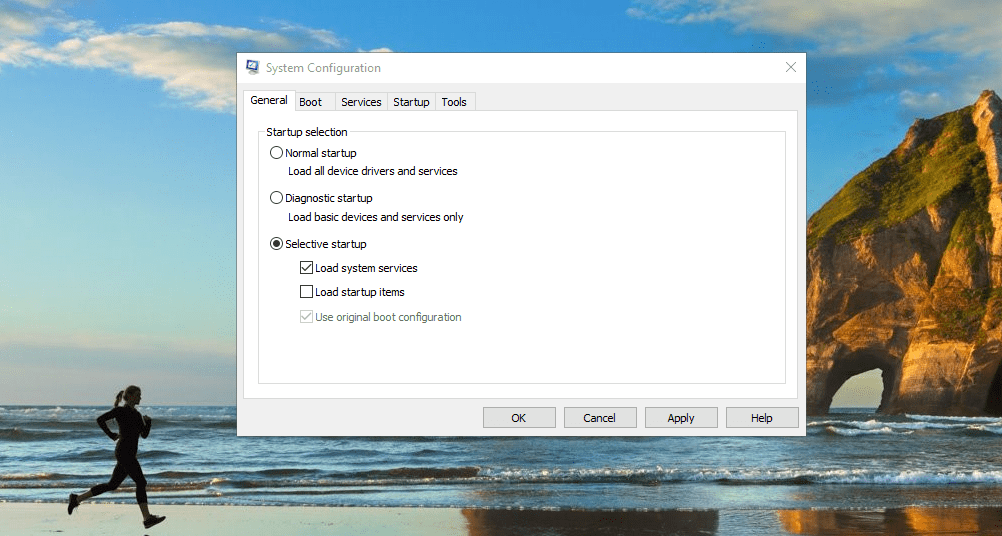
How to perform a clean boot. A clean boot can fix tmgauge.ocx conflicts.


-
In the General tab, select Selective startup.
-
Uncheck Load startup items.
-
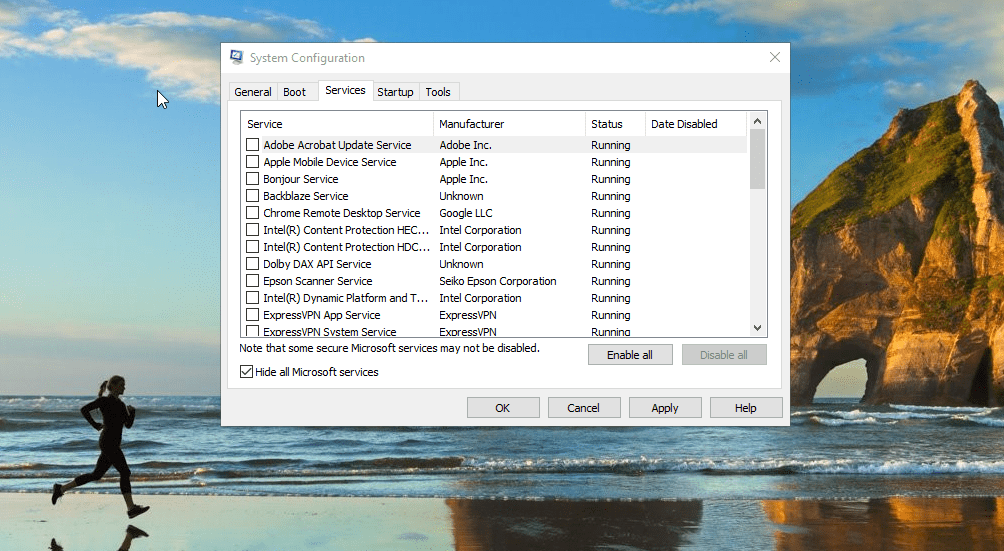
Go to the Services tab.
-
Check Hide all Microsoft services.
-
Click Disable all.
-
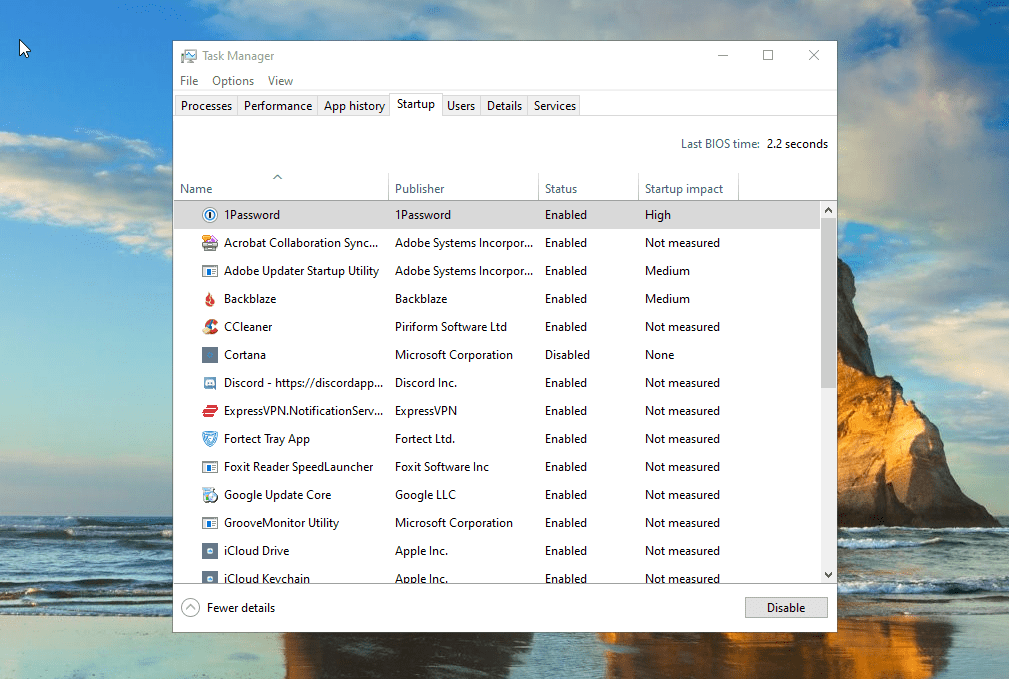
Open Task Manager.
-
Go to the Startup tab.
-
Disable all the startup programs.


Perform a System Restore to Fix System File Errors
In this guide, we provide steps to perform a System Restore to repair tmgauge.ocx issues.

-
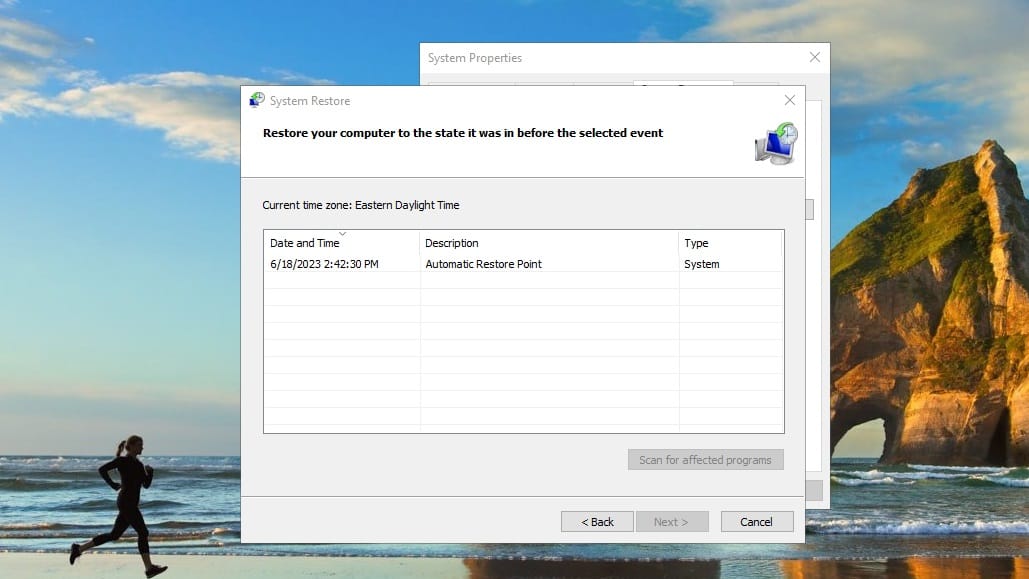
Press the Windows key.
-
Type
System Restorein the search bar and press Enter. -
Click on Create a restore point.
-
In the System Properties window, under the System Protection tab, click on System Restore....
-
Click Next in the System Restore window.
-
Choose a restore point from the list. Ideally, select a point when you know the system was working well.

Software that installs tmgauge.ocx
| Software | File MD5 | File Version |
|---|---|---|
| – | 5.1.9 | |
| 6cb2c2f4def98ec35f34d060ee25c4ce | 13.8.0000 | |
| 6cb2c2f4def98ec35f34d060ee25c4ce | 4.9.0000 | |
| 6cb2c2f4def98ec35f34d060ee25c4ce | 1.10.0000 | |
| 6cb2c2f4def98ec35f34d060ee25c4ce | 1.00.0000 | |
| 6cb2c2f4def98ec35f34d060ee25c4ce | 1.00.0000 |