Recommended: Use Fortect System Repair to repair Flash32_17_0_0_134.ocx errors. This repair tool has been proven to identify and fix errors and other Windows problems with high efficiency. Download Fortect here.
- ✓
Flash32_17_0_0_134.ocx is a file that belongs to Adobe Flash Player, a popular multimedia platform used to play online videos, animations, and interactive content. It serves as a component that helps run Flash applications on your computer. If you are encountering any issues with Flash Player, understanding the purpose of Flash32_17_0_0_134.ocx can be helpful in troubleshooting and resolving the problem.
Understanding Common Issues with Ocx Files
An OCX file, utilized as a component or control file by ActiveX forms in Microsoft applications, is typically useful. However, users might encounter a range of issues when managing OCX files. Let's delve into some of the common problems:
- Compatibility Issues: If an OCX file is designed for a specific version of an application or Windows, it may not function correctly with other versions, which can lead to operational issues or even complete failure of the component to load.
- Problems During Registration: To ensure correct operation, OCX files must be registered in the Windows registry. Should this registration not go as planned, it could lead to complications when an associated application attempts to employ the file.
- Discrepancies Due to Missing OCX Files: When an OCX file is not present at its specified location, it can cause applications that rely on it to malfunction or produce errors. This typically occurs when the file has been inadvertently deleted or moved.
- Difficulty Opening OCX Files: Users might face difficulties opening OCX files if the file associations are incorrect, or if the user is trying to open the file in an incompatible program.
- Clashes Arising from OCX Files: If multiple instances of an OCX file are present on a system, it can instigate conflicts that lead to errors or make the applications that depend on the file unstable.
File Analysis: Is Flash32_17_0_0_134.ocx a Virus?
The file in question, Flash32_17_0_0_134.ocx, has been thoroughly scanned and shows no signs of virus detection, as evidenced by the clean results from 0 distinct virus scanners. It's always reassuring to encounter files with no known associated threats, as these pose a lesser risk to your system's integrity and performance.
Maintaining System Security
A healthy computing environment is achieved through attentive management and proactive protective measures. Keep your system's defenses updated and periodically scan files to maintain your computer's security and performance.
How to Remove Flash32_17_0_0_134.ocx
If the need arises to erase the Flash32_17_0_0_134.ocx file from your system, adhere to the following steps with caution. Modifying system files can have unintended consequences, so proceed carefully.
-
Find the File: Start by locating Flash32_17_0_0_134.ocx on your computer. You can use the File Explorer's search feature to do this.
-
Protect Your Data: Always back up important data before making changes to system files. This ensures the safety of your essential files in case of any issues.
-
Delete the File: After identifying the location of Flash32_17_0_0_134.ocx, you can delete it. Right-click on the file and select Delete to move it to the Recycle Bin.
-
Confirm Deletion: To completely remove Flash32_17_0_0_134.ocx from your system, empty the Recycle Bin. Right-click on the Recycle Bin and choose Empty Recycle Bin.
-
Verify System Health: After removing the file, perform a thorough system scan using a reliable antivirus tool to ensure there are no remaining file fragments or potential threats.
Note: Keep in mind that if Flash32_17_0_0_134.ocx is associated with a specific program, deleting it may affect the program's functionality. If you encounter issues after deletion, consider reinstalling the software or consulting a tech professional for guidance.
Repair Flash32_17_0_0_134.ocx Error Automatically

In this guide, we will fix Flash32_17_0_0_134.ocx and other OCX errors automatically.

-
Click the Download Fortect button.
-
Save the Fortect setup file to your device.

-
Locate and double-click the downloaded setup file.
-
Follow the on-screen instructions to install Fortect.

Perform a Clean Boot
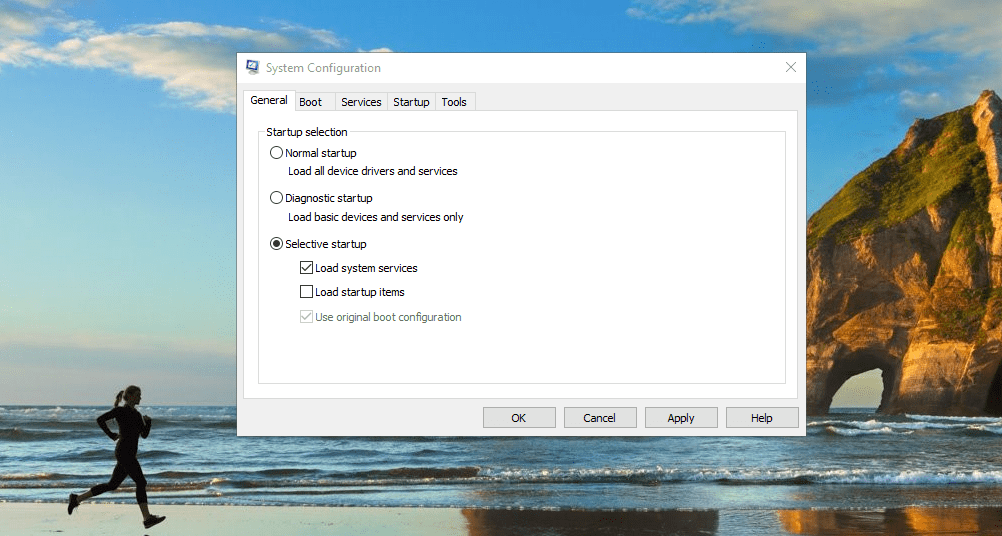
How to perform a clean boot. A clean boot can fix Flash32_17_0_0_134.ocx conflicts.


-
In the General tab, select Selective startup.
-
Uncheck Load startup items.
-
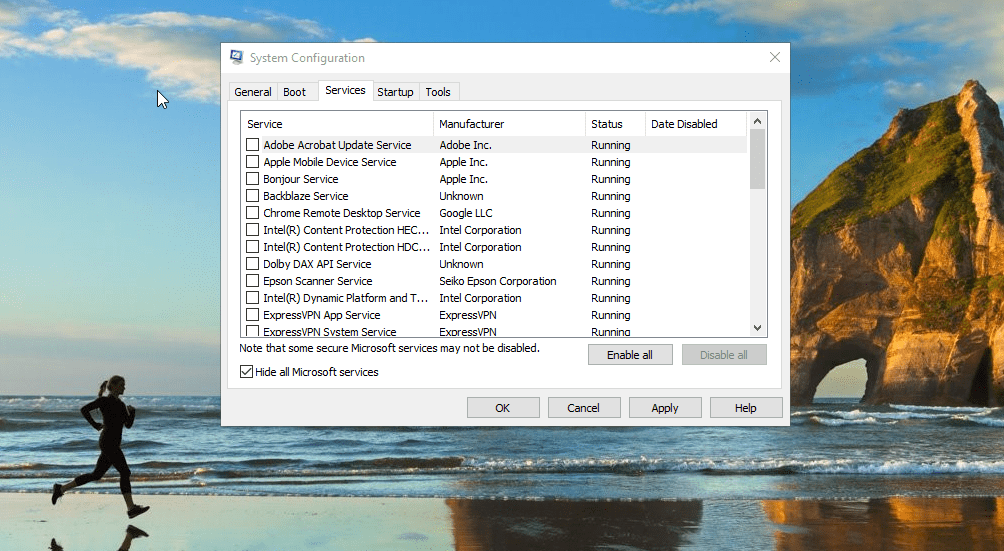
Go to the Services tab.
-
Check Hide all Microsoft services.
-
Click Disable all.
-
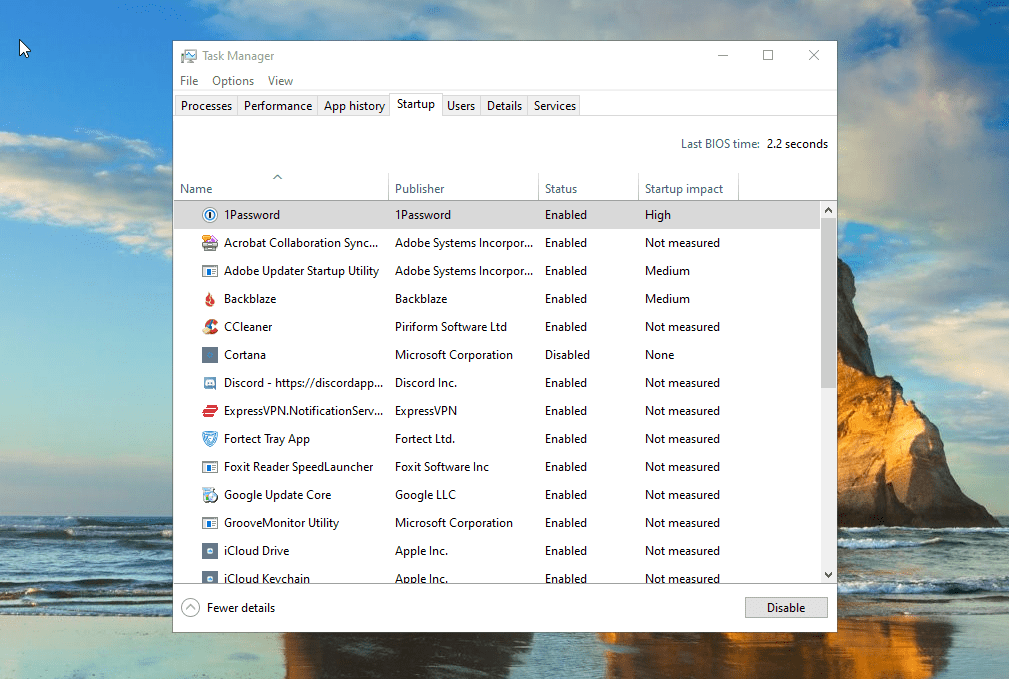
Open Task Manager.
-
Go to the Startup tab.
-
Disable all the startup programs.


Reinstall Problematic Software related to Flash32_17_0_0_134.ocx
In this guide, we will detail the process of uninstalling and then reinstalling the software associated with Flash32_17_0_0_134.ocx.

-
Press the Windows key.
-
Type
Control Panelin the search bar and press Enter. -
Click on Uninstall a program under Programs.
-
Find and click on the software, then click Uninstall.
-
Visit the official website of the software developer.
-
Download the latest version of the software.
-
Open the downloaded file and follow the instructions to install the software.
Software that installs Flash32_17_0_0_134.ocx
| Software | File MD5 | File Version |
|---|---|---|
| – | 18.0.0.255 | |
| – | 18.0.0.209 | |
| – | 17.0.0.188 | |
| – | 19.0.0.185 | |
| – | 17.0.0.191 | |
| – | 19.0.0.185 | |
| – | 18.0.0.209 | |
| – | 19.0.0.207 | |
| – | 17.0.0.188 | |
| – | 20.0.0.270 |