Recommended: Use Fortect System Repair to repair DiscCap.exe errors. This repair tool has been proven to identify and fix errors and other Windows problems with high efficiency. Download Fortect here.
- ✓
If you're encountering issues with the DiscCap.exe file, it's important to troubleshoot the problem in order to resolve it. Understanding and resolving common errors associated with this executable file can help ensure the smooth operation of the related software, EDIUS 5SetupManager. Additionally, it's crucial to identify and address any potential malware issues to safeguard your system's security.
Common DiscCap.exe Errors on Windows
Confronting errors linked to DiscCap.exe can be a daunting task due to the diversity of underlying causes, which might include software incompatibility, obsolete drivers, or even malware presence. In the section below, we've enumerated the most frequently encountered errors related to DiscCap.exe in order to assist you in comprehending and potentially rectifying the issues.
- Error 0xc0000142: This error is often encountered when a user tries to initialize a Microsoft Windows application and the system fails to initialize DiscCap.exe correctly.
- DiscCap.exe - System Error: This alert appears when the execution of DiscCap.exe causes a system issue. Possible causes might include clashes with other software, damaged system files, or insufficient system resources.
- Missing DiscCap.exe File: This error occurs when the operating system can't locate DiscCap.exe. This might be due to a faulty installation, unintentional deletion, or a malware infection.
- Unable to Start Correctly (0xc000007b): This error message is displayed when the application is not able to launch properly, usually due to a mix-up between 32-bit and 64-bit versions of Windows and the application.
- Not a Valid Win32 Application: This error typically occurs when the user tries to execute a program that is not compatible with their version of Windows or when the file is corrupted or incomplete.
File Analysis: Is DiscCap.exe a Virus?
The file in question, DiscCap.exe, has been thoroughly scanned and shows no signs of virus detection, as evidenced by the clean results from 0 distinct virus scanners. It's always reassuring to encounter files with no known associated threats, as these pose a lesser risk to your system's integrity and performance.
Maintaining System Security
A healthy computing environment is achieved through attentive management and proactive protective measures. Keep your system's defenses updated and periodically scan files to maintain your computer's security and performance.
How to Remove DiscCap.exe
In case the removal of the DiscCap.exe file is required, the ensuing steps should be adhered to. It's always important to be cautious when altering system files, as unintended modifications could trigger unforeseen system reactions.
-
Find the File: The initial step involves locating DiscCap.exe on your system. The File Explorer search feature can assist you in doing this.
-
Secure Your Data: Always back up essential data before changing your system files. This is a critical safety step.
-
Eliminate the File: After identifying the location of DiscCap.exe, you can delete it. Just right-click the file and select Delete. This action moves the file to your Recycle Bin.
-
Finalize the Deletion: To ensure DiscCap.exe is completely eradicated from your system, you should empty your Recycle Bin. Right-click on the Recycle Bin and choose Empty Recycle Bin.
-
Verify System Health: Conduct a comprehensive system scan with a reliable antivirus tool once you've disposed of the file. This ensures there are no remnants of the file lurking in your system.
Note: It's important to mention that if DiscCap.exe is associated with the a program, its removal may impact its functionality. If any issues arise post deletion, consider reinstalling the program or consult a technology professional for guidance.
Repair DiscCap.exe Error Automatically

In this guide, we will fix DiscCap.exe and other EXE errors automatically.

-
Click the Download Fortect button.
-
Save the Fortect setup file to your device.

-
Locate and double-click the downloaded setup file.
-
Follow the on-screen instructions to install Fortect.

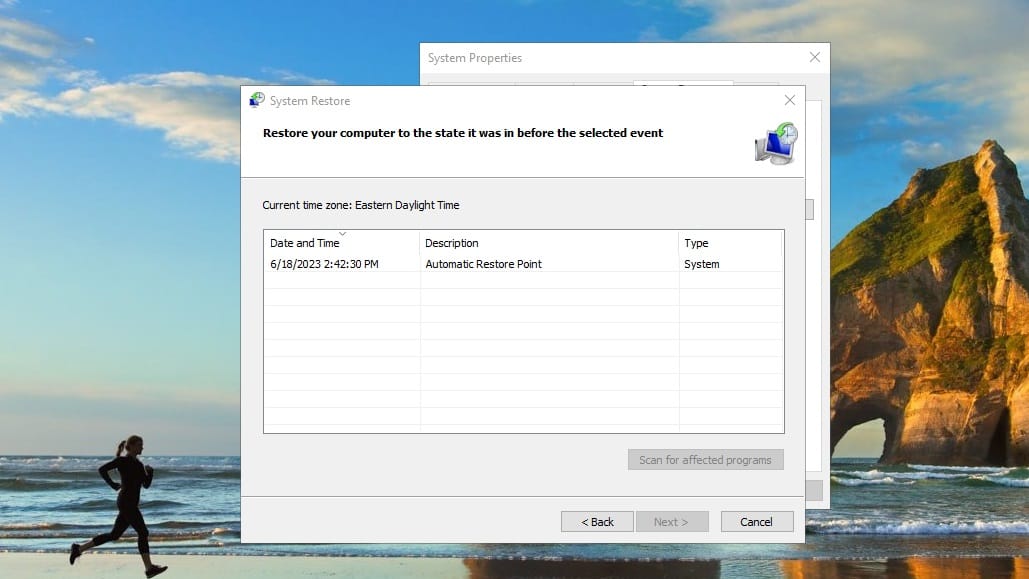
Perform a System Restore to Fix Exe Errors

How to perform a System Restore to repair DiscCap.exe issues.
-
Press the Windows key.
-
Type
System Restorein the search bar and press Enter. -
Click on Create a restore point.
-
In the System Properties window, under the System Protection tab, click on System Restore....
-
Click Next in the System Restore window.
-
Choose a restore point from the list. Ideally, select a point when you know the system was working well.


Perform a Repair Install of Windows

How to perform a repair install of Windows. A repair installation resets all Windows system files.

-
Go to the Microsoft website and download the Windows 10 Media Creation Tool.
-
Run the tool and select Create installation media for another PC.
-
Follow the prompts to create a bootable USB drive or ISO file.
-
Insert the Windows 10 installation media you created into your PC and run setup.exe.
-
Follow the prompts until you get to the Ready to install screen.

-
On the Ready to install screen, make sure Keep personal files and apps is selected.
-
Click Install to start the repair install.

-
Your computer will restart several times during the installation. Make sure not to turn off your computer during this process.
Software that installs DiscCap.exe
| Software | File MD5 | File Version |
|---|---|---|
| 1fe3b685eb345755f65cc7a01bbae3a3 | 5.10 | |
| a9777be996997428495afa597164801e | 2.00 |