Recommended: Use Fortect System Repair to repair 9dfb0061-d4c3-4b72-9b14-4cc5659a8a42.exe errors. This repair tool has been proven to identify and fix errors and other Windows problems with high efficiency. Download Fortect here.
- ✓
If you're having trouble with the 9dfb0061-d4c3-4b72-9b14-4cc5659a8a42.exe file, it could be causing errors or not running as expected. This file is related to the Browsers Apps software developed by Coder Born Group. We'll explore common issues, ways to troubleshoot them, and how to check for malware.
If needed, we'll also go through the steps to uninstall the related software.
Common 9dfb0061-d4c3-4b72-9b14-4cc5659a8a42.exe Errors on Windows
Encountering errors associated with 9dfb0061-d4c3-4b72-9b14-4cc5659a8a42.exe can be frustrating. These errors may vary in nature and can surface due to different reasons, such as software conflicts, outdated drivers, or even malware infections. Below, we've outlined the most commonly reported errors linked to 9dfb0061-d4c3-4b72-9b14-4cc5659a8a42.exe, to aid in understanding and potentially resolving the issues at hand.
- Error 0xc0000142: This alert pops up when an application fails to initiate properly. This could be the result of software glitches, damaged files, or complications with the Windows registry.
- 9dfb0061-d4c3-4b72-9b14-4cc5659a8a42.exe File Not Executing: This warning appears when the executable file fails to launch as expected. Reasons could include damaged file data, improper file permissions, or insufficient system resources.
- Error 0xc0000005: This warning appears when the system encounters an access violation problem. This could be due to issues with memory, malware affecting the system, or drivers that need updating.
- 9dfb0061-d4c3-4b72-9b14-4cc5659a8a42.exe - Bad Image Error:: This alert is displayed when Windows fails to execute 9dfb0061-d4c3-4b72-9b14-4cc5659a8a42.exe due to its corruption, or the related DLL file being absent or damaged.
- Unable to Start Correctly (0xc000007b): This warning is shown when the application fails to start as it should, typically caused by an inconsistency between the 32-bit and 64-bit versions of the application and the Windows operating system.
File Analysis: Is 9dfb0061-d4c3-4b72-9b14-4cc5659a8a42.exe a Virus?
The executable file, 9dfb0061-d4c3-4b72-9b14-4cc5659a8a42.exe, has unfortunately raised potential safety issues, as numerous virus detection tools have flagged it. Such a warning highlights the necessity of caution when handling this file, as it could lead to undesired consequences, including unauthorized access to data, compromised system performance, or even system crashes.
Recommended Action: Use Fortect
We recommend using Fortect, a reliable malware scanner, to ensure system safety. Download the software, and initiate a thorough system scan. This proactive approach will detect the presence of malicious files like 9dfb0061-d4c3-4b72-9b14-4cc5659a8a42.exe and help rectify any issues they may cause.
Multiple virus scanners have detected possible malware in 1 variations of 9dfb0061-d4c3-4b72-9b14-4cc5659a8a42.exe.
| Scanner Software | Version | Result |
|---|---|---|
| AhnLab-V3 | 2014.11.13.00 | PUP/Win32.CrossRider |
| avast! | 8.0.1489.320 | Win32:Crossrider-AI [PUP] |
| AVG | 15.0.0.4189 | Generic.16F |
| Avira | 7.11.184.252 | ADWARE/CrossRider.Gen2 |
| AVware | 1.5.0.21 | Crossrider (fs) |
| Baidu-International | 3.5.1.41473 | Trojan.Win32.GoogUpdate.AcvK |
| Comodo Security | 20070 | ApplicUnwnt |
| Dr.Web | 7.0.10.8210 | Trojan.Crossrider.27854 |
| ESET-NOD32 | 10716 | a variant of Win32/Toolbar.CrossRider.AG |
| Fortinet FortiGate | 5.0.999.0 | W32/GoogUpdate.AG!tr |
| F-Prot | 4.7.1.166 | W32/S-9ad4719b!Eldorado |
| G Data | 24 | Win32.Adware.Crossrider.R |
| K7 AntiVirus | 9.185.13993 | Trojan ( 0049ee3e1 ) |
| K7GW | 9.185.13994 | Trojan ( 0049ee3e1 ) |
| Kaspersky | 12.0.0.1225 | Trojan.NSIS.GoogUpdate.cr |
| Malwarebytes | 1.75.0.1 | PUP.Optional.BrowsersApps.A |
| McAfee | 6.0.5.614 | Artemis!6F6D6E8B478C |
| McAfee-GW-Edition | v2014.2 | BehavesLike.Win32.Trojan.fh |
| NANO AntiVirus | 0.28.6.63362 | Trojan.Win32.GoogUpdate.ddtufd |
| Panda Antivirus | 4.6.4.1 | Trj/Genetic.gen |
| Qihoo-360 | 1.0.0.1015 | Win32/Trojan.3b1 |
| Sophos | 4.98.0 | AppRider |
| Symantec | 20141.1.0.330 | Trojan.Gen |
| Tencent | 1.0.0.1 | Nsis.Trojan.Googupdate.Wrqz |
| Trend Micro | 9.740.0.1012 | TROJ_GEN.R0C1C0EJV14 |
| TrendMicro-HouseCall | 9.700.0.1001 | TROJ_GEN.R0C1C0EJV14 |
| Vba32 AntiVirus | 3.12.26.3 | Trojan.GoogUpdate |
| VIPRE Antivirus | 34748 | Crossrider (fs) |
| Zillya | 2.0.0.1981 | Trojan.GoogUpdate.Win32.82 |
| Antiy-AVL | 1.0.0.1 | GrayWare[AdWare:not-a-virus]/NSIS.Adwapper.ai |
| CAT-QuickHeal | 14.00 | AdWare.NSIS.r6 (Not a Virus) |
| Kingsoft AntiVirus | 2013.4.9.267 | Win32.Troj.NSIS.cr.(kcloud) |
| Rising Antivirus | 25.0.0.11 | PE:Trojan.Win32.Generic.177E5AB5!394156725 |
| Lavasoft Ad-Aware | 12.0.163.0 | Adware.Generic.1029642 |
| Agnitum Outpost | 5.5.1.3 | PUA.Toolbar.CrossRider! |
| Bitdefender | 7.2 | Adware.Generic.1029642 |
| Bkav FE | 1.3.0.4959 | W32.ATVC_VuschekpoLTO.Trojan |
| Emsisoft Anti-Malware | 3.0.0.600 | Adware.Generic.1029642 (B) |
| F-Secure | 11.0.19100.45 | Adware.Generic.1029642 |
| MicroWorld-eScan | 12.0.250.0 | Adware.Generic.1029642 |
| Clam AntiVirus | 0.98.4.0 | Win.Adware.Kazy-3 |
| IKARUS anti.virus | T3.1.7.8.0 | Trojan.GoogUpdate |
| nProtect | 2014-10-12.01 | Trojan/W32.Agent.1903976 |
| Avira AntiVir | 7.11.168.254 | TR/Agent.355688 |
| Jiangmin | 16.0.100 | Adware/Adload.ayo |
How to Remove 9dfb0061-d4c3-4b72-9b14-4cc5659a8a42.exe
If it becomes necessary to eliminate the 9dfb0061-d4c3-4b72-9b14-4cc5659a8a42.exe file from your system, kindly follow the steps provided below. As with any modification to system files, it's crucial to proceed with care to avoid unintentional changes that may cause unpredicted system responses.
-
Locate the File: Start by finding 9dfb0061-d4c3-4b72-9b14-4cc5659a8a42.exe on your system. You can do this by using the search feature in your File Explorer.
-
Protect Your Data: Always have a backup of important data before you make changes to your system files. This keeps your important files safe, even if something goes wrong.
-
Remove the File: Once you've found 9dfb0061-d4c3-4b72-9b14-4cc5659a8a42.exe, remove it by right-clicking on the file and choosing Delete. This moves the file to your Recycle Bin.
-
Complete the Deletion: To get rid of 9dfb0061-d4c3-4b72-9b14-4cc5659a8a42.exe fully, you must empty your Recycle Bin. Right-click on the Recycle Bin icon and choose Empty Recycle Bin.
-
Check Your System: After you've removed the file, run a full system scan using a trusted antivirus tool. This helps ensure no harmful bits of the file are left behind.
Note: If 9dfb0061-d4c3-4b72-9b14-4cc5659a8a42.exe is related to a specific program, deleting it could cause the program to stop working correctly. If you notice any issues after removing the file, you might need to reinstall the software, or you could contact a tech professional.
Repair 9dfb0061-d4c3-4b72-9b14-4cc5659a8a42.exe Error Automatically

In this guide, we will fix 9dfb0061-d4c3-4b72-9b14-4cc5659a8a42.exe and other EXE errors automatically.

-
Click the Download Fortect button.
-
Save the Fortect setup file to your device.

-
Locate and double-click the downloaded setup file.
-
Follow the on-screen instructions to install Fortect.

Perform a Clean Boot
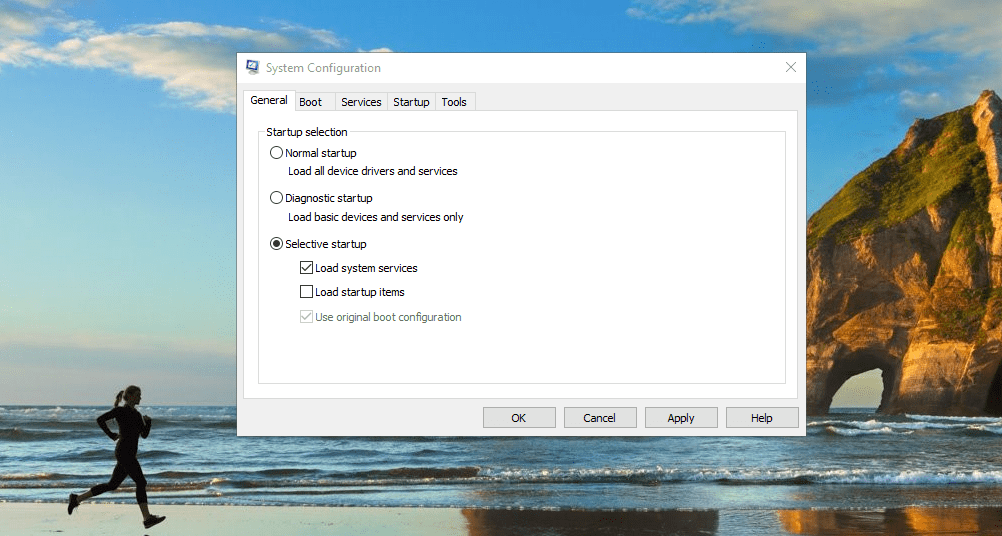
In this guide, we will demonstrate how to perform a clean boot. A clean boot can repair 9dfb0061-d4c3-4b72-9b14-4cc5659a8a42.exe problems.


-
In the General tab, select Selective startup.
-
Uncheck Load startup items.
-
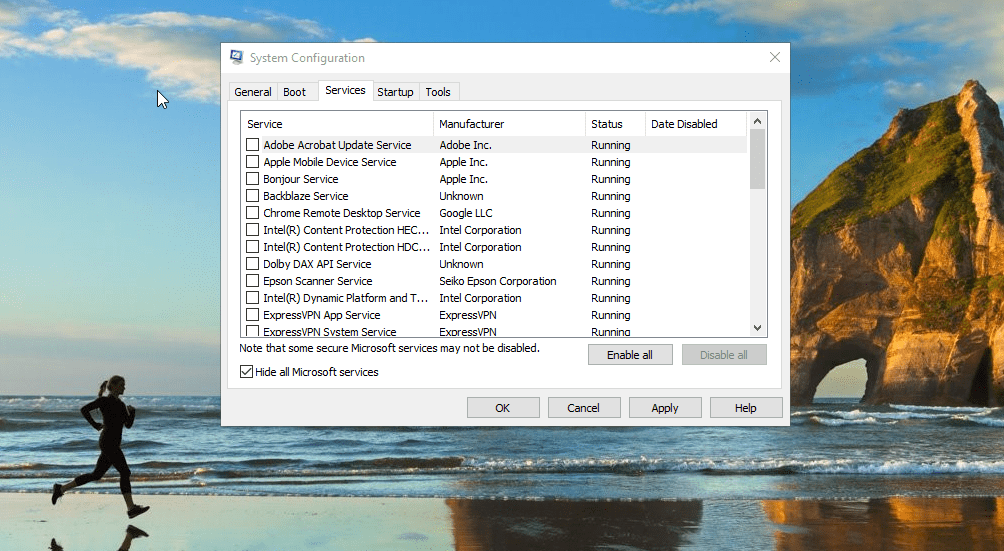
Go to the Services tab.
-
Check Hide all Microsoft services.
-
Click Disable all.
-
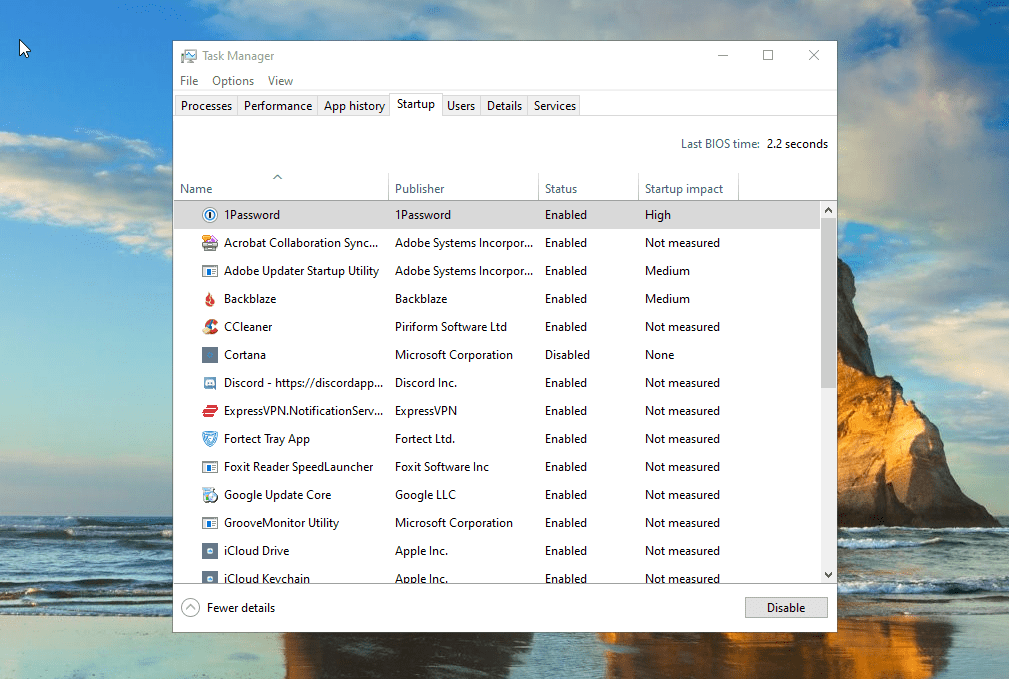
Open Task Manager.
-
Go to the Startup tab.
-
Disable all the startup programs.


Perform a Repair Install of Windows

How to perform a repair install of Windows. A repair installation resets all Windows system files.

-
Go to the Microsoft website and download the Windows 10 Media Creation Tool.
-
Run the tool and select Create installation media for another PC.
-
Follow the prompts to create a bootable USB drive or ISO file.
-
Insert the Windows 10 installation media you created into your PC and run setup.exe.
-
Follow the prompts until you get to the Ready to install screen.

-
On the Ready to install screen, make sure Keep personal files and apps is selected.
-
Click Install to start the repair install.

-
Your computer will restart several times during the installation. Make sure not to turn off your computer during this process.
Software that installs 9dfb0061-d4c3-4b72-9b14-4cc5659a8a42.exe
| Software | File MD5 | File Version |
|---|---|---|
|
|
6f6d6e8b478c451d85d0f55c9b562e98 | 1.34.7.29 |