How to Enable Remote Desktop in Windows 10

Remote Desktop allows you to work on your Desktop even when you are not in front of that specific Computer. It is excellent for those who want to work at home and in the office, and it also gives you access to all your resources at the office from more mobile surroundings.
Recommended: To easily install drivers automatically, use the tool below.
If you are a college educator and want to use all the resources of the University in a setting without student interruptions, Remote Desktop is a great resource. Or, say you need to work collaboratively with others on a project; by allowing access to all the team members, you can get the work done anywhere you want.
Downsides of using Remote Desktop
The downside to enabling a remote desktop is that it can give other users access to your files and network when you do not want them to have it. If you provide a team of people access to your computer, they will be able to access every file, not just the ones on which you are collaborating.
Remote Desktop is now more secure against outside attacks than when it was first developed because they initially allowed remote man-in-the-middle data attacks. Even with the added layers of protection, using Administrator access remotely is still not recommended.
You can access the Remote Desktop enabled Computer using Android, Windows, or iOS devices, but the connection will not work. You also cannot allow a Remote Desktop on a Windows 10 Home version computer because the remote connection feature is permanently disabled.
You can still use your Windows 10 Home computer to access another computer with an Ultimate, Pro, or Enterprise version of Windows as long as you have enabled Remote Desktop on the Computer you are accessing.
See Also: The Best Antivirus Software of 2020
What Precautions Should You Take When You Enable Remote Desktop?
Although many of the Remote Desktop vulnerabilities were fixed, you should still take some precautions if you are using them.
- Make sure your software is updated.
- Do not use third-party remote access software or management tools.
- All accounts accessing Remote Desktop should be protected with strong passwords and two-factor authentication.
- Use both hardware and software firewalls and a VPN.
- Use Network Level Authentication (NLA).
- Limit the number of users that can use Remote Desktop and limit your Administrator accounts from using it.
- Set up account lockout if the incorrect password is guessed too many times.
- Do not use the default listening port.
- Use an RDP Gateway server.
Step 1: Enable Remote Access
Method 1: Using Windows Settings
This has to be done from a computer with a version of Windows that is compatible with running Remote Access.
Step #1
Open the Start Menu and click on the Settings icon (or type Settings into the Search bar and click on that option.)

Step #2
Click on “System.”

Step #3
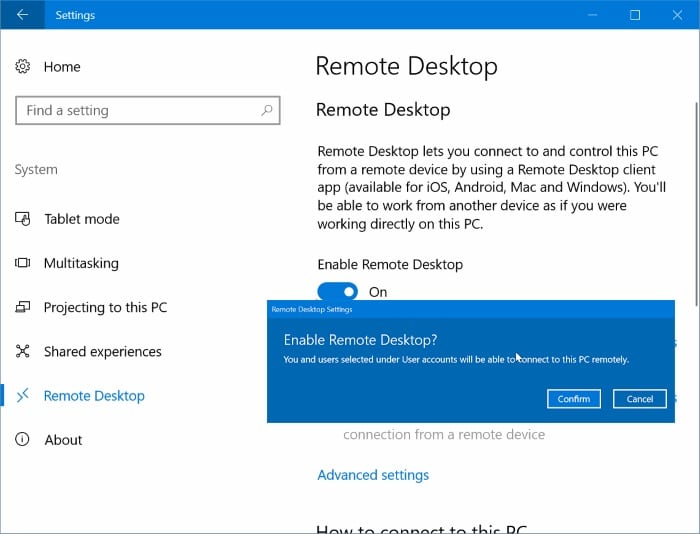
Now scroll down on the left side of the window until you find “Remote Desktop” and select that. Then move the switch to “On” underneath “Enable Remote Desktop” on the right.
You want to ensure “Keep my PC awake for connections when it is plugged in is selected,” or you will need to adjust your power options settings. You will not be able to access a computer in Sleep or Hibernate mode. You also need to write down the PC’s name (you will find it under “How to connect to this PC.”)

Step #4
You will be asked to confirm your choice. Click “Confirm.” If you later want to disable Remote Desktop on this Computer, follow the instructions above and move the switch to “Off” under “Enable Remote Desktop.”
Method #2: Using Sysdm.cpl
The above method is best because you can note the Computer’s name. You will need this name to connect. However, the above method will not tell you if you need to adjust your power settings automatically. This method will let you know if your power settings are incompatible with Remote Desktop.
Step #1
Type sysdm.cpl into the Start Menu and select the “sysdm.cpl Control panel item.”

Step #2
Click on the “Remote” tab. Make a mark next to “Allow Remote Assistance connections to this computer.” Then click “Apply” and “OK.” You may need to change your sleep settings, so your Computer never sleeps. If this is the case, a dialog box will open telling you to go to Power Options and change that setting.

Once you have enabled Remote Desktop on the Computer you want to connect, you can connect your devices to it so you can work wherever you are.
Step 2. Connecting With Your Devices
You can use two methods to connect depending on your device.
Connecting a Windows 10 PC:
Even the Windows 10 Home edition has preloaded software enabling it to connect with a remote desktop computer.
Step #1
Type “Remote Desktop Connection” into the Start menu and select that option.

Step #2
In the window that appears, type the name of the PC you noted when you enabled Remote Desktop using the first method above. Then select “Connect.”

Connecting a Windows Mobile, iOS, or Andriod Device:
If you are trying to connect with any other device, you will need to follow these steps:
Step #1
Download the Remote Desktop app free from the Microsoft Store, Google Play, or the Mac or iOS App Store.
Click on the app to open it once it is installed. You may have to search for it by typing “Remote” into the search feature on your device.
Step #2
Each of the apps may appear slightly different depending on your device. All of them should have a “+” button you can click on at the top to add a connection and click on that.

Step #3
To add the Remote Desktop, you will see a screen with a lot of information and options available. The only items you must fill out are the PC name (which you found under “How to connect to this PC” when you were enabling the Remote Desktop) and your Username (the name you need to access the Remote Desktop).
All the other information is helpful but optional.

Step #4
When you are finished setting up the connection in the app, close the setup screen (the red button at the top of the screen in the example above does this). You will see the Remote Desktop on the main screen as soon as it is closed. Double-click the connection.
In some cases, you might see a warning about the certificate. To access the Desktop, you will need to “Continue,” or you can “Show Certificate” and choose to “Always trust” it when you are connecting to a trusted server.
- Your machine is currently running Windows 10
- Fortect is compatible with your operating system.
Recommended: To repair Windows Errors, use this software package; Fortect System Repair. This repair tool has been proven to identify and fix these errors and other Windows problems with very high efficiency.

- 100% safe as confirmed by Norton.
- Only your system and hardware are evaluated.
Frequently Asked Questions
How do I know if Remote Desktop is enabled?
You can check if Remote Desktop is enabled by going to the System Properties dialogue box. On the left-hand side of the box, click on the “Remote” tab. If the “Allow remote connections to this computer” option is selected, then Remote Desktop is enabled.
Is Remote Desktop enabled by default?
No, Remote Desktop is not enabled by default, and it is a feature that needs to be enabled to allow a user to remote access another computer.
How do I open Remote Desktop on Windows 10?
To open Remote Desktop on Windows 10, you will need to take the following steps:
Click on the Start Menu, and then type “Remote Desktop Connection” into the search bar.
Once the search results populate, click on the “Remote Desktop Connection” application.
A new window will open, asking you for the Computer’s address you want to remote access.
How many inbound remote connections are allowed by Windows 10?
Windows 10 allows a maximum of 10 inbound remote connections. This means you can have up to 10 devices connect to your Computer remotely at any time.
How do remote desktop connections work?
Remote desktop connections allow users to connect to a computer in another location as if sitting in front of it. The user’s keyboard and mouse are used to control the remote Computer, and the user can see the remote Computer’s screen on their screen.
To set up a remote desktop connection, the user must install special software on their Computer and the remote PC.
How to enable remote desktop Windows 10?
To enable remote desktop on Windows 10, you will need to follow these steps:
Go to the Start menu and type in ‘Control Panel.’
Click on ‘System and Security’ and then select ‘System.’
On the left-hand side of the System window, click on ‘Remote Settings.’
In the Remote tab, under ‘Remote Desktop,’ select ‘Allow remote connections to this computer.’
How to enable remote desktop Windows 10 home?
To enable a remote desktop on Windows 10 Home, you’ll need to install the Remote Desktop Connection app first. Once the app is installed, open it and click the “Enable Remote Desktop” button. This will open up the Windows Firewall and allow you to add a new rule for the RDC app. Once you’ve added the rule, you’ll be able to connect to your PC from another device using the RDC app.
What is the remote desktop protocol?
The Remote Desktop Protocol (RDP) is a proprietary protocol developed by Microsoft, which provides a user with a graphical interface to another computer. RDP uses the Transmission Control Protocol (TCP) and allows a user to take control of another computer to run programs remotely.
How to use the remote desktop app?
The Remote Desktop app allows you to connect to another computer or device and access its files and programs. To use the app, you’ll need to connect your computer to the other device. Once a connection is established, you can access the files and programs on the other machines if you use them yourself.
How to allow users to remote access using RDP?
To allow users to remotely access a computer using the Remote Desktop Protocol (RDP), you will need to enable remote desktop connections on your Computer. You can do this by opening the Control Panel, going to System and Security, and clicking on Allow remote access. You can enable the RDP service and specify which users can connect to the Computer remotely with a remote device.
How to use RDP to access a remote computer?
To use RDP to access a remote computer, you’ll need to have an RDP client installed on your local machine. Once you have that, you can simply enter the IP address or hostname of the remote machine into the RDP client, and it will connect you. Depending on its configuration, you may also need to provide credentials for the remote machine to enable remote access.
What is the current remote desktop port?
The current remote desktop port is 3389. This port is used for communication between a client and a server, and the port allows communication between the two computers using the TCP/IP protocol.
How to configure remote desktop on Windows?
To configure a remote desktop on Windows, you must access the Control Panel. From there, you will need to select ‘System and Security.’ Next, select ‘Allow remote access.’ Under the ‘Remote Desktop’ section, you must choose ‘Allow remote connections to this computer.’ Ensure the ‘Allow connections only from computers running Remote Desktop with Network Level Authentication’ option is selected.
How to configure remote desktop client?
Click on the start button in the lower-left corner of your screen.
Type “Remote Desktop Connection” into the search bar that appears.
Select “Remote Desktop Connection” from the list of results.
In the box that pops up, type in the IP address or hostname of the machine to which you want to connect.
Click “Connect.”
How to add user to remote desktop access?
To add a user to remote desktop access, you’ll need to take the following steps:
On the machine that will be accessed remotely, open the System Properties dialog box by clicking on the Start menu, right-clicking on Computer, and selecting Properties.
Click on the Remote tab.
Under “Remote Desktop,” select the radio button next to “Allow connections from computers running any version of Remote Desktop.”