
15 Ways to Fix the 100% Disk Usage Error On Windows 10

For people who use their PC frequently, storage can eventually pile up without many of us noticing. Your PC’s disk usage is a variable that can have its storage used very quickly and eventually read 100% disk usage.
The article below shows many solutions if your system shows 100% disk usage.
Recommended: To easily install drivers automatically, use the tool below.
Common Reasons for 100% Disk Usage in Windows 10
Understanding the factors causing 100% disk usage in Windows 10 is essential to address and fix the issue effectively. Here are some common reasons that can lead to high disk usage in Windows 10:
- Outdated Windows Version: Running an older version of the operating system can result in incompatibilities and miscommunications between the system files and the device’s hard disk, causing 100% disk usage.
- Faulty or Outdated Drivers: Inadequate or outdated device drivers can hinder communication between the system and the hard disk, potentially leading to high disk usage.
- Windows Search/Indexing: The Windows Search feature indexes all the files on your computer, making it easier for you to find what you’re looking for. However, the indexing process can consume significant disk space, particularly if there are numerous files on your computer.
- SuperFetch Service: While SuperFetch is designed to decrease the boot time of the operating system, it can interfere with disk usage and management, causing 100% disk usage in Windows 10.
- Corrupted System Files: Damaged or corrupted system files can consume and block hard disk space or system drive, leading to high disk usage.
- Virtual Memory: Errors associated with pagefile.sys can cause virtual memory to treat the hard disk as RAM, resulting in 100% disk usage in Windows 10.
- StorAHCI.Sys Driver Issues: Firmware bugs related to PCI-Express (AHCI PCIe) models associated with the StorAHCI.sys driver can result in 100% disk usage in Windows 10.
- High Power Usage: Unoptimized energy options can lead to increased disk usage, contributing to the 100% disk usage problem.
- Third-Party Applications: Certain applications, such as antivirus software, can consume a large amount of disk space, causing high disk usage.
By identifying the specific cause of 100% disk usage in Windows 10, you can implement the appropriate solution to resolve the issue and optimize your computer’s performance.
Restart Your System
When you encounter disk usage errors, it probably happens due to junk of temporary files on the hard disk consuming maximum space and not letting the operating system work properly. In this context, you would get an error pop-up, i.e., fix high disk usage or disk usage 100 windows 10. If you face a disk usage error, the primary way to resolve the problem is to restart your device. Here is how you can act.
Step 1: In the windows main menu, click on the windows icon and select the power option.
Step 2: In the context menu of the power option, select restart

Update Windows
Using an older version of OS (windows) on the device may also lead to disk usage in windows errors. The system files may not communicate with the device’s hard disk installed, resulting in 100% disk usage windows 10. In this context, updating windows to the latest version on the device can fix the error. Here are the steps to follow:
Step 1: Launch settings with windows key+ I from the keyboard. In the settings menu, click the option of update and security.


Step 2: In the update and security window, click on windows update. And check for updates. Select update. Your device will install the update automatically. Restart the device to check if you still get an error message.

Disable Windows Search
Windows search is a feature of the Windows operating system that allows users to search for files and folders on their computers. When Windows search is enabled, it indexes all the files on your computer to make it easier for you to find what you’re looking for. This indexing process can cause your computer to use up a lot of disk space and can lead to 100% disk usage if there are a lot of files on your computer.
Any search loop on windows can also cause disk usage errors like 100% disk usage in windows 10. this issue comes with two potential quick fixes, i.e., temporarily disable windows search or permanently disable windows search. Here is how you can perform the fixes.
1- Temporarily disabling windows search
Step 1: Launch the command prompt from the windows main menu. Type the command in the taskbar’s search box and click the option in the list.
Step 2: Select the option of run as administrator.

Step 3: In the command prompt, type net.exe, stop “Windows search,” and click enter to complete the action. It will stop the windows search temporarily to check if the disk usage error is solved.

Permanently Disabling Windows Search
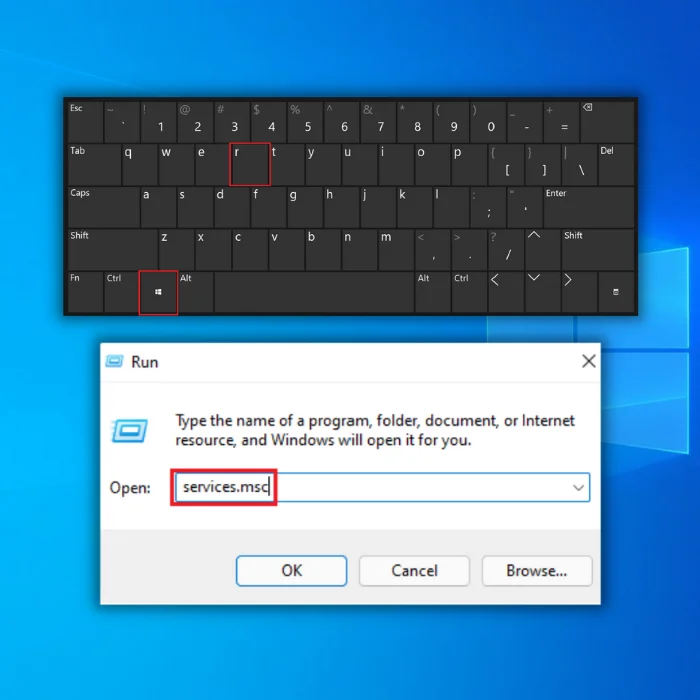
Step 1: Launch the Run utility with windows key+R, and in the command box, type services. msc. Click enter to continue.
Step 2: In the services menu, navigate to windows search and right-click the option to select properties from the context menu.
Step 3: In the properties window, go to the general tab, click on startup type and select the option of disabled. Click apply and ok to save changes.

Disabling Windows search can help free up some disk space and may also solve your 100% disk usage problem. However, it’s worth noting that disabling Windows search may make it more difficult for you to find the files and folders you’re looking for. So if you’re not having any problems with 100% disk usage, you may consider keeping Windows search enabled.
Disable SuperFetch Service
Superfetch mostly leads to disk performance errors, i.e., 100% disk usage in windows 10. Although it reduces the operating system’s boot time, it can interrupt the computer’s disk usage and, in turn, interrupt management. To resolve the problematic disk errors and reduce disk usage, one can permanently disable the superfetch service. Here is how you can perform the command.
Step 1: Launch the command prompt from the taskbar’s search box. In the box, type the command and click the option in the list. Choose run as administrator mode for launching the utility.
Step 2: In the UAC pop-up window, click yes to continue.

Step 3: In the command prompt, type either net.exe stop superfetch or net.exe stop sys main. Click enter to complete the action. As the command completes, the superfetch service will be disabled.

Perform a Clean Boot
While performing a clean boot, you are allowing your OS to launch on the device with a minimal number of system files and drivers. It automatically reduces usage in windows 10. By using minimal windows features, one can assist in the high performance of the hard drive. Hence, utilizing the original boot configuration to perform a clean boot can help resolve the disk usage problem. Here are the steps to follow:
Step 1: In the search box of the windows main menu, type msconfig. Click on the option to launch.

Step 2: Right-click msconfig to select run as administrator from the menu. It will launch a system configuration utility.

Step 3: In the system configuration utility pop-up window, select the General tab and select the selective startup option.

Step 4: In the next window, uncheck the option of load startup items.
Step 5: Head to the services tab and checkmark the option of hide all Microsoft services followed by clicking disable all button option. Click ok to continue. Restart the device to start the normal mode.

Update Device Drivers
A computer’s physical memory can also show up highest disk usage due to outdated device drivers. Getting driver details may show that the windows system cannot communicate with old versions of drivers causing high disk usage. So updating drivers from the device manager or via windows updates can help to resolve the challenging disk issues. Here are the steps to follow:
Step 1: In the main menu’s search bar, type device manager and double-click the option to launch it.

Step 2: Check the attached and running devices list in the device manager window.
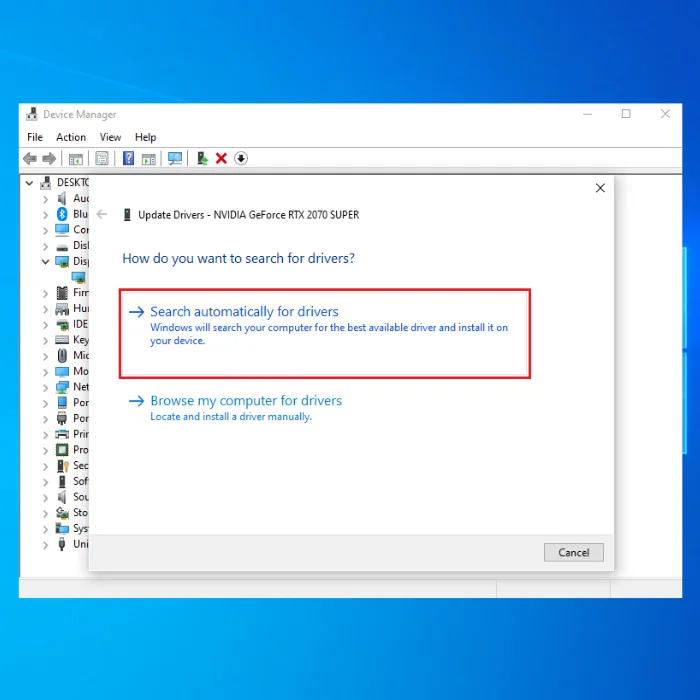
Step 3: If you see any device with an exclamation mark, right-click the device and select update driver from the drop-down menu.

Step 4: In the update driver window, select Search automatically for drivers. This will initiate searching for any available update linked to the device and its drivers. If no update is available, select the search for updated drivers option in the windows updates option.

Step 4: In the windows update window, select Check for updates. If the window is updated, then select the drivers update section. Check the options and select the option of Download and install.
Check for Corrupted System Files
For checking the corrupted system files consuming and blocking the hard disk space or system drive in windows 10, SFC (system file checker) scan is the best option. It helps scan all system files and identifies the corrupted ones and potential solutions to fix them. Here are the steps for running an SFC scan to resolve 100% disk usage in windows 10.
Step 1: Launch the Run utility by clicking the windows key+R from the keyboard.
Step 2: In the run command box, type cmd and click Ctrl + Shift + Enter to launch the command prompt by giving administrative permissions. Click Yes to continue.

Step 3: In the command prompt, type sfc /scannow and click enter to continue.

Step 4: Once the SFC scan is completed, close the prompt and restart your device to check if the error is resolved.
Perform a Disk Check
For the errors linked to the hard disk, i.e., 100% disk usage windows 10, performing the disk check can help run a system scan for all the files on a hard drive. In this context, using windows task manager can serve the purpose. Here are the steps to follow:
Step 1: Launch the task manager pop-up list with windows key+ X. Select the command prompt (admin) option. It will launch a command prompt with all administrative privileges.

Step 2: In the window of UAC, click yes to continue.

Step 3: In the command prompt, type chkdsk.exe/f/r and click enter to continue. In the following command line, type Y to complete the command. The disk check action will start as soon as you boot the device.

Step 4: In the next step, type task manager in the taskbar search box. Double-click the option in the list to launch the feature.

Step 5: In the task manager window, navigate to the processes tab and check the disk usage (%) in the disk column in the header menu.
Reset Virtual Memory
Temporary files consume all the memory from RAM due to errors associated with pagefile. Sys. In this context, virtual memory deals with the hard disk as RAM and causes 100% disk usage in windows 10. The only solution to fix the issue is via resetting the virtual memory. Here are the steps to follow:
Step 1: Launch the control panel from the taskbar’s search box and double-click the option to launch it.

Step 2: In the control panel window, select the system and security option and choose the system properties option.

Step 3: In the system properties window, navigate to advanced system settings in the left pane. In the pop-up window, locate the advanced tab, and under the performance section, click on the settings button.
Step 4: In the new pop-up, the performance tab, navigate to the advanced tab, and under the virtual memory tab, click change to continue.

Step 5: In the next pop-up screen, check the box of option Automatically manage paging file size.

Step 6: In the next step, check the option of no paging file and click Ok to complete the action.

Fix StorAHCI.Sys Driver
Any firmware bug leached to PCI-Express (AHCI PCIe) models associated with the StorAHCI.sys driver can result in 100% disk usage windows 10 error. Here are the steps to follow:
Step 1: Launch the device manager with windows key+ X and select the Device manager option from the pop-up list.

Step 2: In the device manager window, navigate to IDE ATA/ATAPI Controllers and expand the option.

Step 3: In the list, right-click the option of the AHCI controller to select properties from the context menu.

Step 4: In the properties window, navigate the drivers tab and click on driver details. Check the destination for StorAHCI.sys.

Step 5: In the next window, select the option of device instant path and note down the path.
Step 6: Launch the registry editor from the run command box via windows key+ R. In the command box, type regedit and click ok to continue.
Step 7: In the registry editor, locate the following key and click the option.
HKEY_LOCAL_MACHINE\System\CurrentControlSet\Enum\PCI\ <AHCI Controller>\<Random Number>\Device Parameters\Interrupt Management\MessageSignaledInterruptProperties

Step 8: In the next step, click the option of MSISupported key and change its value to 0. Click Ok to complete the action.

Step 9: In the next step, launch the task manager by right-clicking anywhere in the taskbar and selecting the option of taskbar settings. Check the status of disk usage from the disk column.
Change Energy Options
For settling the 100% disk usage windows 10 error, changing the device’s power usage/energy options can serve the pursuit. Here are the steps to follow:
Step 1: Launch the control panel by typing control in the taskbar’s search box.

Step 2: Select the hardware and sound option in the control panel window.

Step 3: In the next step, click on the option of power options. Select the option of changing plan settings.
Step 4: Click on Change advanced power settings in the following pop-up.
Step 5: Now choose a high-performance option from the context menu. Restart the device to check if the errors exist.

Change Settings in Google Chrome
When it takes a long to load any webpage, it constantly binges on the hard disk and utilizes space, leading to hard disk errors. Making specific changes via the internet browser can help to resolve the error, and chrome users can follow the given steps to fix the issue.
Step 1: Launch Chrome and select the settings option from the hamburger menu.
Step 2: In the next step, select advanced settings. Under the Privacy section, toggle the button off for the option Use a prediction service to load pages more quickly.

Other Methods to Lower Disk Usage
- Use Disk Cleanup to delete unnecessary files on your hard disk. To open Disk Cleanup, click the Start button, type Disk Cleanup in the Search box, and then press Enter.
- Delete temporary files. Temporary files are stored on your hard disk so that you can access them more quickly. However, they can take up a lot of space, especially if you don’t regularly delete them. To delete temporary files, click the Start button, type %TEMP% in the Search box, and then press Enter. In the Temp folder, select all the files and folders. Press Delete on your keyboard.
- Reduce the size of your pagefile. The pagefile is a file on your hard disk that Windows uses to store information that can’t fit into RAM. You can safely reduce your pagefile size if you have a lot of RAM. To do this, open the Control Panel and click System and Security > System > Advanced system settings > Performance > Advanced > Change. In the Virtual Memory box, uncheck the Automatically manage paging file size for all drives check box. Select a custom size for your page file and then click Set.
- Remove unnecessary programs from your computer. Programs you don’t use often can take up a lot of space on your hard disk. To remove a program from your computer, click the Start button, type Add or remove programs in the Search box, and then press Enter. In the Add or Remove Programs window, select the program you want to remove and click Uninstall.
Keep Your Windows Updated Regularly
When the Task Manager is opened, Windows users may experience disk usage at 100%. This can be due to several reasons, but one of the most common is that updates are not installed regularly. The system may become unstable when updates are not installed, resulting in disk usage at 100%.
Keeping your windows updated is important for several reasons. Not only does it keep your system running smoothly, but it also helps to prevent 100% disk usage. By keeping your updates installed, you can help to avoid this issue and keep your computer running at its best.
Frequently Asked Questions About Disk Usage 100 Windows
What is Antivirus Software?
Antivirus software is a program that helps protect your computer from viruses and other types of malware. It typically scans your files and email attachments for threats and can help protect your computer from infection. Antivirus programs usually take up a large amount of space in your storage and can be removed without consequence.
Why Can’t I Use a Disk on My Windows Explorer?
Windows Explorer may not be able to use a disk because the disk is not formatted with a file system that Windows Explorer can read. To format the disk, open Disk Management and, right-click the disk, then select Format.
What is Advanced Host Controller Interface?
Advanced Host Controller Interface (AHCI) is a hardware interface specification defining a standard for operating Serial ATA (SATA) computer host controllers. AHCI was developed to allow the use of SATA hard drives and optical drives by providing a standard way for the system BIOS, operating system, and device drivers to communicate.
What does 100% Disk Usage Mean?
100% disk usage indicates that your computer uses all its available disk space to store files. This can cause your computer to run slowly or crash if it runs out of space. You can free up disk space by deleting unused files or expanding storage.
Does Antivirus Software Impact Disk Usage in Windows 10?
Disk usage measures how much space a program or file takes on a disk drive. Antivirus programs often consume much disk space, typically storing an extensive database of virus definitions. This can result in disk usage creeping up over time and cause problems for users with limited disk space.
Why Should I Clear Space on My Disk?
A computer’s disk space is a precious commodity. When it becomes full, the computer can no longer store new files, and this can cause errors and slow down your computer. To avoid these problems, you should clear space on your disk regularly. You can free up space by deleting old files, emptying your recycle bin, and compressing large files.
Do Downloaded Program Files take up Space on My PC Disk?
Yes, downloaded program files take up space on your PC disk. However, the amount of space they take up will vary depending on the program size and how many programs you have downloaded.
Is it Safe to Delete Antivirus Applications Installed?
Deleting antivirus applications installed on your computer is safe because they are only used for protection. These applications can be uninstalled without any adverse effects on the system and will not cause any data loss.
Will Disabling Windows Updates Clear Disk Space?
Disabling Windows updates will not clear disk space. However, it may prevent your computer from downloading updates automatically, which can take up a significant amount of disk space.
Why does Windows Search Entry take up Disk Space?
Windows Search Entry can take up disk space if the index is not maintained. The index is a file that stores information about where files are located on the computer. If the index is not supported, the index will become fragmented and take up more disk space.


![[FIXED] BSOD Windows 10 Error SYSTEM SERVICE EXCEPTION](https://cdn.techloris.com/app/uploads/2020/02/sse.jpg)