![Critical Error Start Menu Isn’t Working [Solved]](https://cdn.techloris.com/app/uploads/2018/08/windows-10-critical-error.jpg)
Critical Error Start Menu Isn’t Working [Solved]

- The Windows 10 Critical Error is related to the Start menu not working. It happens when some files become corrupted.
- Sometimes, the Start menu alone is affected, but other times the search feature, Cortana, and the Start menu are all involved.
- If you’re having issues with a Windows 10 critical error, we recommend downloading the Windows Troubleshooter (Fortect.)

This walkthrough will teach you how to resolve the error. For more methods that deal with a Start menu icon not working, click here.
Recommended: To easily install drivers automatically, use the tool below.
Common Reasons for Critical Error: Your Start Menu Isn’t Working
There are several common reasons why you might encounter the critical error “Your start menu isn’t working” on your Windows 10 system. Understanding these reasons can help you pinpoint the root cause and apply the appropriate solution. Here are some of the most common reasons for this error:
- Corrupted System Files: One of the primary reasons for the Start menu not working is corrupted system files. These files may have been damaged for various reasons, such as software conflicts, incomplete updates, or power outages.
- Interrupted Windows Updates: If a Windows update has been interrupted or not installed correctly, it could lead to issues with the Start menu and other system functions.
- Third-Party Software Conflicts: Some third-party software, especially antivirus programs, can sometimes interfere with the normal functioning of the Start menu. This conflict may cause the critical error to appear.
- User Account Issues: If there is a problem with your user account, such as corrupted files or settings, it can also cause the Start menu to stop working.
- Registry Errors: Errors in the Windows registry can lead to various issues, including the Start menu not functioning correctly.
- Incompatible Drivers: Outdated or incompatible drivers can cause conflicts with the operating system, leading to the Start menu not working.
Keeping these common reasons in mind can help you troubleshoot and resolve the critical error “Your start menu isn’t working” on your Windows 10 system. Follow the solutions provided in this article to fix the issue and restore the functionality of your Start menu.
First Step: Perform a System Backup

Before making any changes to your PC, you should always perform a system backup to prevent lost files.
Here is how to back up your computer:
Step #1
Press the [X] and the [Windows] keys on your keyboard simultaneously. Choose “Settings” on the menu that appears.
Step #2
In the Settings window, click on Update & Security. Then select “Backup” from the left panel in the Update & Security window.

Step #3
Connect an external drive, such as a USB drive to your computer. Click “Add a Drive” and then choose the drive you attached.

It may take some time, but Windows will create the backup on the drive.
Resolving the Windows 10 Start Menu Critical Error
Fix #1: Reboot Windows
The easiest way to deal with this issue is to restart your computer.
Step #1
Press the [ctrl], [alt], and [delete] keys on your keyboard at the same time. This opens the Task Manager menu.

Step #2
Click the Power icon in the lower right corner. Choose “Restart.”

Once the computer restarts, see if the Start Menu Critical Error is still present. If it is, continue to the following method.
- See Also: WhatsApp Web Not Working? Repair Guide
Fix #2: Run a System File Check and Repair the Windows Image

The system file check is designed to repair and fix corrupt files on your computer automatically. You can access this app through the Command Prompt.
Step #1
Press the [X] and the [Windows] keys on your keyboard simultaneously.
Choose “Windows PowerShell (Admin)” on the menu that appears, and choose “Yes” if the system asks if you want to allow that app to make changes.
Step #2
In the PowerShell window that opens, type “sfc /scannow” (without quotation marks) into it and press [Enter].
Wait until the process is done. It may take some time to complete.

Step #3
When the scan is complete, and you see a new prompt, type “Repair-WindowsImage -RestoreHealth” (without quotation marks) into it or copy and paste the command.
Press [Enter] when you are done. Again, it may take some time for the repair to finish.

Step #4
When the scan finishes, you must restart your computer.
As before, Press the [ctrl], [alt], and [delete] keys on your keyboard at the same time, click the Power icon, and choose “Restart.”
If you still see the Windows 10 Critical Error, continue to the following method.
Fix #3: Reinstall the Start Menu App
When the Start menu app becomes corrupt, it is sometimes best to reinstall it and other corrupt Microsoft Windows 10 apps that may interfere with it. To do this, Windows 10 has a command that you can access through PowerShell.
Step #1
Press the [X] and the [Windows] keys on your keyboard simultaneously.
Choose “Windows PowerShell (Admin)” on the menu that appears.
Again, choose “Yes” if the system asks if you want to allow that app to make changes.
Step #2
In the PowerShell window that opens, type or cut and paste the following command:
Get-AppXPackage -AllUsers | Foreach {Add-AppxPackage -DisableDevelopmentMode -Register “$($_.InstallLocation)\AppXManifest.xml”}
And press [Enter].
Wait until the process is done. This will take some time to complete.

Step #3
Now, you need to restart your computer again.
Return to the [ctrl], [alt], and [delete] menu by pressing the keys simultaneously on your keyboard, clicking the Power icon, and choosing “Restart.”
If you still see the Windows 10 Critical Error pop-up, continue reading to find another method to resolve your computer’s error.
Fix #4: Create a New User Account With Administrative Privileges
If your settings or any changes that were automatically made to your computer settings cause the Start menu or Cortana to stop working, creating a new user account is the best option for resolving the issue.
Step #1
Right-click on the taskbar, and when the menu opens, choose “Task Manager.”
Alternatively, you could press the [Ctrl], [Shift], and [Esc] keys at the same time to open it.

Step #2
When the Task Manager opens, click “File” in the upper left-hand corner.
Choose “Run new task” from the drop-down menu.
Type “PowerShell” into the window that opens and make sure the “Create this task with administrative privileges” box is checked before clicking “OK.”

Step #3
When the PowerShell opens, type:
net user DifferentUsername DifferentPassword /add
In this case, you should replace DifferentUsername with the username you want for the new account.
DifferentPassword is replaced with the password you want to use for the new account.
Neither the password nor the username can contain any spaces, and both will be case-sensitive.
When you have finished typing the command in, press [Enter] to execute it.

Step #4
As with the other methods, you have to restart your computer.
Close the PowerShell window, press the [ctrl], [alt], and [delete] keys simultaneously on your keyboard, click the Power icon, and choose “Restart.”
When the computer restarts, log on to the new user account you created using the new username and password you typed into the PowerShell command.
The Windows 10 Critical Error should be gone when you log in to your new user account. If it is, transfer all your files to your new account and delete the old one.
Otherwise, continue reading for more methods of dealing with this issue.
Fix #5: Do a Clean Boot
Sometimes third-party apps will interfere with the Start menu function. A clean boot starts the computer with only the necessary Microsoft apps running. If a third-party app is a cause, you can try updating it or uninstalling it to fix the issue permanently.
Step #1
Once you log in as an administrator and see the Critical Error message, press the [R] key and the [Windows] key together to open the Run box.
Type “msconfig” and click “OK.”

Step #2
The System Configuration window will appear.
Click the services tab.
“Hide all Microsoft services” should have a checkmark next to it. (Click it if it doesn’t.)
Then click “Disable all.”

Step #3
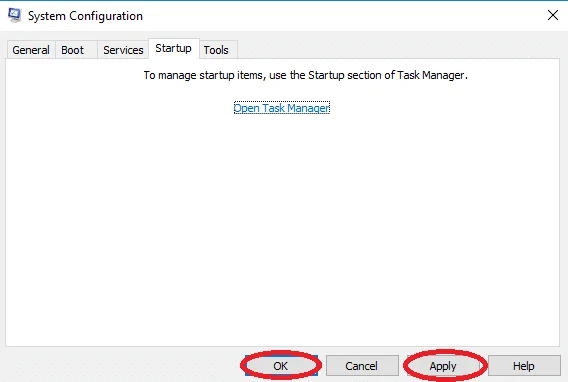
Now, click the “Startup” tab in the System Configuration window.
Click on “Open Task Manager” there.

Step #4
The Task Manager will open. Click the tab labeled “Startup.”
Select each item you find and click the button to “Disable” it if it isn’t already disabled.
Now you can close the Task Manager.

Step #5
On the System Configuration window still open, click the “Apply” button and then “OK.”
Step #6
Restart your computer.
As the computer restarts, see if you get the Critical Error message. If the message is gone, repeat the steps above, but this time “enable” each app one at a time until you find the app causing the error.
You must use your computer in the Clean Boot state until you determine which app is interfering. If this method does not work, continue to the following method.
Fix #6: Update or Uninstall a Third-Party Antivirus
If you are using a third-party antivirus, the antivirus may be interfering with some components of Windows.
Since Windows 10 comes with Windows Defender, first, you should make sure Windows Defender has been deactivated if you are running a third-party antivirus. Running two antivirus programs simultaneously can cause problems because the programs interfere.
To find out how to deactivate Windows Defender, click here.

Since each antivirus is different, the instructions below are general and not specific to any antivirus program. Visit the manufacturer’s website for instructions on updating or uninstalling your antivirus.
Step #1
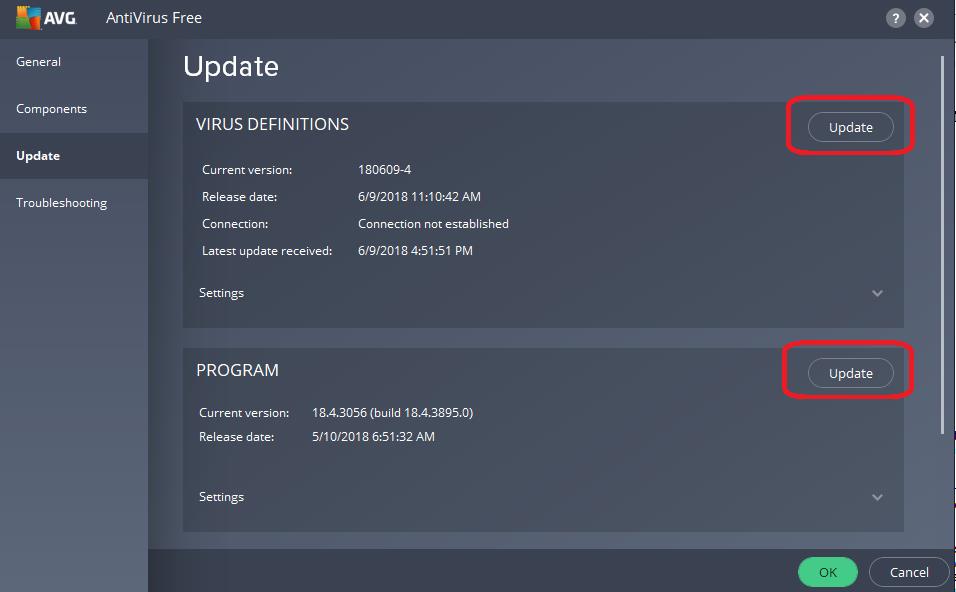
When you open the third-party antivirus program, you should be able to find an “Update” area.
Sometimes, this is located in a “General” folder. In other cases, you might find it under “Settings.”
Click the button to update the program.
Step #2
After you update and restart your computer, you need to uninstall your antivirus software if you still see the Critical Error message.
Press the [X] and [Windows] keys simultaneously. Choose “Settings” from the list.
Step #3
Click “Apps” in the Settings window.
In the “Apps & Features” sub-menu, scroll down until you find your antivirus program.
Click on it and then click the “Uninstall” button.

Step #4
Restart your computer
If the problem is resolved, you can try reinstalling your third-party antivirus. If the problem appears after you reinstall the antivirus again, you will need to uninstall it and find another one or turn on Windows Defender and use that.
Fix #7: Download the Microsoft Start Menu Troubleshooter
Shortly after Windows 10 came out, it was notorious for having Start menu/ Cortana critical errors. As a result, Microsoft created a special troubleshooter.
This option works best if you think the errors might be related to issues with missed updates. All you need to do is download the Troubleshooter and run it, following the on-screen instructions.
Fix #8: Reinstall the Start Menu and Re-register Cortana
If the Start menu is corrupt or the registration process for Cortana is missing on your computer, this is the best option to fix it.
Also, running the Start menu Troubleshooter tells you “Microsoft.Windows.ShellExperienceHost” and “Microsoft.Windows.Cortana” applications need to be installed correctly; the following directions will resolve the issue.
Step #1
Press the [X] and the [Windows] keys together. Click on “Windows PowerShell (Admin).”
Choose “Yes” if the system wants permission for the app to make changes.
Step #2
In the PowerShell window that opens, type:
Get-AppxPackage Microsoft.Windows.ShellExperienceHost | Foreach {Add-AppxPackage –DisableDevelopmentMode –Register “$($_.InstallLocation) AppXManifest.xml”}
into the PowerShell and press [Enter]. Wait until the process is done.
Step #3
When that finishes, type:
Get-AppxPackage Microsoft.Windows.Cortana | Foreach {Add-AppxPackage –DisableDevelopmentMode –Register “$($_.InstallLocation) AppXManifest.xml”}
into it or copy and paste the command.
Press [Enter] when you are done. Again, it may take some time for the repair to finish.

Step #4
Now, restart your computer.
Fix #9: Perform a System Restore
If you manually created a system restore point before the Start menu stopped working, you can restore your system to that point. Although some of your information might be lost, this method allows you to fix many issues. You can find out how to turn the System Restore feature on and create a restore point here.
Step #1
As mentioned, press the [X] and [Windows] keys simultaneously.
Choose “Settings” from the menu that appears.
Step #2
Choose “Update & Security.”
In the Update & Security window, click on “Recovery” on the left side menu.
You should see “Advanced Start-up” on the right; click the “Restart now” button found underneath that.

Step #3
This will cause Windows to restart and see the “Choose an Option” menu.
Step #4
Pick “Troubleshoot” and then “Advanced Options.”

Step #5
Choose “System Restore.”

Fix #10: Reset the Computer
If you don’t have a system restore point and none of the other methods mentioned in this walkthrough work, you will have to reset your computer if you want your Start menu functionality back. Sometimes this can cause a Stuck restarting loop.
Step #1
Press the [X] and [Windows] keys together.
Choose “Settings” from the menu.
Step #2
Click on “Update & Security.”
Then choose “Recovery” on the left side.
You should see “Reset this PC” on the right; click the “Get started” button found underneath that.

Step #3
Now click “Keep my files” and continue.
The computer will reset to Windows 10 factory conditions.

Hopefully, you have rectified your Windows 10 critical error. If not, check out these posts for more help: Windows 10 taskbar not working, Windows 10 startup folder, the second monitor not detected, and application unable to start correctly.
How do I fix a critical error in Windows 10?
We have highlighted several methods in this article that you can perform to fix a critical error in Windows 10. Here’s our list of steps you can follow:
– Reboot Windows
– Run a System File Check and Repair the Windows Image
– Reinstall the Start Menu App
– Create a New User Account With Administrative Privileges
– Do a Clean Boot
– Update or Uninstall a Third-Party Antivirus
– Download the Microsoft Start Menu Troubleshooter
– Reinstall the Start Menu and Re-register Cortana
– Perform a System Restore
– Reset the Computer
You can find the detailed steps in this article.
How do you fix a critical error?
You can refer to the troubleshooting methods that we listed in this article. Although there are multiple steps to follow, it doesn’t mean you have to perform all of them. You may get off fixing a Critical Error in your system by completing the first one on our list.
What is a critical error on a computer?
A critical error is a severe type of computer error that causes the system to stop working and makes it difficult for the operating system that is currently being used to continue functioning correctly. This issue may cause the system to shut down or freeze, depending on the severity of the problem.
How do you fix a critical error has occurred and the process must be terminated?
Before you start performing any troubleshooting steps to fix this problem, it would be best to know what may be causing it. If you recently downloaded and installed an application, it is wise to uninstall it. The same goes for updating drivers and installing new peripherals and other components. After doing so, restart your computer and check if the problem persists.
If these steps fail to fix the issue, we suggest performing any troubleshooting methods we listed in this article.
How do you fix Windows has encountered a critical problem and will restart?
Sometimes, the simplest things can solve this type of issue. If you have performed all the troubleshooting steps in this article, try to ensure your peripherals, such as external storage, mouse, keyboard, etc., are correctly connected to your system.
Once everything is securely installed, restart your computer and see if this fixes the problem.


